How to Check iPhone Location History [2024]
Wondering where you've been last week? Your mobile phone knows everywhere you been and where you are. So, here's a complete guide on how to check iPhone location history. Now, pick your iPhone up and follow me step-by-step to see your past locations.
Check iPhone Location History with Google Maps
The Google Maps app is as good for navigation as Apple Maps. It has a "Timeline" feature that displays information about the places you visited, the time of your visit, and how long you stayed at each location. What's more, it stores your location history data for up to 36 months. Here's how to view the full iPhone location history:
Before you start:
- Google Maps is installed on your phone and runs in the background on your iPhone.
- The Google Maps Timeline feature is enabled.
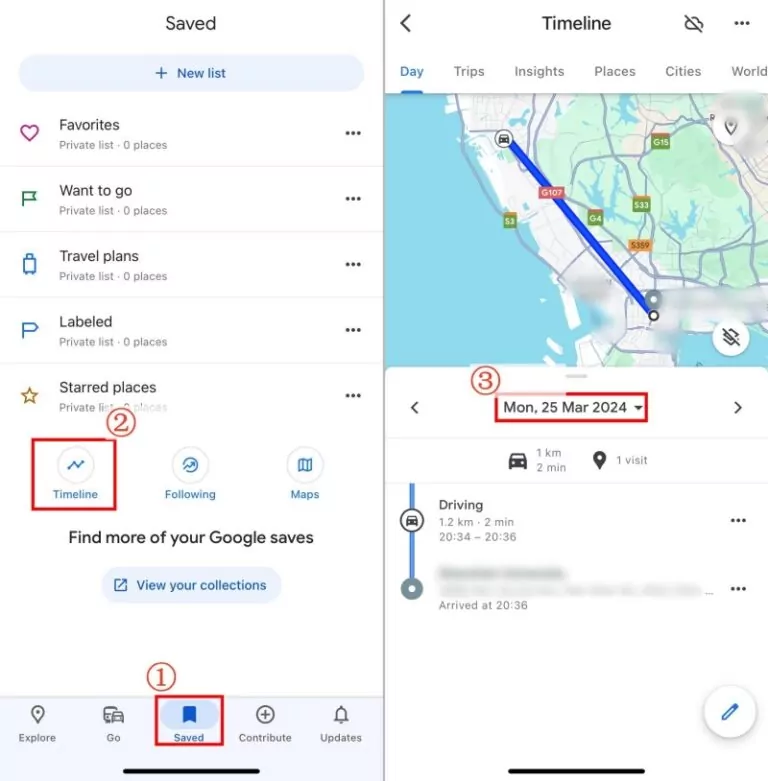
- Step 1.On Google Maps, go to the "Saved" tab.
- Step 2.Tap on "Timeline," where all places you visited today will be displayed.
- Step 3.Open the "Today" menu, and you can access your iPhone location history by date.
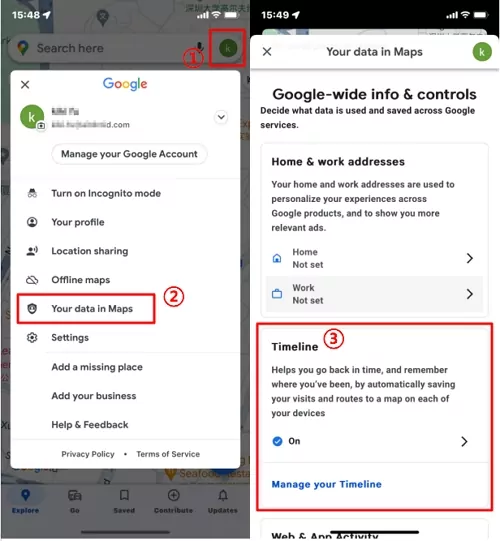
Here’s another way to check iPhone location history with Google Maps on iPhone:
Open Google Maps > Tap profile photo > Select"Your data in Maps" > Select"Timeline"
Check iPhone Location History with Signification Locations
The other way to find your location history is from the Setting of iPhone. iPhone has a built-in feature called "Significant Locations" recording frequent locations you often go to. Now, follow the steps to check where you've been last day.
Before you start:
- The location service for the iPhone is on.
- The "Significant Locations" option is enabled.
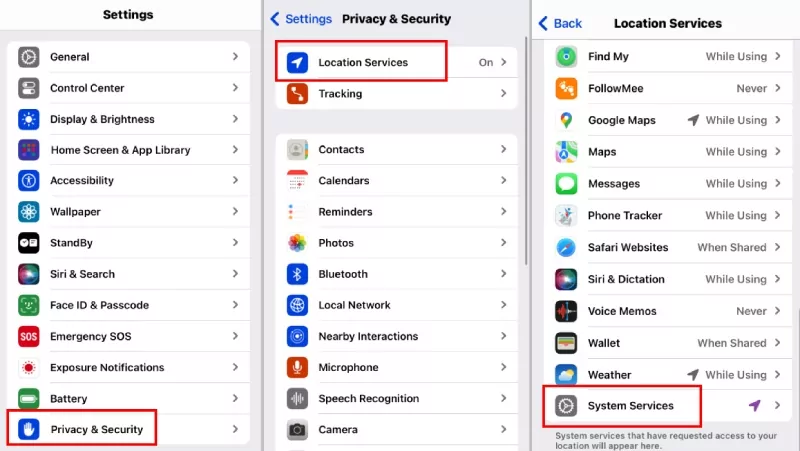
- Step 1.Navigate to iPhone "Settings" and then "Privacy & Security."
- Step 2.Press "Location Services."
- Step 3.Scroll down to the bottom and tap on "System Services."
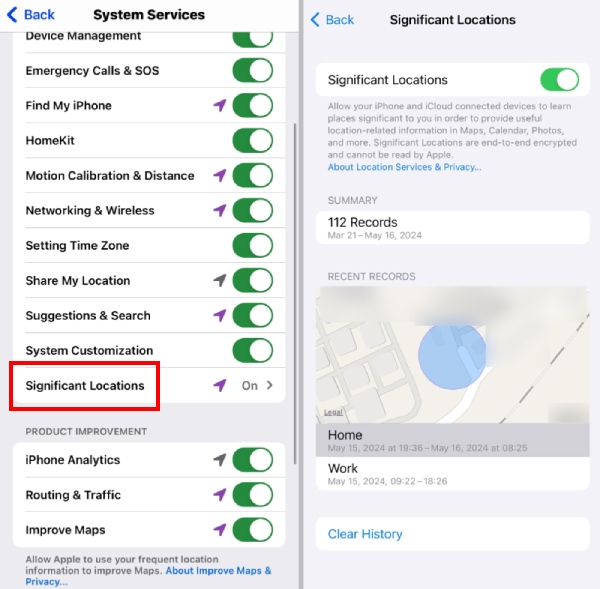
- Step 4.Find "Significant Locations" (called Frequent Locations in some versions of iOS).Then you can see recent locations you've been with time stamps of your arrival and departure.
Bonus: Check children's Location History on iPhone with AirDroid Family Locator
Checking location history is good for keeping our family members(especially our children) safe. It can tell us if they are in a potentially dangerous situation. There are many paid or free Locator on the market that can do this, and AirDroid Family Locator is the most convenient because it can not only help us view our children's accurate location history, but also check their real-time location and even help us remotely view their surroundings.
- Step 1.Install AirDroid Family Locator from the Play Store or App Store.
- Step 2.Complete the setup by following the on-screen prompts.
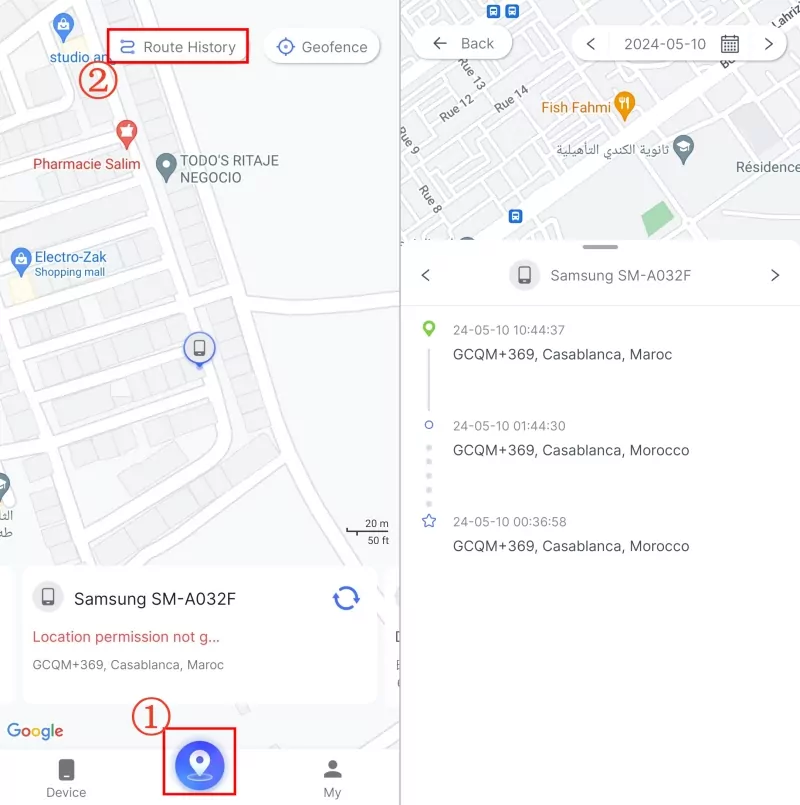
- Step 3.Tap on the "map" icon to see your child's current location.
- Step 4.Then, tap "Route history" to view where your child has been past 15 days.
Final Words
There are two methods to Check iPhone Location History.If you use Google Maps, ensure the app is installed on your device and that location services are activated in your phone settings. For the iPhone's built-in Location Services, you just need to simply enable the Significant Locations feature within the native Location Services.
For parents who want to keep their children safe, checking location history is very necessary. But using Google's location service or Apple's "Share My Location" feature can be complicated, so consider trying the AirDroid Family Locator app as an alternative. You can create virtual boundaries around key locations, such as your child's school, grandma's house, or park. If your child enters or exits one of these zones, you'll get alerts instantly, giving you greater peace of mind.
FAQs about Location History on iPhone
On iPhone Settings: go to Privacy & Security > Location Services > System Services > Significant Locations > Clear History.
On Google Maps: open Google Maps Timeline, then tap the Delete button.








Leave a Reply.