- From your iPhone, go to Settings > Your Name > iCloud.
- Tap Photos and enable iCloud Photos.
- Repeat the same steps on iPad with the same Apple ID.
- It will automatically sync iPhone photos on your iPad.
How to Transfer Photos from iPhone to iPad in Lossless Quality
We all encounter situations when transferring iPhone photos to an iPad is necessary. Maybe, you want to back up the important photos, view them on a bigger screen, or clear up some storage on the iPhone.
Whatever the reason, knowing in advance how to transfer photos from iPhone to iPad can save you a lot of time and effort. And that’s why we are here today.
In this blog post, we will cover several user-friendly ways to help you sync photos from iPhone to iPad. All the methods listed below are simple to understand and execute, even for a non-technical user.

Let’s take a look!
Easiest Way to Transfer Photos from iPhone to iPad – Use AirDroid Personal
Best for: Sharing the bulk of photos from iPhone to iPad with a single click. It can achieve a remarkable transfer speed of up to 20MB/sec.
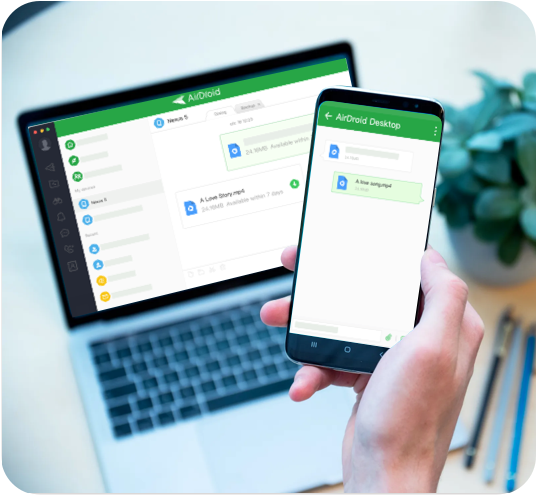
When it comes to the most recommended solution for transferring photos from iPhone to iPad wirelessly, AirDroid Personal stands out. This powerful tool boasts of its ability to share unlimited photos across your devices at a blazing-fast speed.
Not just photos, AirDroid supports all types of data, including videos, documents, music, contacts, and so on. But what makes it so unique is its compatibility with all platforms, including Android, iOS, Windows, and macOS. Now, you can share documents between any two devices, regardless of their operating systems. If that’s not enough, AirDroid also has an extraordinary ability to share your photos on a remote device.
Key features of AirDroid Personal
- Ability to transfer photos from iPhone to iPad wirelessly.
- Supports all data files, including videos, documents, music, contacts, and more.
- Offers super-fast transfer speed without any limit on the file size or format.
- It can transfer data to multiple devices in one go; just install the app on all your devices and start sharing files.
- Supports one-click phone backup on PC.
- AirDroid has additional features like Remote Control, File and Notifications management, and Mirroring your Android phone on a PC.
Here’s how to send photos from iPhone to iPad wirelessly:
Step 1: First, download and launch AirDroid Personal on both iPhone and iPad. Log in with the same AirDroid account.
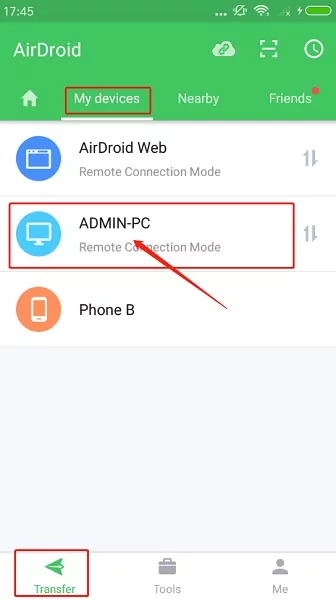
Step 2: Open the app on your iPhone, and tap the Transfer icon. Select your iPad’s name under “My devices” to connect both devices wirelessly.
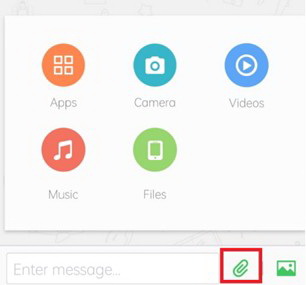
Step 3: Then tap the attachment icon and select the photos you want to transfer to the iPad.
Step 4: When pictures are loaded, tick the checkbox at the top to select all the files and hit Send. It will transfer them to your iPad within seconds.
And that’s how to transfer pictures from iPhone to iPad via AirDroid Personal. No other tool offers such convenience and flexibility in sharing your photos/data across devices.
Aside from AirDroid Personal, you can also rely on the below solutions for transferring photos between iPhone and iPad.
Use iCloud to Move Photos from iPhone to iPad
Best for: Hassle-free transfer of all your photos from iPhone to iPad. But the free plan can transfer up to 5GB of photos.
If you are an iPhone user, you'd already know a thing or two about iCloud. This built-in cloud storage lets you instantly move all your photos from iPhone to iPad. This is Apple’s recommended solution for how to share photos from iPhone to iPad without losing quality.
What it does is sync all the photos on your iPhone to iCloud. Logging in with the same iCloud account on the iPad helps you download the photos effortlessly.
The biggest downside of iCloud is it cannot move specific photos. Instead, it syncs all the photos in your iPhone’s gallery. This can be a deal breaker for many users.
Having said that here’s how to sync photos from iPhone to iPad using iCloud:
Step 1: Go to Settings > Your Name > iCloud on your iPhone.
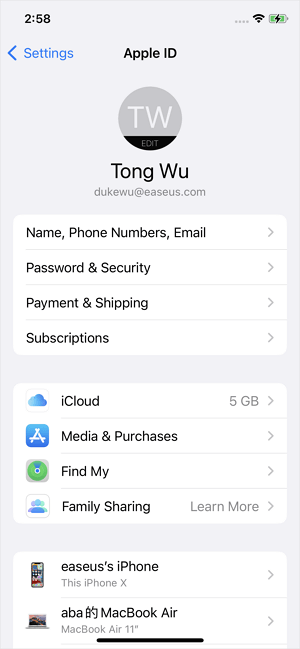
Step 2: Next, tap Photos and enable the ‘iCloud Photos” toggle. Also, tap on “Optimize iPhone Storage.”
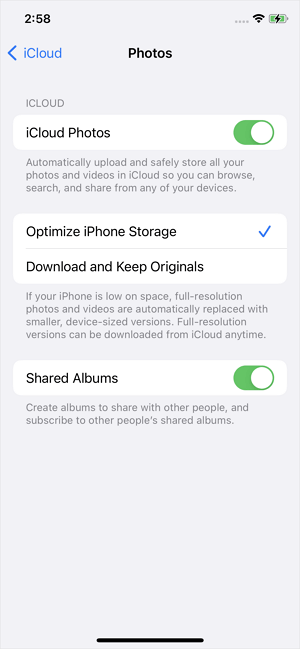
Step 3: iPhone will start syncing your photos. Wait patiently.
Step 4: Then repeat the same steps on your iPad (log in with the same Apple ID).
And voila, it will transfer your photos from iPhone to iPad if they are less than 5GB in size.
Transfer Photos from iPhone to iPad via AirDrop
Best for: Quickly moving one or more photos between iPhone and iPad. However, many users face issues like “AirDrop not working” when using this method.
Another simple way to get photos from iPhone to iPad is using the built-in AirDrop feature. Like Bluetooth in Android devices, AirDrop is a reliable service for sharing data between iOS and macOS devices.
Aside from photos, it can transfer videos, documents and map locations at a remarkably high speed. Note that you must enable the Wi-Fi and Bluetooth feature on both devices for AirDrop to work.
Once you do that, here’s how to send photos from iPhone to iPad via AirDrop:
Step 1: Go to the Control Center on your iPhone, long-press the AirDrop icon, and select the “Everyone for 10 Minutes” option.
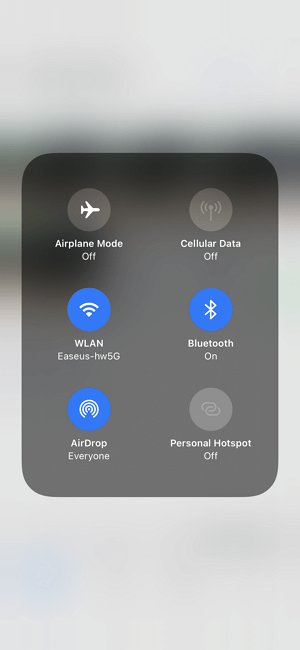
Also, make sure Airdrop is enabled on iPad as well.
Step 2: Select the desired photos you want to transfer from the Photos app on your iPhone. Tap the Share icon and hit AirDrop.
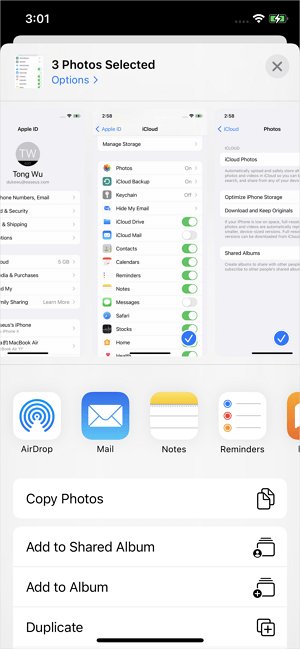
Step 3: Within seconds, it will detect the nearby iPad. Tap on it. On your iPad, hit Accept on the pop-up notification to transfer the photos.
Transfer Photos from iPhone to iPad via iTunes
Best for Sharing unlimited photos between iPhone and iPad. But you need a computer to get the job done.
With iTunes, you can easily move photos from iPhone to iPad without losing quality. It offers a two-step procedure for transferring photos from iPhone to iPad. First, you must back up the iPhone using iTunes, then sync the backup with your iPad.
It might take you a few extra minutes to transfer all the photos. But it is a perfect application to share your photos and other data files between iPhone and iPad.
Follow the below instructions for how to move photos from iPhone to iPad via iTunes:
Step 1: Launch the latest version of iTunes and connect your iPhone to it.
Step 2: Click the "phone" icon at the top and go to Summary. Here, hit Back up Now and wait until the process is finished.
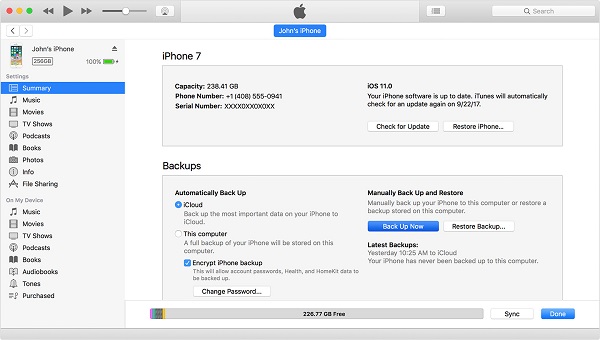
Step 3: Unplug the iPhone and connect your iPad to iTunes.
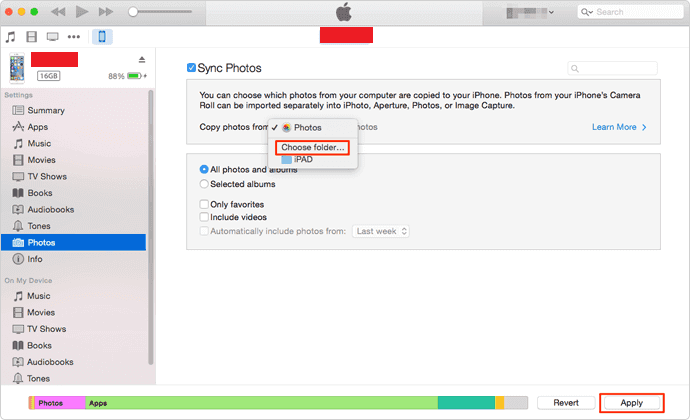
Step 4: Click the "phone" icon and go to Photos from the left tab.
Step 5: Now, check the “Sync Photos” and “All Photos and Albums” options as shown in the figure. Hit Apply.
Comparison Table: Which Method to Choose
Now that you know several methods to transfer photos from iPad to iPhone, the next step is to shortlist the most suitable one. The below table will clear out the things for you.
| Tool/Method | Transfer Limit | Ease of Use | Speed | User Ratings |
AirDroid Personal | Unlimited | High | Very fast | 4.9/5 |
iCloud | A free account can sync data up to 5GB. | Low | Slow | 4.5/5 |
AirDrop | Unlimited | High | Fast | 4.6/5 |
iTunes | Unlimited | Low | Very slow | 4/5 |
It clearly shows that AirDroid Personal is the priority for everyone when it comes to transferring loads of photos quickly.
Final Remarks
And that’s all for today. Now, you have a better idea about transferring photos from iPhone to iPad in lossless quality. While all the methods we outlined are simple and practical, we recommend AirDroid Personal.
It lets you transfer unlimited photos between iPhone and iPad with a single click. In addition, you can share almost all types of data files without any limit on file size.
FAQs
Don’t want to use iCloud? Worry not and follow the below steps:
- Install AirDroid Personal on both devices and log in with the same account.
- Open it on your iPhone and go to My Devices. Tap on the iPad's name to connect them wirelessly.
- Now, tap the Transfer icon and select the photos you want to share. Hit Send.
Look for the below reasons:
- Your internet is working fine.
- Log in with the same Apple ID on both devices.
- Make sure the device’s date and time settings are accurate.






Leave a Reply.