How to Connect Canon Camera to Mac Using Wi-Fi
You have finally visited your dream tourist destination and captured breathtaking snaps on your Canon Camera. Now, it’s time to move these photos and videos from the camera to a Mac. Or maybe you wish to use your Canon camera as a webcam.
Either way, it’s necessary to connect a Canon camera to a Mac to get the job done. Luckily, connecting any Cannon Camera to a Mac is a straightforward job – but not everyone knows how to do it. And that’s what this article will talk about today.
In this blog post, you’ll learn:
You have multiple options to connect Canon to Mac. It can be using a USB cable or via Wi-Fi. Here is a step-by-step guide to each method for our readers:
Method 1: Connect Canon Camera to Mac Via Wi-Fi or Wirelessly
If your Canon camera supports the Wi-Fi feature, you’re in luck. It is a reliable way to connect the camera Canon to a Mac is doing it wirelessly. This indicates you don’t have to play with wires or card readers to transfer your photos and videos.
Also Read: How to Transfer Photos from Canon Camera to iPhone/Android
Note that the steps for establishing a wireless connection might vary slightly depending on your Canon camera model. But generally, you can follow the below steps to connect the Canon camera to your Mac using Wi-Fi:
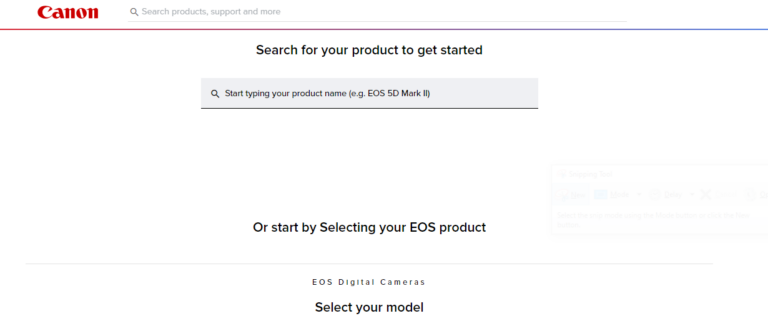
Step 1: From your Mac, go to the Canon EOS Utility page. Here, select your Canon model and navigate to the Drivers and Downloads segment.
Step 2: Download the latest EOS Utility tool on your Mac and install it.
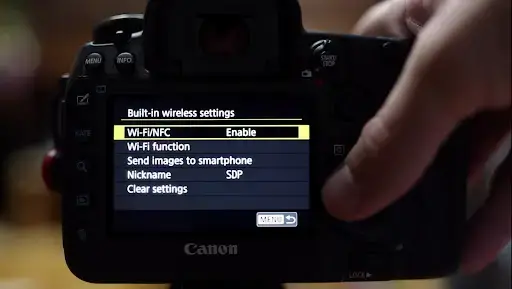
Step 3: Now, turn on your camera, go to the Menu panel, and press the Wi-Fi option. Enable it.
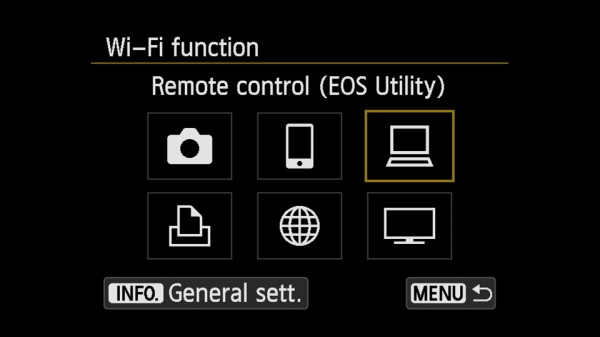
Step 4: Now, choose “EOS Utility” as the type of connection. Click on the laptop icon and press “Register a device for connection.”
Step 5: From the available Wi-Fi networks, pair it with your Mac’s Wi-Fi network. Also, set a password.
Step 6: On your Mac, the network connection of your Canon camera will appear. Click on it and select the “Pairing over Wi-Fi/Lan” option.
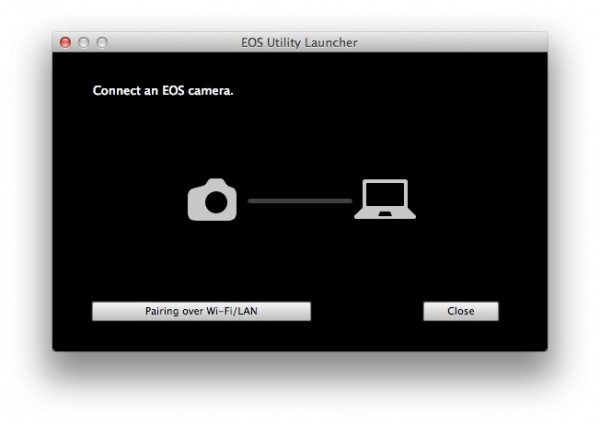
Step 7: Click “Ok” and the EOS Utility app will open on the screen.
And that’s how you connect Canon camera to Mac using Wi-Fi. Once connected, you can easily transfer photos or videos to your Mac.
Bonus Tip: Transfer Media from Mac to iPhone/Android With A Single Click
Hunting for an application that can easily transfer your photos or videos from Mac to iPhone/Android? Look no further and get AirDroid Personal. This powerful file transfer tool can move unlimited media wirelessly between your Mac and smartphone within seconds.
Moreover, it doesn’t cause any quality loss during the transfer – a common issue with most data transfer apps. Besides media, it can transfer any type of data including contacts, music files, documents, and so on.
With AirDroid, you can also manage files on a phone from the comfort of your computer. Some of its other features include Android mirroring on a PC, SMS and notification management from a computer, remote camera, and backup & restore.

Using AirDroid Personal is very simple. Just install it on both devices and log in with the AirDroid account to connect them remotely. After that, it takes just a single click to start transferring your data.
Method 2: Connect Canon Camera to Mac Via USB
Want a more straightforward method that works seamlessly on all Canon camera models, whether old or new? Try using a USB cable to connect Canon camera to Mac. This solution is as simple as it sounds. All you need to do is plug your camera into the Mac using a cable
However, you still need to install the Canon Camera Connect app for Mac also called, the EOS Utility tool. This is illustrated in detail in the below steps:
Step 1: First of all, navigate to the Canon EOS Utility page on your Mac. Here, download the EOS tool corresponding to your camera’s model.
Step 2: Install and launch the software following the on-screen instructions.
Step 3: Now, using a USB type-c cable, connect your Canon camera to the Mac.
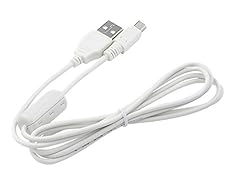
Step 4: Immediately after, the Utility app will pop up on the screen. Click on it and now, you can start moving your files.
How to Download Canon Photos to Mac
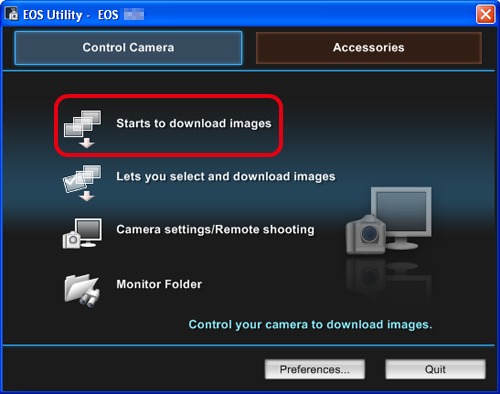
Once you connect Canon Camera to Mac, downloading photos and videos to the computer is at your fingertips. Check out the below instructions to download Canon photos to Mac: Step 1: By default, the EOS Utility tool will open once your Mac and camera are connected. If not, open it.
Step 2: Click on your Canon camera’s name from the list of connected devices.
Step 3: After that, select the “Camera Settings/Remote Shooting” option and customize the settings.
Step 4: Finally, hit “Download Images” to move images and videos from the camera to your Mac.
Tips: Use an SD Card Reader to Download Photos from the Camera to the Mac
Using an SD card reader is the quickest way to transfer Canon photos to a Mac. Most probably, your Mac already has a built-in card reader. If not, you can always get one from the local store.
With that said, follow the below steps to proceed:
Step 1: Turn off the Canon camera, pull out its SD card, and insert it into an SD card reader.
Step 2: Now, plug the SD card reader into your Mac.
Step 3: Wait for a few seconds until the SD file folder appears on the Mac.
Step 4: Open the photos folder and copy-paste the desired photos anywhere on your computer.
Canon camera won’t connect to Mac? How to Fix
Are you trying to connect the Canon camera to the Mac but to no avail? Unfortunately, this is a common problem that almost all Canon owners experience at some point.
Here are several major reasons behind this issue:
1. Incorrect Version of EOS Utility Software: Make sure you have installed the right EOS tool corresponding to your camera’s model.
2. Outdated USB Drivers: If the USB drivers on your Mac are outdated or corrupt, it can lead to connectivity issues. So, if you are having trouble connecting the Canon camera to a Mac, make sure the USB drivers are up-to-date.
Similarly, a faulty USB cable or a damaged USB port in your Mac can also cause this issue. Keep this in mind when trying to connect your devices.
3. macOS not Updated: Are there any updates pending on your Mac? You have to make sure the macOS is updated to the latest version. Also, install any pending updates of the system-related drivers to avoid getting issues like the Canon camera won’t connect to Mac. Hopefully, it helps.
Final Remarks
This article shows that connecting a Canon Camera to a Mac is as straightforward as it can get. We outlined the two simplest methods to perform this task. Hopefully, you won’t face any issue when trying to connect Canon camera to Mac. Moreover, we also talked about moving photos and videos from the camera to your computer. In this regard, use AirDroid Personal to transfer all your media and other data files from a Mac/Windows to your smartphone. It also lets you manage the phone remotely from a computer including SMS and notifications.
FAQs
1. Can you use a Canon camera as a Webcam?
Yes, it’s pretty straightforward to use your Canon camera as a webcam. To do that, just install the EOS webcam utility pro app on your computer. Install it and follow the on-screen instructions to get it done.
2. How do I transfer photos from my Canon camera to my MacBook?
To transfer photos from Canon to Mac:
- Install the Canon EOS Utility software on your Mac.
- Use a USB type-c cable to connect the camera to the computer.
- When the EOS tool detects your camera, you can start moving the desired photos and videos.
3. Can you connect a Canon Camera to a Mac wirelessly?
Yes, you can. If your camera has a built-in Wi-Fi feature, it’s quite easy to connect it to a Mac wirelessly. To do that:
- Install the Canon EOS Utility software on your Mac.
- On your camera, go to Menu and enable the Wi-Fi function.
- Here, select “EOS Utility” as the type of connection.
- Now, connect the camera to your Mac’s Wi-Fi network. Also, set up a password.
- On your Mac, a pop-up notification or Canon camera connection will appear. Click on it and choose “Pairing over Wi-Fi/Lan.”
- Click OK and the EOS Utility app will open up. Select the Download option to start moving your photos.







Leave a Reply.