Everything You Need to Know about Sharing Screen in Webex
In today's age, remote conferencing has become standard because everything has shifted to digitalization. To boost online meetings' efficiency, screen-sharing tools contribute more importantly. Picking up the most reliable application with the best video and audio conferencing and advanced screen sharing features is what organizations are looking for.
Thousands of tools, like Webex, have been launched in the digital market. This article is a complete guide on sharing screen in Webex so that you can better use it in your business. We will also recommend the best remote support software serving quality services beyond your expectations.
What Is Webex Screen Sharing
Webex, developed by Cisco, features high-quality remote meet-ups via audio and video conferencing to ease online businesses efficiently. Sharing screen in Webex allows you to communicate with your colleagues without conducting a physical meeting. Share screen with Webex assists in improving your workstreams and promotes collaborative teamwork.

Scope of Webex Screen Sharing
Webex screen sharing connects all team members remotely, no matter from which location they are joining. Webex supports Windows (10 or later), Android (10 or later, and 3GB RAM is a must), iPad and iOS (16 or later), and MacOS (10.13 and later). Some advanced features of Webex demand additional requirements.
During calls and meetings, you can share your entire screen, or you can share applications. Plus, you can even share only specific areas of your screen.
Entire Desktop Screen
Webex lets you share the entire screen of everything you have opened and viewed. The whole control is within your reach, what you share on your screen.
Share Applications
With Webex, you can share complete application sets like productivity tools and web browsers. You can customize your application sharing preferences within a call, message, or meeting. Whether you share a selected or all of an application's windows is up to you.
Other Advanced Options for Webex Screen Sharing
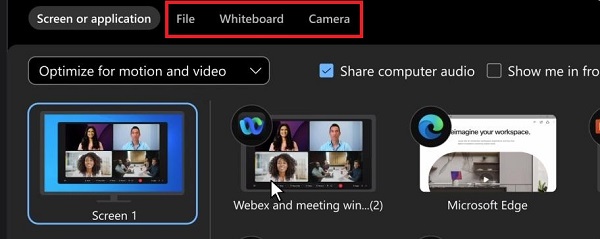
The advanced options in Webex assist you in screen sharing when joining Webex meetings. These include: File, Whiteboard and Camera.
File
Sharing files facilitates you in sharing a single file, which may be a document or video file saved on your PC. You can share your screen or application if your file is already open. Your shared file can open in the meeting, webinar, or event window. And participants in the meeting can collaborate on it.
Whiteboard
Sharing a whiteboard in a call is another advanced feature. Other members can edit your whiteboard from their device/Webex app when you share it. Whiteboards created during a meeting are stored automatically in the Webex space.
Camera
You can share your computer's default camera or an external USB camera in a meeting/webinar as you share your desktop. In this way, other meeting members can see whatever your camera sees. But this option is not available for events (classic).
Limitations of Webex Screen Sharing
Anyone can share content with Webex, but only one person at a time. Another limitation is staying within the file size of over 2GB because this tool supports 2GB as the maximum file size to transfer.
How to Share Screen with Webex [Step-by-Step Guide]
You can use Webex to share your screen with your team during a call or meeting, so let's explore the exact steps of screen sharing:
Webex Screen Sharing on Computer (Windows and Mac)
We present a step-by-step guide to clear your mind about sharing screens with Webex on Windows and Mac.
Step 1: When attending a Webex meeting, navigate to the "Share" option. Click on this button to avail of this option.
![]()
Step 2: At this time, every application and screen interface opened on your Windows or Mac becomes visible. Place your cursor on the screen or application you want to share and click "Share."
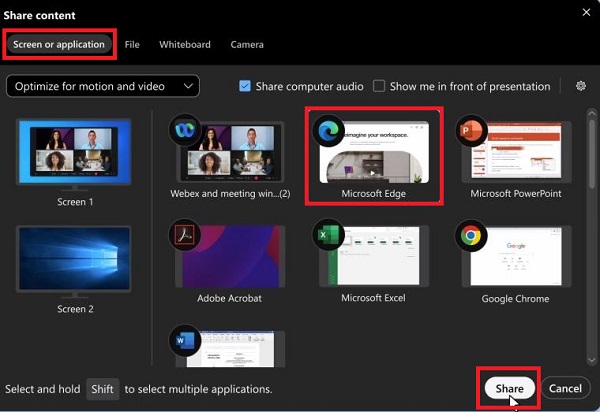
Step 3: A notification "You're Sharing Your Screen" appears at the top for confirmation. When you intend to quit sharing, don't forget to click "Stop" icon at the upper part of the panel. Another option of "Pause" is available to freeze the view other meeting members see.

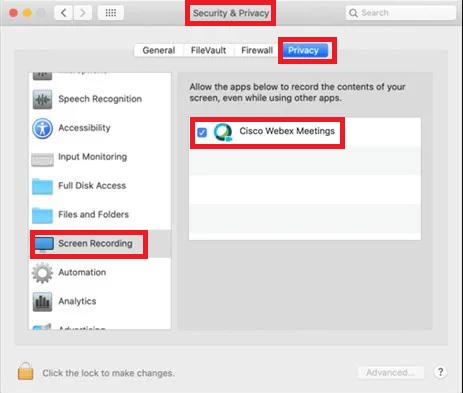
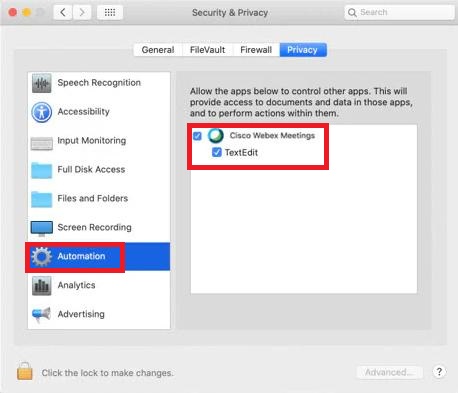
For Mac, to use screen sharing during a meeting, you must grant permissions in Screen Recording in your system.
Step 1: Go to "System Preferences" > "Security & Privacy" > "Privacy" > "Screen Recording" to enable "Cisco Webex Meetings."
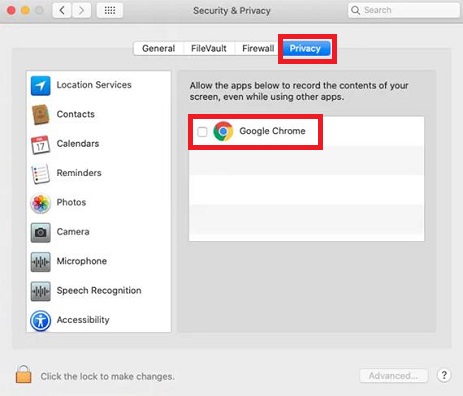
Step 2: You can also enable the permissions of the Web browser you are using in "Privacy" to use the screen sharing feature of Web applications normally.
Step 3: If you want to share content from a third-party application during a meeting, go to "System Preferences" > "Security & Privacy" > "Automation" and enable the application under Cisco Webex Meetings.
Webex Screen Sharing on Mobile (Android and iOS)
After opening the Webex application on your smartphone and joining the online meeting, follow this step-wise guide to share screen.
For Android
Step 1: Open the Cisco Webex Meetings application and click the "three dots" button at the bottom of the screen.
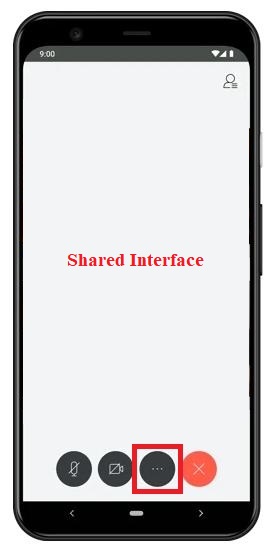
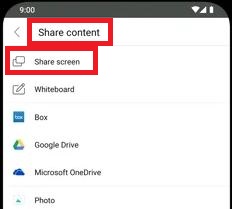
Step 2: Click "Share content" > "Share screen" > "Start now."
For iOS
Step 1: Like the first step for Android, open the app and tap the "three dots" icon.
Step 2: Once done, click the "Share Content" button. It will open a new menu.
Step 3: Proceed to the first option, "Share Screen," from the menu. Then tap "Screen Broadcast" to share your screen in a Webex conferencing meeting.
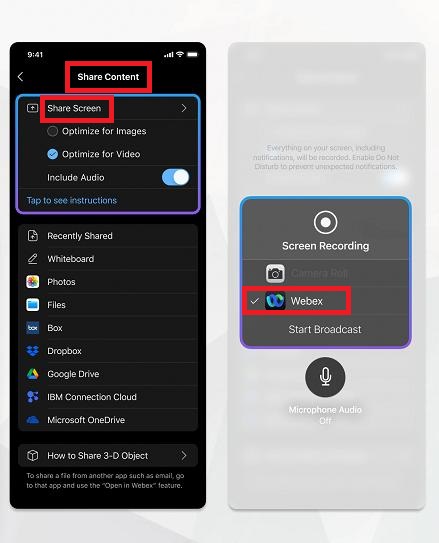
Step 4: To cancel the screen-sharing feature, choose the red option of "Stop" in the upper-left corner of your screen.
Webex Screen Sharing on the Web
When you use a Web browser, Webex screen sharing is still accessible. Follow this step-by-step tutorial to get yourself connected remotely via screen sharing.
Step 1: First, connect with the Webex Meeting Web version using the meeting ID on your web browser.
Step 2: Press the "Share" button on the home page of the Webex interface.
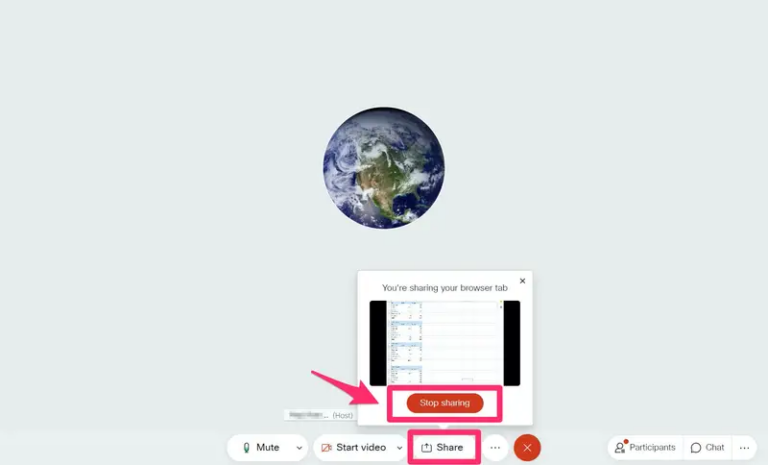
Step 3: Select the screen page you want to share with other participants. Finally, click the Stop Sharing button to finish the sharing process.
Fix: Webex Screen Sharing Not Working
Webex will inevitably encounter screen sharing not working, but you don't have to panic. See if it matches any of the following scenarios and try the fixes.
Webex Screen Share Not Working on Windows
There are many issues that can restrict your way when Webex screen sharing does not work on Windows. You can face these hazards including:
Unable to Share Screens/Apps in Webex
To fix "Webex screen share not working" error, you should first click on the official link and follow the steps to check the availability of service status, "Sharing" options, user roles, meeting types. If all the above conditions are fine, you can uninstall the meeting application from your computer. Then, reinstall the latest Webex Meeting Software.
Unable to Share Documents
The document conversion mechanism of Webex converts the desktop file shared by the presenter into the document displayed by Webex through the print loader. So, if you don't have administrator permissions to add printer rights on your computer, you won't be able to share the document. At this point, you can use a shared desktop/sharing application or email the file to a host with administrative permissions.
Error When Joining a Webex Session
Ensure that your PC meets all your computer requirements for the Webex application. Then, you can observe if your system or network is okay or has any issues. Try restarting your computer or router is also a good idea.

Error When Joining an Audio Conference
When you join an audio conference but can't hear anything, there may be an error in your configuration. To resolve this issue, go to "Audio" > "Integrated Voice Conference" and click the "Join Conference" button. After that, click on the "Ask for Mic" option on the participant's panel. Then, the presenter will get to pass Mic to you.
Missing Details in Shared Documents
If your shared document contains special characters, then you may find missing details when you share the document. At this time, you can convey important content by choosing to share the application instead of sharing the file.
Annotation Tool Is Disabled
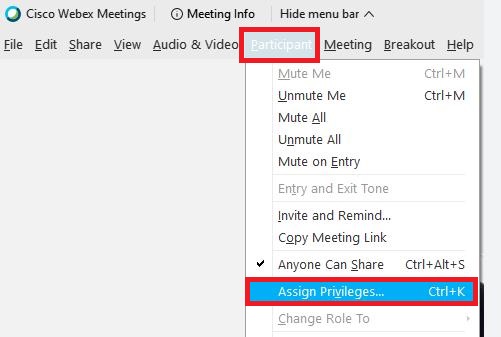
Remember that only the presenter has the right to add annotations for other participants during a Webex session. The reason you find the annotation tool disabled is because you are not a presenter but only a participant. To enable this feature, click on "Menu." After that, tap "Participant" and click "Assign Privileges."
Recurring Echoes during Meetings
Recurring echoes during the session may be due to some participants externalizing their voices. It is recommended that each participant use a headset with a microphone to participate in the meeting, as this will significantly improve the audio quality.
Webex Share Screen Icon Is Grayed Out
There are many reasons for the Webex share screen icon to be grayed out, such as outdated applications and operating systems, unenabled sharing permissions, conflicts with browsers or applications, unpublished meetings, etc. In this case, you can check each possibility and then fix it accordingly.
Webex Screen Share Not Work on Mac
Webex screen sharing on Mac is not working because the appropriate permissions are not enabled. It may lead to issues such as the inability to share content, grayed-out sharing screen icons, and more. I have provided 5 solutions for you here to help you solve the problem.
Solution 1: Enable Screen Sharing on the Mac
Step 1: On Mac, go to "System Preferences" > "Sharing."
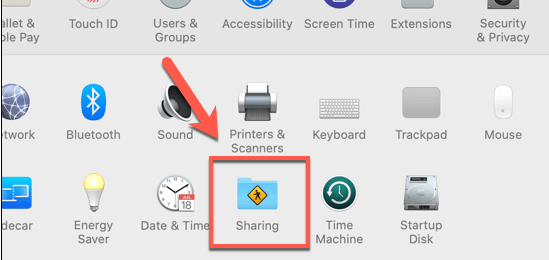
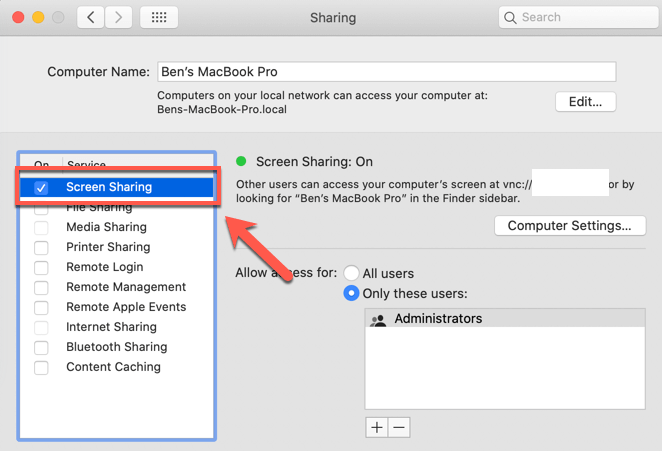
Step 2: Check the "Screen Sharing" option.
Solution 2: Enable Screen Recording on the Mac
Step 1: To enable screen recording on Mac, choose the "Apple" icon > "System Preferences" > "Security & Privacy."
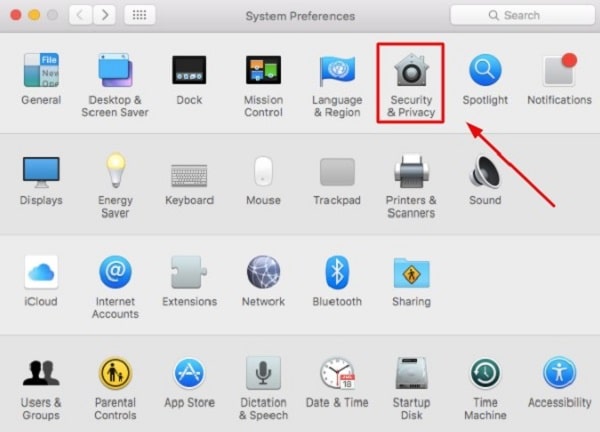
Step 2: Press "Privacy" > "Screen Recording" and enable "Cisco Webex Meetings."

Solution 3: Disable Remote Management on the Mac
Go to "System Preferences" > "Sharing." Scroll the list to find the option of "Remote Management." Uncheck this box for disabling remote management on Mac.
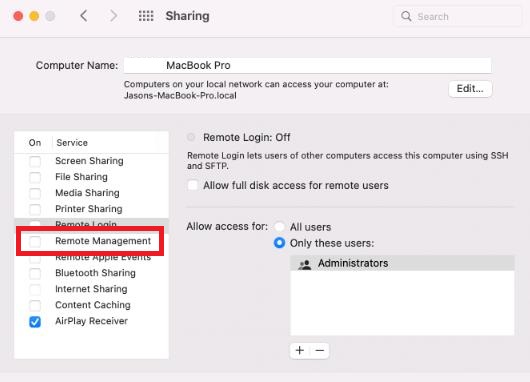
Solution 4: Switch to Manage Account
Step 1: Go to "System Preferences" > "Users & Groups."
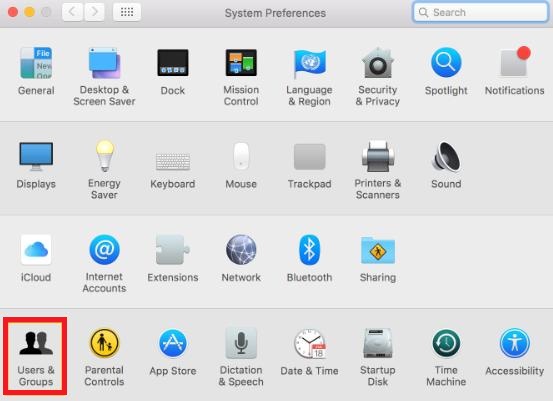
Step 2: Select the administrator account and enter the account password to log in.
Solution 5: Restart the Application
Quit the operation and restart the application. Don't forget to verify the Webex site you are using supports your MacOS version.
Best Practice: Better Webex Screen Sharing Experience
Webex screen sharing can help organizations communicate and collaborate effectively. Here are some tips for getting the most out of Webex screen sharing:
- Before the web meeting begins, open any screens/apps to be shared and prepare materials needed for the meeting in advance to save time.
- Close all unnecessary apps, videos, and VPNs to overcome connectivity issues. In this way, Webex works optimally with maximum bandwidth.
- Hide all notifications that may pop up on the screen to prevent distractions and protect privacy. Remember that in screen sharing, all participants can see notifications and information on the shared screen.
- During the sharing process, you can use the whiteboard function or the annotation tool to explain and add notes to your document. The digital whiteboard lets you express your ideas in real-time during project discussions.
Recommended: Best Remote Support Solution with Screen Sharing and Remote Control
AirDroid Remote Support is the best remote support solution with screen sharing and remote control. It specializes in mobile devices and allows you to access and view the screen of your mobile device in real-time. During screen sharing, you can also enjoy advanced remote support features such as AR camera, tutorial gesture, live chat and more. In addition, it can remote control Android devices and has a black screen mode to provide security!
Key Features
- Unattended Android Access: Under the unattended mode, you can connect and remote control a device without consent from the device end for maintenance purposes.
- AR Camera & 3D Marker: Allows you to see through the customers' device camera and guide your customers by placing 3D markers onto real-world objects.
- Tutorial Gesture: Swipe or tap on the shared screen, the tutorial gesture will appear on your customer's device. (Only for Android)
- Live Chat via Voice Call and Voice/Text Message: Tackle and resolve complex issues by communicating directly with real-time voice chat and screen viewing. If the user is not available to take a call, you can communicate through voice messaging or text.
- Black Screen Mode under Remote Control: Black screen mode is a privacy-centric technology, which enables IT admins to hide the screen image of the remote device during the remote control session and a hint saying "This device is under maintenance" will be shown.
Conclusion
Every user wants an efficient screen-sharing tool that is compatible with all devices and has the highest level of security. This article is a comprehensive guide to Webex screen sharing to help you use it in your daily business. In addition, we recommend a remote support software built for mobile devices to fulfill your screen-sharing needs for mobile devices.


Leave a Reply.