How to Share Your Screen on Microsoft Teams [Step-by-Step Guide]
Microsoft Teams is a popular collaboration platform that lets you communicate and work with your team members, clients, and partners. One of its useful features is the ability to share your screen with others during a meeting or a chat. Screen sharing can help you present your ideas, demonstrate your work, troubleshoot issues, or provide feedback.
💡Sharing the screen on Teams is actually quite simple:
Step 1: Open Microsoft Teams and join the meeting
Step 2: Click the "Share Content" icon in the toolbar to start screen sharing
Step 3: Select the content you want to share
Step 4: End the screen sharing
However, the method of sharing the screen may vary across devices or platforms, which can be confusing for users.
In this article, we will show you how to share your screen in Microsoft Teams meetings and chat and solve some common screen-sharing problems. We will also introduce you to a powerful tool for remote assistance with screen sharing for IT support.
How to Share Screen in Microsoft Teams Meeting
If you are in a Microsoft Teams meeting, you can share your screen with the other team members by following these steps:
Desktop
Step 1: When you are in a meeting in Microsoft Teams, click the "Share Content" button at the top or bottom.
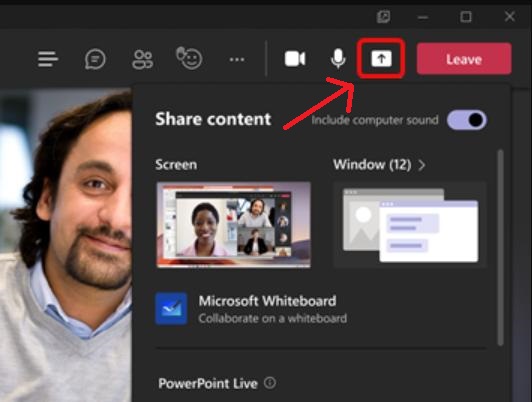
Step 2: You can share different things with others in the meeting. You can pick one of these:
- Screen: Share your whole screen with everyone.
- PowerPoint Live: Share your PowerPoint slides. This is good for showing your work.
- Microsoft Whiteboard and Freehand by Invision: Share a board on which you and others can draw. This is good for making ideas together.
- Window: Share one window or app that you have open.
Step 3: After selecting what you want to share, you will see a red border around the screen. This means that other people are viewing the screen you are sharing.
Step 4: To stop sharing, click on "Stop sharing" button or the box with the 'x.'

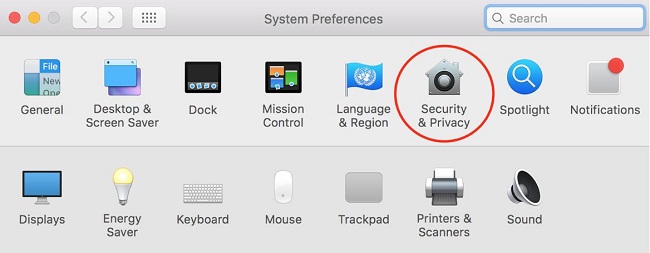
Step 1: Go to Apple Menu > "System Preferences" > "Security & Privacy."
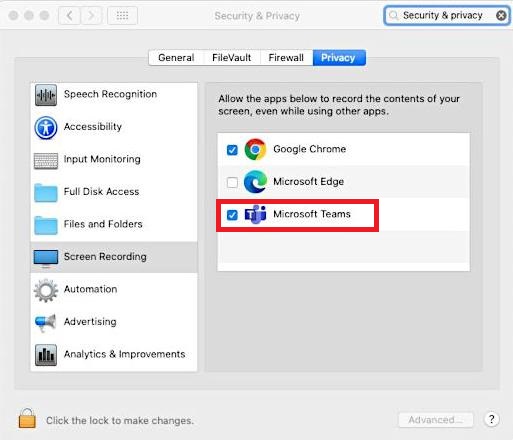
Step 2: Check "Microsoft Teams" in the "Screen Recording" section.
Step 3: Return to Microsoft Teams. Click the "Share Content" button at the top or bottom.
Above is a step-by-step guide on how to share your screen on Microsoft Teams desktop app.
When you share your screen or a window in a Teams meeting, you can also give control to another participant or request control of their shared content. This can be helpful for collaborating, editing, or troubleshooting something together.
Here are the steps to give and take control of shared content:
Tips: How to Give and Take Control of Shared Content
- To give control, hover over the top of the screen. On the sharing toolbar, pick "Give Control."
- Select the name of the person you want to give control to. Teams send a message to that person to allow them to know you're sharing control.
- While you're sharing control, they can make choices, edits, and other changes to the shared screen.
- To take control back, select “Take Back Control” on the sharing toolbar.

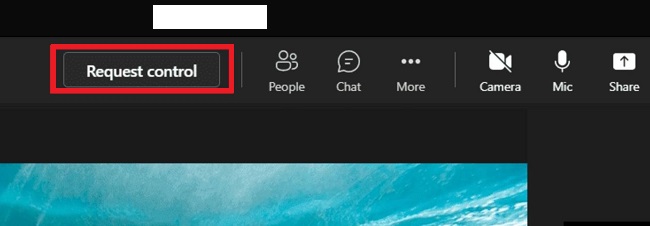
- To request control, hover over the top of the screen. On the sharing toolbar, select “Request Control.”
- The person sharing their screen will get a message asking if they want to allow you to control their screen. They can accept or deny your request.
- If they accept, you can make selections, edits, and other modifications to the shared screen.
- To release control, select “Release Control” on the sharing toolbar.
Mobile
Step 1: Start the Teams app on your phone and join a meeting.
Step 2: In the meeting, tap the button with three dots at the bottom of your screen. Then tap "Share."
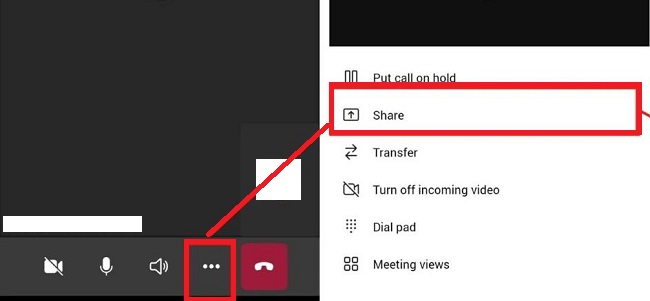
Step 3: Choose what you want to share. You can share photo, video, PowerPoint, or screen.
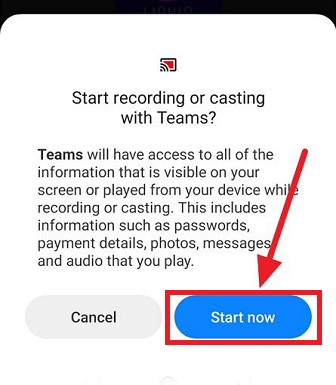
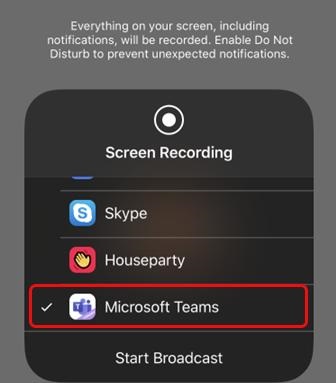
Step 4: A prompt may appear asking your device to allow Microsoft Teams to share your screen.
- For Android, click "Start Now" to enable sharing.
- For iOS, swipe up from the screen to open "Control Center," long press the "Screen Recording" button, select "Microsoft Teams" in the pop-up dialog box, and then click "Start Broadcast."
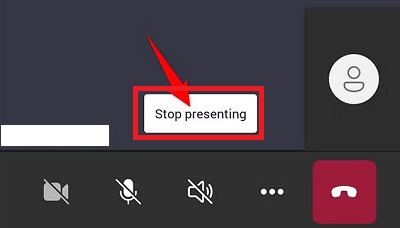
Step 5: To stop sharing, tap "Stop presenting."
Web
To show your screen on Teams on the web, you must let Teams use your screen, camera, and microphone.
Step 1: In your browser's address bar, locate the icon in front of the Microsoft Teams website link to view the website information (it may be a settings icon, a lock icon, or a down arrow).
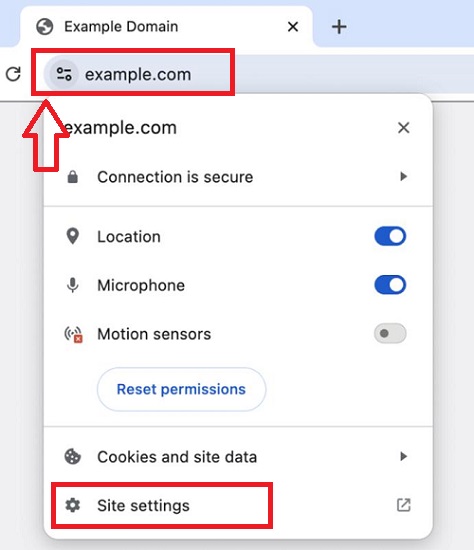
Step 2: In the Site settings, enable permissions for "Microphone" and "Camera." If you see an option for "Screen Sharing" or "Screen Recording", enable it as well.
The Teams version and web browser you use might change how you share your screen. Let's see how to share the screen on Teams on the browser.
Step 1: Open Microsoft Teams in your Web browser and join the meeting.
Step 2: Click on the "Share" icon in the toolbar to screen share.
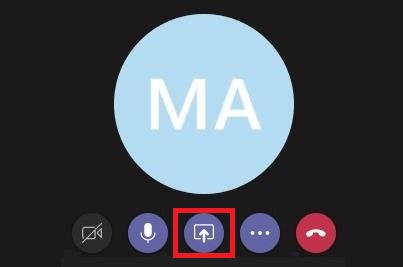
Step 3: Select what you want to share. You can choose Desktop, Window, PowerPoint or Whiteboard.

Step 3: When you have completed the task, click "Stop Sharing" to end the shared content.
How to Share Screen in Microsoft Teams Chat
If you are not in a meeting and are just chatting with one or more people, you can also share your screen as you would in a meeting.
But this feature is limited to computers only. To share your screen in a Microsoft Teams chat, follow these steps:
Step 1: To share your screen, look at the top right of the chat window and click the screen-sharing icon.

Step 2: Choose what you want to share. You can choose "Window" to share that particular program and its contents, or "Desktop" to share everything on the screen..
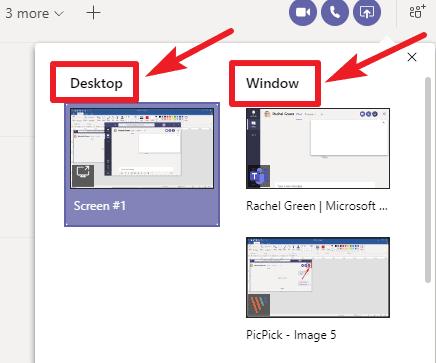
Step 3: Other members of the chat will receive a notification asking them to accept your screen share. Once they accept, they will be able to see your screen and continue chatting.
Step 4: When you are done, click the "Stop Sharing" button to end screen sharing.
Solved: Microsoft Teams Screen Sharing Not Working
Screen sharing is a useful feature in Microsoft Teams that allows you to present your device’s screen to your meeting participants. However, sometimes you may encounter problems with this feature, such as:
- Your screen is black or frozen for the viewers.
- You can’t share your screen or see the option to do so.
- You experience lag or poor quality when sharing your screen.
- You can’t share your Mac screen due to permission issues.
Fortunately, there are some possible solutions to fix these problems and make screen sharing work smoothly in Microsoft Teams. Here are some of them:
Team Admins Grant the Necessary Permissions
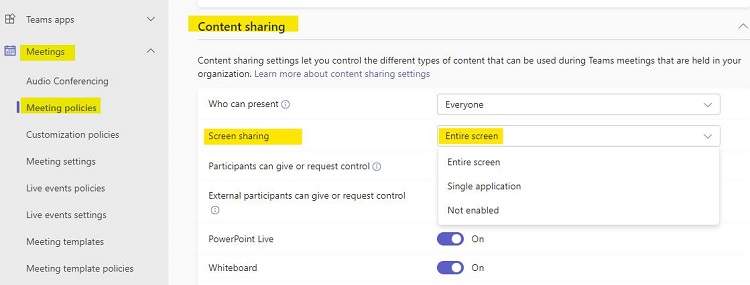
One reason you can't share your screen in Microsoft Teams is that the meeting admin has restricted the screen-sharing option for some or all participants. Before sharing the screen in Microsoft Teams, admins must set or activate the following options from the admin center:
- Who can present
- Screen sharing options
- Participants can give or request control
- External participants can give or request control
- PowerPoint Live
- Whiteboard
Clear Teams Cache
Another possible cause of screen sharing problems in Microsoft Teams is that the app’s cache is corrupted or outdated. This can affect the app’s performance and functionality. To fix this, you can try clearing the Teams cache and see if that helps.
To clear the Teams cache on Windows, you can follow these steps:
Step 1: Quit Microsoft Teams.
Step 2: Press "Windows + R" to open the "Run" dialog box.
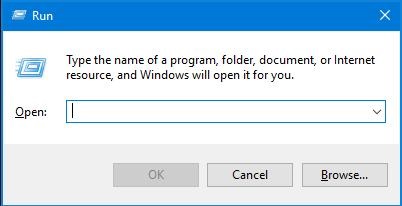
Step 3: Type "%appdata%\Microsoft\Teams" and press "OK."
Step 4: Delete all files and folders in the directory.
Step 5: Restart Microsoft Teams.
To clear the Teams cache on Mac, you can follow these steps:
Step 1: Quit Microsoft Teams.
Step 2: Open Finder and find the "/Applications/Utilities" folder, then double-click "Terminal."
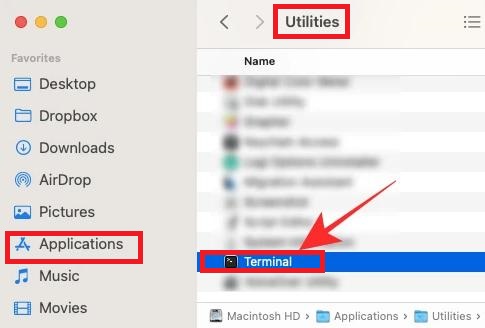
Step 3: Type "rm -r ~/Library/Application\ Support/Microsoft/Teams" and press "Return."
Step 4: Restart Microsoft Teams.
Check Device Internet and Security Settings
You can check your internet speed using a site like Fast.com and see if you need to upgrade your plan or switch to a better network.
You can also close any other apps or activities that use your internet bandwidth, such as streaming, downloading, or gaming, to free up some resources for Teams.
In addition, you can add Teams as an exception or a trusted app in your security settings to prevent conflicts.
Restart or Update Microsoft Teams
Sometimes, the simplest solution to screen-sharing problems in Microsoft Teams is to restart the app or update it to the latest version. This can help refresh the app and fix bugs or glitches that may cause screen-sharing issues.
Best Tool for Remote Assistance with Screen Sharing for IT Support
If you are an IT support professional or a business owner who needs remote assistance from your customers or employees, you may need a more powerful and reliable tool than Microsoft Teams for screen sharing.
One of the best tools for remote assistance with screen sharing is AirDroid Remote Support. It is an enterprise-grade solution that allows you to troubleshoot remotely or directly control attended and unattended devices with fast response and secure reliability.

You can provide remote assistance intuitively with real-time screen sharing, voice calls, text messages, tutorial gestures, AR cameras, and more. It supports Android and iOS devices, so you can help your customers or employees no matter what devices they use.
Final thoughts
Microsoft Teams offers a valuable screen-sharing feature for seamless collaboration. Whether you're presenting ideas, troubleshooting, or providing feedback, screen sharing enhances communication.
For IT support professionals seeking a robust solution, AirDroid Remote Support stands out. Its compatibility with Android and iOS devices, along with its affordable pricing plans, makes it a compelling choice for businesses of all sizes.


Leave a Reply.