How to Turn on Computer Remotely: Step-by-Step Guide
Do you want to access your home computer while traveling, or access files or applications on your office computer while working from home? For these purposes, you need to use the capability of Wake-on-LAN (WoL) to turn on computer remotely.
But what is Wake-on-LAN and how does it work? People who are not technically savvy will definitely be confused by this. In the following section, we will briefly explain the principle of its functioning and the detailed steps to turn on computer remotely.
Wake-on-LAN, a remote wake-up technology and standard that allows the computer to be turned on over the network or woken up from a low-power state (e.g., sleep mode). This is particularly useful for remotely managing computers, maintaining systems, and other scenarios where the computer cannot be physically accessed.
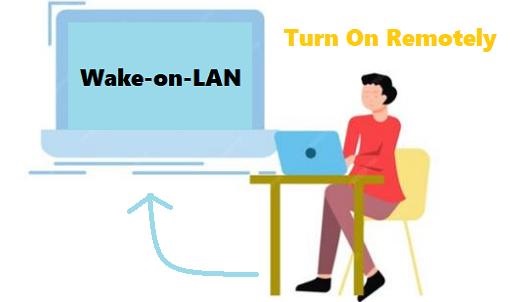
Generally, you must set up the BIOS controls of the target computer to allow Wake-on-LAN activation. A unique network signal called a "Magic Packet" is delivered to the intended computer’s Media Access Control (MAC) address. Data in this packet instructs the specified computer to power on.
You must use software or applications made especially for Wake-on-LAN to deliver the magic packet. With such applications, you can send the magic packet from another device on the same network and provide the specified computer’s MAC address.
Considerations Regarding Wake-on-LAN Support
- The hardware of the computer, notably the Ethernet adapter or network interface card (NIC), must support WoL. Some networking devices from older or less expensive PCs could not have this feature.
- WoL must be activated in the computer’s BIOS settings, even if the hardware supports it. WoL options may be hidden in network setup or power management options on specific BIOS interfaces.
- WoL packets need to be supported by the network setting. It ensures that the sending and receiving devices are connected to a single subnet address and that network-level settings do not block WoL packet delivery.
- The target computer’s firewall and antivirus applications may block WoL packets automatically. For proper functioning, firewall rules allowing WoL traffic may need to be configured.
- Even though WoL is commonly supported, various software and hardware pairings may have distinct implementations. Restrictions or usability problems could occur based on the devices and configurations used.
How to Turn on Computer Remotely
Wake-on-LAN enables a PC to communicate with another on a local network by sending a magic packet comparable to an "ON signal." Here is a detailed guide on how to turn on pc remotely:
Enable Wake-on-LAN in BIOS or UEFI
Wake-on-LAN must be enabled in some (but not all) motherboard BIOS to allow remote PC waking. It is activated by default on the latest UEFI motherboards, while older boards usually do not have it on by default. You can check if the WOL feature is activated by logging into the BIOS or UEFI on your motherboard.
To enable Wake-on-LAN in BIOS, please refer to the following steps:
Step 1: You need to restart the computer, and after the computer is turned on, repeatedly click the "Del", "F2", "F10" or "F12" key to enter the motherboard's BIOS.
Step 2: Find and enable Wake-on-LAN in the BIOS menu.
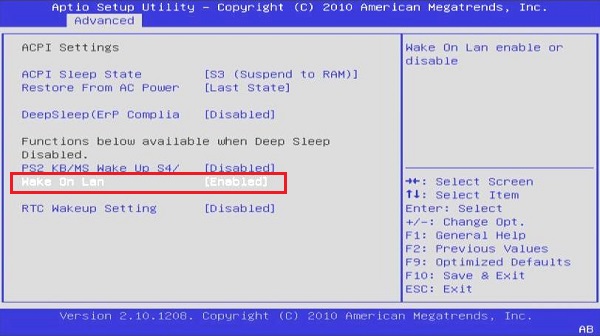
The BIOS/UEFI settings differ depending on your computer's motherboard version and company. For more details, you must consult the user guide that came with your motherboard. However, it is usually located beneath the power or networking-related options.
Set up Wake-on-LAN in Windows
Once the BIOS or UEFI of your target PC has confirmed that Wake-on-LAN has been activated, proceed with getting into your Windows installation as usual. After that, perform the following steps:
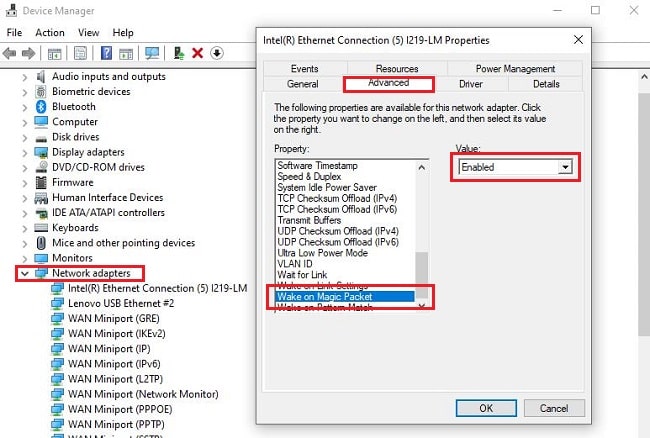
Step 1: Go to the Device Manager. In Windows 10, you may access it from the administrative tools quick menu by pressing the Windows key + X. Alternatively, you can search for it by typing "Device Manager" into the Start menu or using the Windows key.
Step 2: Locate the "Network adapters" and double-click the network adapter you are using in the drop-down menu. You can also right-click on it and select "Properties."
Step 3: Proceed to the "Advanced" tab and review the "Property" entries. Find the entry for "Wake on the Magic Packet" and turn it on.
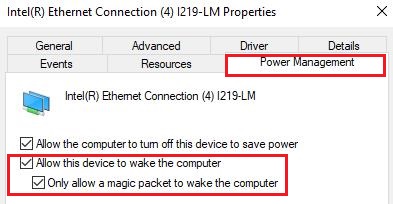
Step 4: Go to the "Power Management" tab in the same window. Ensure that the options "Allow this device to wake the computer" and "Only allow a magic packet to wake the computer" are enabled.
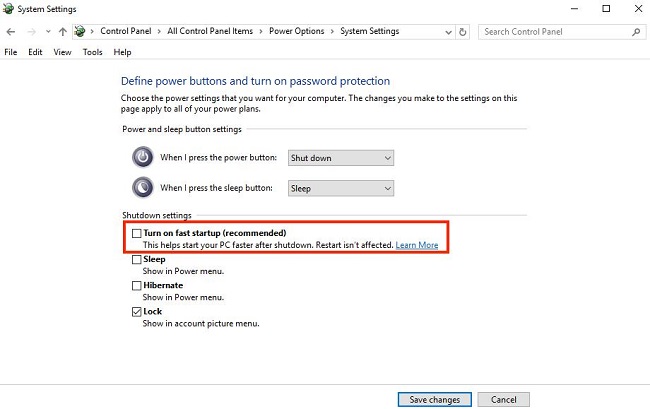
Some people find that they can't get Wake on LAN to work properly because they have fast startup enabled on their computer. So if you are experiencing that problem, you can try disabling fast startup.
Go to "Control Panel" > "Hardware and Sound" > "Power Options" > "Choose what the power buttons do," click on "Change settings that are currently unavailable" and uncheck "Turn on fast startup."
Select the Right Tool to Wake up Computer
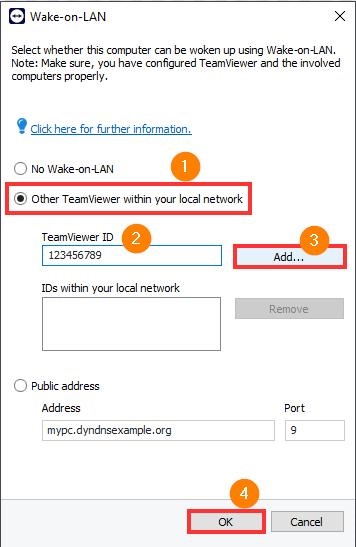
After configuring all the settings related to Wake on LAN on your computer, you are ready to wake up your computer over the network. You can use the built-in Wake on LAN feature, but the easiest and fastest way to turn on your computer over LAN is to use a third-party application such as TeamViewer.
Step 1: Open TeamViewer. Go to Settings > Network > Wake on LAN.
Step 2: Enter the TeamViewer ID of the device waking up the remote computer under "Other TeamViewer within your local network." Click "Add..." and "OK."
Conclusion
You can turn on pc remotely by configuring Wake-on-LAN abilities, which are convenient and adaptable for various situations. You can power on your computer without worrying about being physically present if WoL is set.
You may ensure you can access your computer from anywhere at any time by following this article’s instructions to enable WoL on your local and public networks. However, before allowing Wake-on-LAN over a public network, it is crucial to be mindful of the security consequences.


Leave a Reply.