A Complete Tutorial to Enable Remote Desktop in Windows 10
In today's increasingly digital world, the ability to access your computer remotely offers a wealth of convenience. Remote Desktop Protocol (RDP) is a built-in feature in Windows 10 that allows you to securely connect to another computer from any device with an internet connection.
With the rise of remote work and the need for easy access to workstations from any location, understanding how to use and activate remote desktop windows 10 is more relevant than ever.
This tutorial will guide you through the process of enabling Remote Desktop in Windows 10, establishing a remote connection, and exploring best practices for security. So, let’s get started!
- Part 1: Prerequisites for Enabling Remote Desktop on Windows 10
- Part 2: The 4 Ways to Enable Remote Desktop Windows 10

- Part 3: Additional Settings or Requirements for Remote Connection
- Part 4: How to Connect to Another Computer Using Remote Desktop
- Part 5: Security Tips for Secure Remote Desktop Connection
Part 1: Prerequisites for Enabling Remote Desktop on Windows 10
Before diving into the enabling process, let's ensure your system meets the essential requirements to allow remote desktop on windows 10:
Updated Windows 10: Running the latest Windows 10 version guarantees optimal performance and security features for Remote Desktop connections. Update your system through Settings > Update & Security > Windows Update.
Compatible Windows 10 Version: You can only use Remote Desktop to connect to Professional and Enterprise editions of Windows, not to Windows 10 Home. To verify your edition, navigate to Settings > System > About and check under "Edition."
Best Remote Desktop Solution for Individuals/Businesses
Frustrated with Remote Desktop on Windows 10 Home? Try AirDroid Remote Support!
Network Connectivity: Consider the type of network you'll be using to connect. If both computers reside on the same local network, connection by name or IP address is sufficient. For external access (over the internet), additional configuration like port forwarding on your router can be necessary.
Part 2: The 4 Ways to Enable Remote Desktop Windows 10
With the prerequisites addressed, let's explore the various methods to enable Remote Desktop in Windows 10. You can enable it through any of the methods:
Method 1: Via Windows Settings
This is the most straightforward approach:
Step 1: Go to "Windows Settings" - "System" - "Remote Desktop."
Step 2: Under "Enable Remote Desktop," toggle the switch to "On."
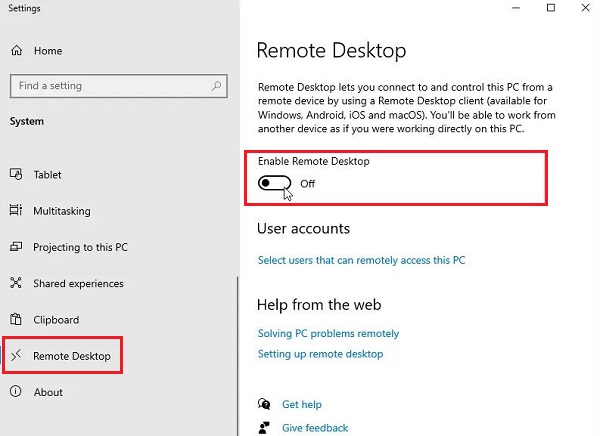
Step 3: A confirmation prompt may appear; click "Confirm." See the below images to understand easily.

Then, it is best to check the "Keep my PC awake for connections when it is plugged in" option under the "On" button to ensure a smooth remote connection.
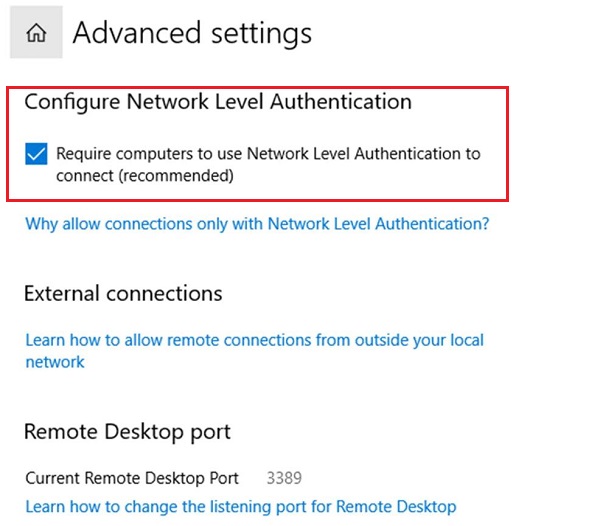
You can also go to "Advanced settings" and check "Require computers to use Network Level Authentication to connect" to increase the security of the remote connection.
Method 2: Via Control Panel
For users accustomed to the classic Control Panel interface:
Step 1: Press the Windows key and type "Control Panel." Then open it.
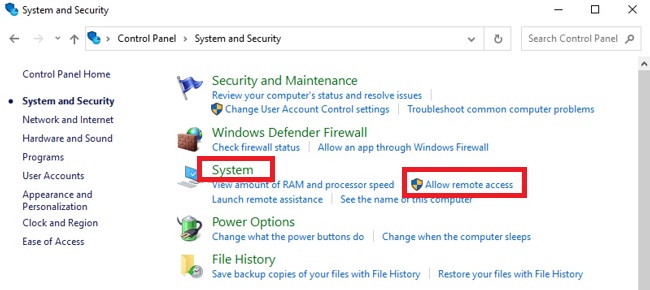
Step 2: Click on "System and Security."
Step 3: Navigate to "System." Then click on the "Allow remote access" option.
Step 4: Under the "Remote" tab, select "Allow remote connections to this computer." You can also check "Allow connections only from computers running Remote Desktop with Network Level Authentication" to increase the security of the remote connection.
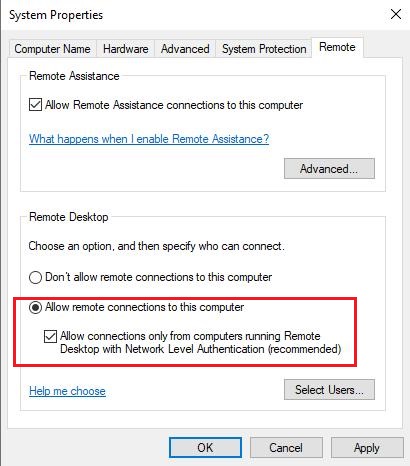
Then, simply click "Apply" and "OK" to save changes.
Method 3: Via Command Prompt
Some users are comfortable with command-line tools. You can try this approach to enable Remote Desktop.
Step 1: Press the Windows key, type "cmd"
Then, right-click on "Command Prompt." Select "Run as administrator."
Step 2: In the Command Prompt window, type the following command and press "Enter":
reg add "HKEY_LOCAL_MACHINE\SYSTEM\CurrentControlSet\Control\Terminal Server" /v fDenyTSConnections /t REG_DWORD /d 0 /f
Step 3: Although enabling RDP in the registry allows connections, the firewall might still block them. Use this command to open the necessary firewall rule:
netsh advfirewall firewall set rule group="remote desktop" new enable=Yes
Extra: How to disable Remote Desktop with Command Prompt
- Disable Remote Desktop: reg add "HKEY_LOCAL_MACHINE\SYSTEM\CurrentControlSet\Control\Terminal Server" /v fDenyTSConnections /t REG_DWORD /d 1 /f
- Disable Remote Desktop through Firewall: netsh advfirewall firewall set rule group=" remote desktop" new enable=No
Method 4: Via PowerShell
PowerShell offers another command-line method:
Step 1: Press the Windows key, type "PowerShell"
Next, right-click on "Windows PowerShell." Select "Run as administrator."
Step 2: In the PowerShell window, type the following command and press "Enter":
Set-ItemProperty -Path 'HKLM:\System\CurrentControlSet\Control\Terminal Server' -name "fDenyTSConnections" -value 0
Step 3: Use the following command to enable the firewall rule for Remote Desktop:
Enable-NetFirewallRule -DisplayGroup “Remote Desktop”
Extra: How to disable Remote Desktop with PowerShell
- Disable Remote Desktop: Set-ItemProperty -Path 'HKLM:\System\CurrentControlSet\Control\Terminal Server' -name "fDenyTSConnections" -value 1
- Disable Remote Desktop through Firewall: Disable-NetFirewallRule -DisplayGroup "Remote Desktop"
Part 3: Additional Settings or Requirements for Remote Connection
To use Remote Desktop on Windows 10, the following requirements or settings need to be enabled, because those things can ensure a smooth and secure connection. Let’s have a quick look below:
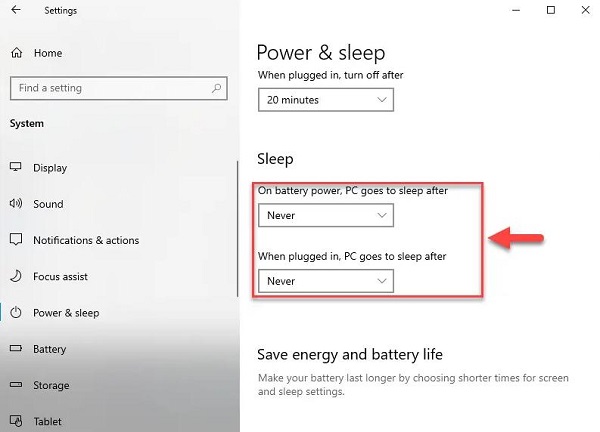
Turn off Computer Sleep Mode
A sleeping computer cannot accept remote connections. Adjust your power settings to prevent sleep mode activation while using Remote Desktop.
Go to "Settings" > "System" > "Power & sleep" and set the sleep mode to "Never."
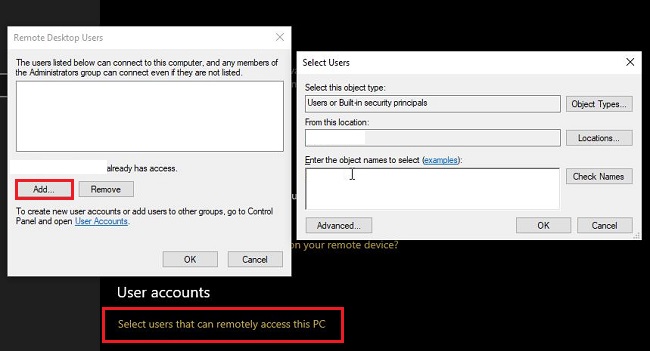
Be in the List of Users and Have Connection Privileges
Only authorized users can establish remote connections. Ensure your user account is listed under "Users that can remotely access this PC" within Remote Desktop settings and possesses the necessary privileges.
Go to "Settings" > "System" > "Remote Desktop," find "Select users that can remotely access this PC" at the bottom, and click "Add" to add an account.
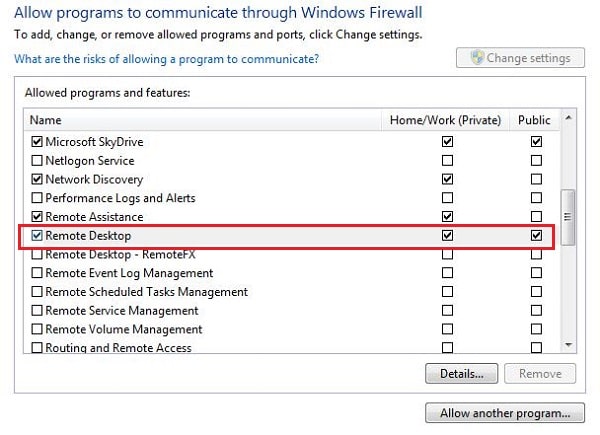
Allow Remote Desktop Connection through Its Firewall
Windows Firewall might block incoming Remote Desktop connections by default. Create an exception rule within your firewall settings to permit Remote Desktop traffic.
Open the "Control Panel" on the computer and go to "System and Security" > "Windows Defender Firewall." Click "Allow an app or feature through Windows Defender Firewall" on the left side. Click "Change settings" and locate "Remote Desktop" in the list of apps. Make sure both "Private" and "Public" options are checked.
Part 4: How to Connect to Another Computer Using Remote Desktop
Now that Remote Desktop is enabled and configured, you can connect to another computer. Here's how:
Step 1: Locate the target computer's name or IP address. You can find this information on the target computer itself (Settings > System > About) or through your network router's device list.
Step 2: Open the Remote Desktop client. This application is pre-installed on most Windows machines. Search for "Remote Desktop Connection" in the Start menu or search bar.
Step 3: Enter the computer details. In the "Computer" field, type the target computer's name or IP address.
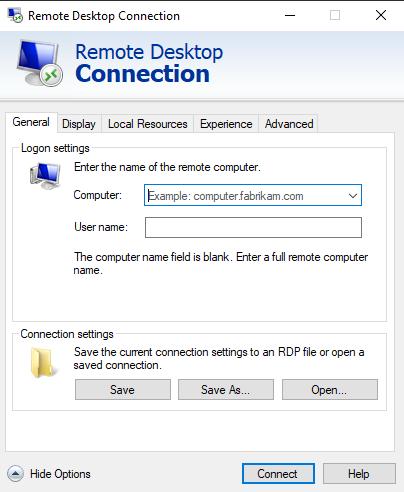
Step 4: Authenticate (if required). If you enabled NLA in the settings, you'll be prompted to enter the username and password for a user account authorized for remote access on the target computer.
Step 5: Connect. Click "Connect" to initiate the remote connection. You may encounter a security certificate window; verify the details and click "Yes" to proceed.
Step 6: Remote Desktop session. Once connected, you'll see the desktop of the target computer displayed on your local machine. You can now interact with the remote computer as if you were sitting in front of it.
Part 5: Security Tips for Secure Remote Desktop Connection
Enabling Remote Desktop Connection (RDC) unlocks convenient access. But prioritizing robust security measures is essential to safeguard your system from unauthorized access. Here's a comprehensive guide to refreshing your RDC experience:
Unbreakable Passwords: The first line of defense is implementing complex and unique passwords for user accounts with RDP access. Resist the urge to reuse passwords across different accounts, and consider using a password manager to generate and store strong, unique credentials securely.
Limited User Permissions: Restrict remote access permissions only to authorized users who genuinely require it. Avoid granting remote access to administrative accounts if possible, as a compromised admin account can create chaos on your system.
Firewall Rules: When creating a firewall exception to enable RDP, exercise caution. While allowing RDP access, restrict incoming connections to specific ports – the default RDP port is 3389, but consider changing it to a less common one for an extra layer of obscurity.
Secure Remote Desktop Software for Individuals/Businesses
Provide a great remote access and support experience with end-to-end encryption and security policies.
By following these security best practices, you can ensure that the convenience of Remote Desktop Connection doesn't come at the cost of compromised security. Remember, awareness is key!
Final Notes
By following this comprehensive guide, you can successfully enable Remote Desktop on Windows 10, establish secure remote connections, and unlock the flexibility of accessing your computer from anywhere.
Remember to prioritize security by implementing strong passwords, user permissions, and firewall configurations. With the above mentioned step-by step guidelines in place appropriately, Remote Desktop can become a valuable tool both for enhancing your overall productivity and remote work capabilities.


Leave a Reply.