How to Control Android USB Connection Settings (With Pics)
You may need to use a USB connection with an Android phone for many reasons. In fact, a USB connection is a powerful tool when utilizing an Android device, allowing you to connect your Android phone to other devices. As technology expands, the amount of devices you can use a USB connection with continues to increase. For example, in 2023, the latest Android operating system update (Android 13) enabled connecting MIDI 2.0 hardware through USB.
Because there are so many options of devices to connect to, Android devices have their default setting as ‘No Data Transfer’ for security purposes. However, if you would like to transfer data or use a USB connection to make changes to your device from a computer, you must alter the USB settings on your Android device.
In this guide, we will discuss Android phone USB settings, how you can adjust these settings, and how to manage them.
What USB Connection Options are Available When Android Device is Connected to Computer?
With a USB connection, there are many things you can do when your Android phone or tablet is connected to a computer. These options include:
- Charging the device
- Transferring files from device to computer
- transferring files from computer to device
- USB tethering
- MIDI
- Step One: Plug the Android device into the computer via a USB cable.
- Step Two: Wait for a pop-up notification to appear on the Android device.
- Step Three: Click on the pop-up notification and select your desired option.
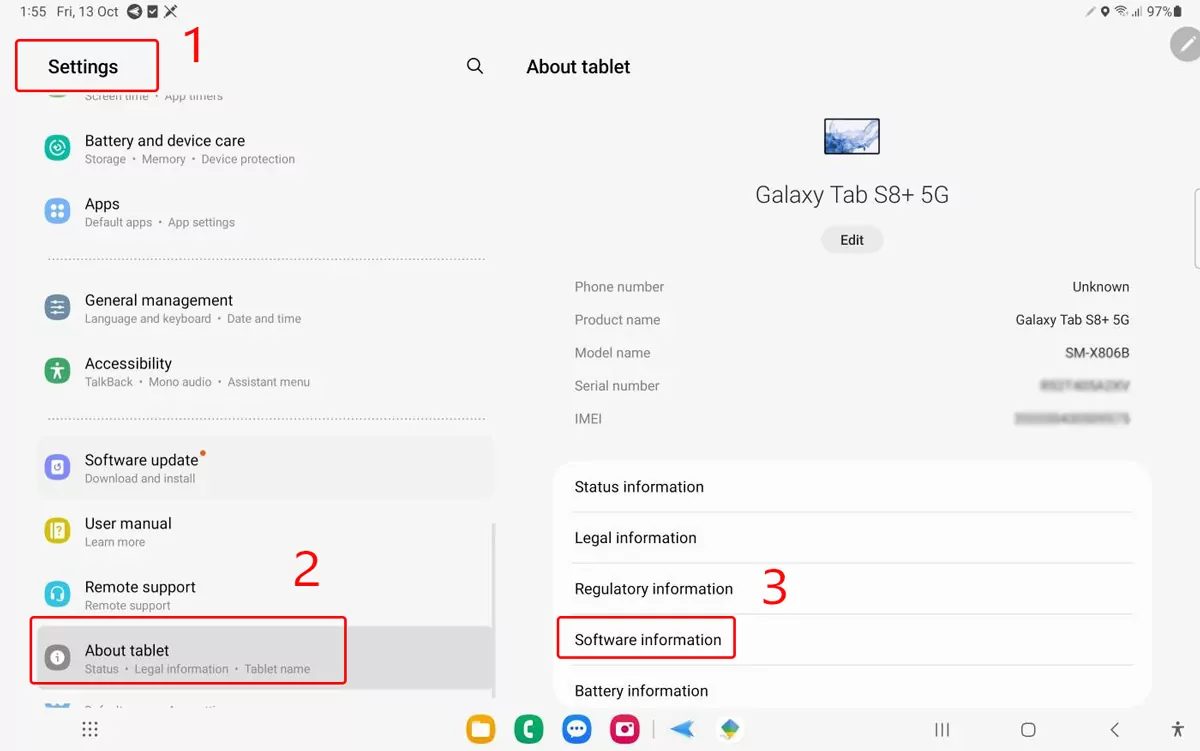
- Step One: Navigate to the Setting on the device, and then About tablet.
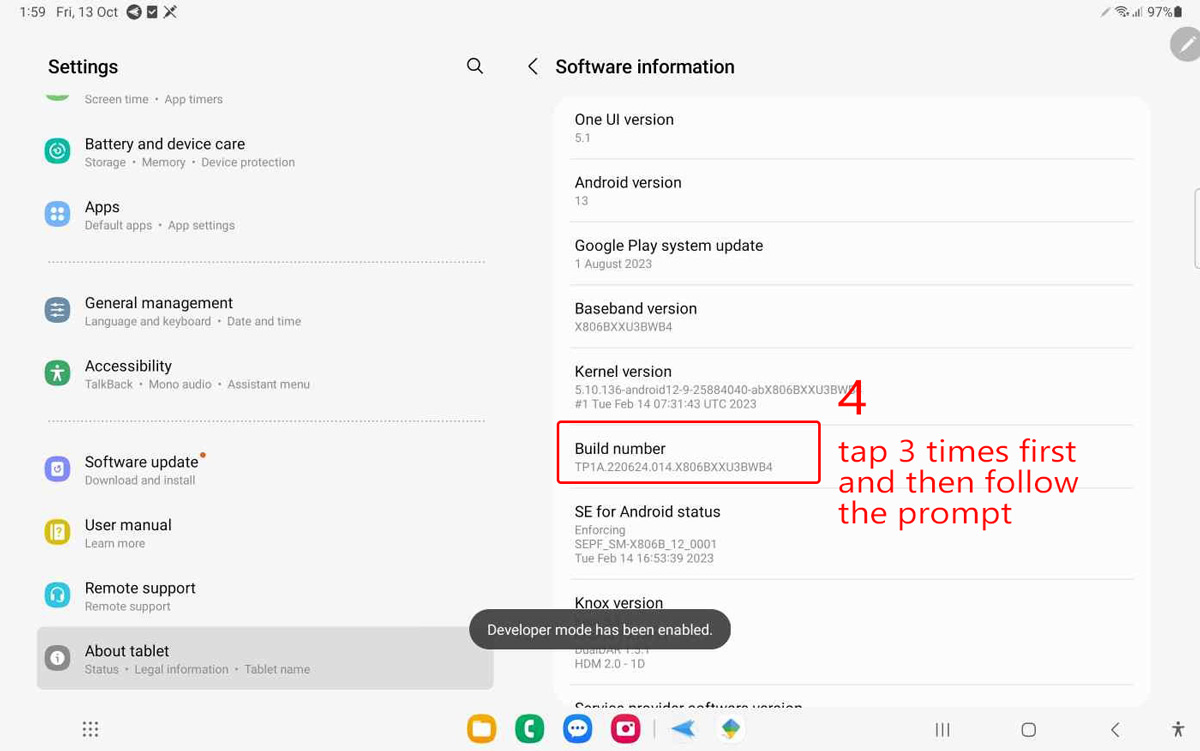
- Step Two: Click Software information and find Build number. Next, tab it three times and a prompt will show up as "You are now 4 steps away from being a developer." Continue to tab the Build num for four times.
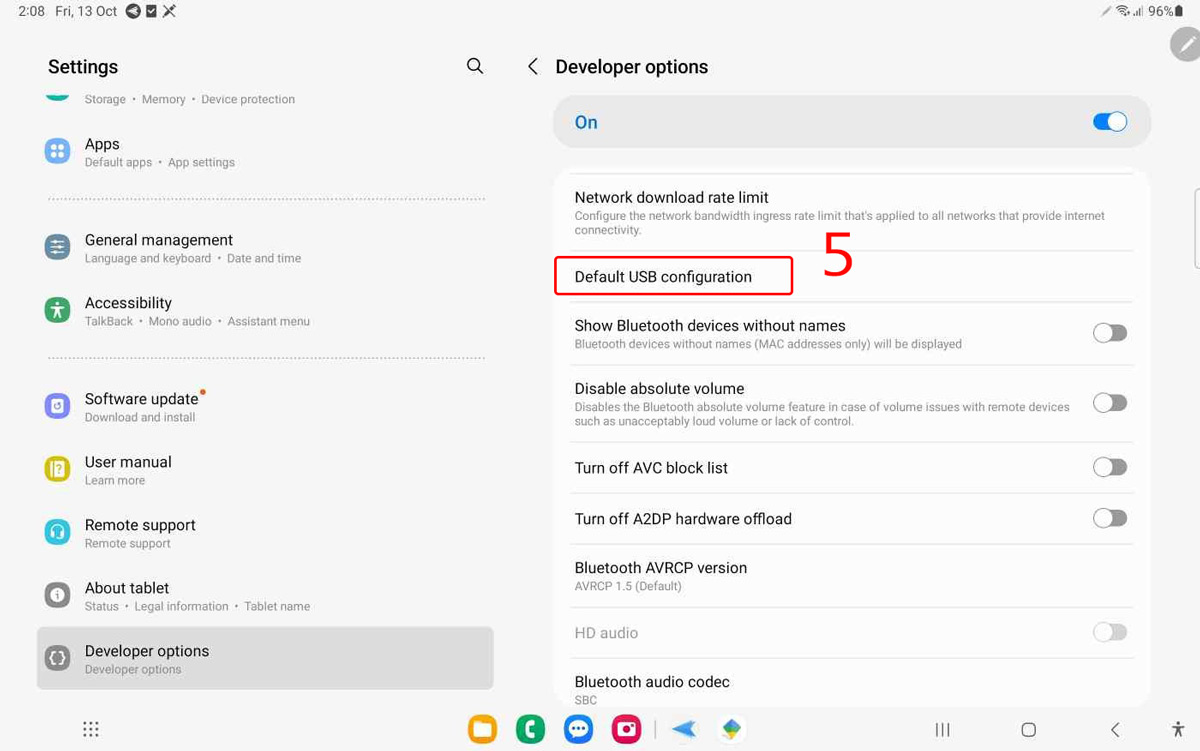
- Step Three: Scroll down About tablet, and you will see Developer options beneath it. Click the options and go to Default USB configuration by swiping the screen.
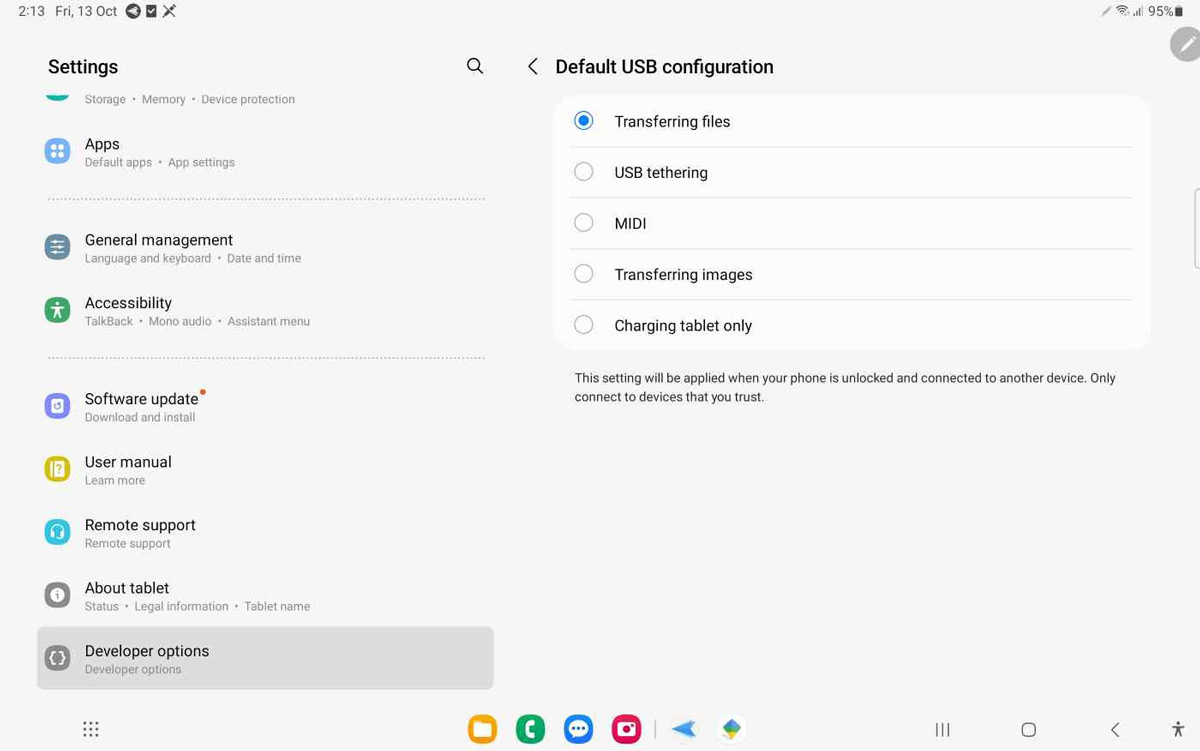
- Step Four: Now you can see five options - Transferring files, USB tethering, MIDI, Transferring images, and Charging tablet only.
- Step One: Attach devices to AirDroid Business in order to access them.
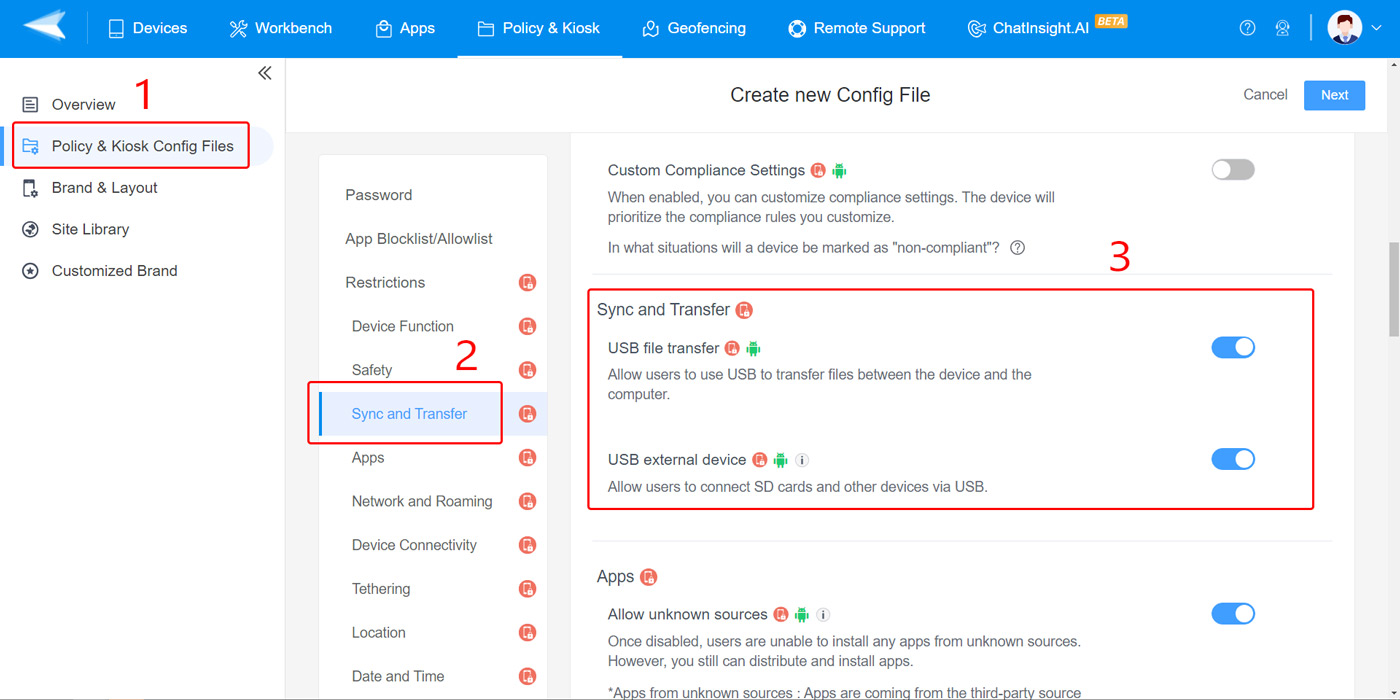
- Step Two: Navigate to Admin Console, then select the ‘Policy & Kiosk’ tab.
- Step Three: Select ‘Policy,’ then ‘Restrictions.’
- Step Four: In the ‘Restrictions section, you will find many settings options that you can enforce and change on multiple devices at once. These settings include those that enable/disable file transfer through USB for Android. These are found under ‘Sync and Transfer.’
- Step Five: After making your changes, apply the Policy config file to the devices. You’ve now successfully finished the USB configuration for Android devices under your AirDroid Business account.
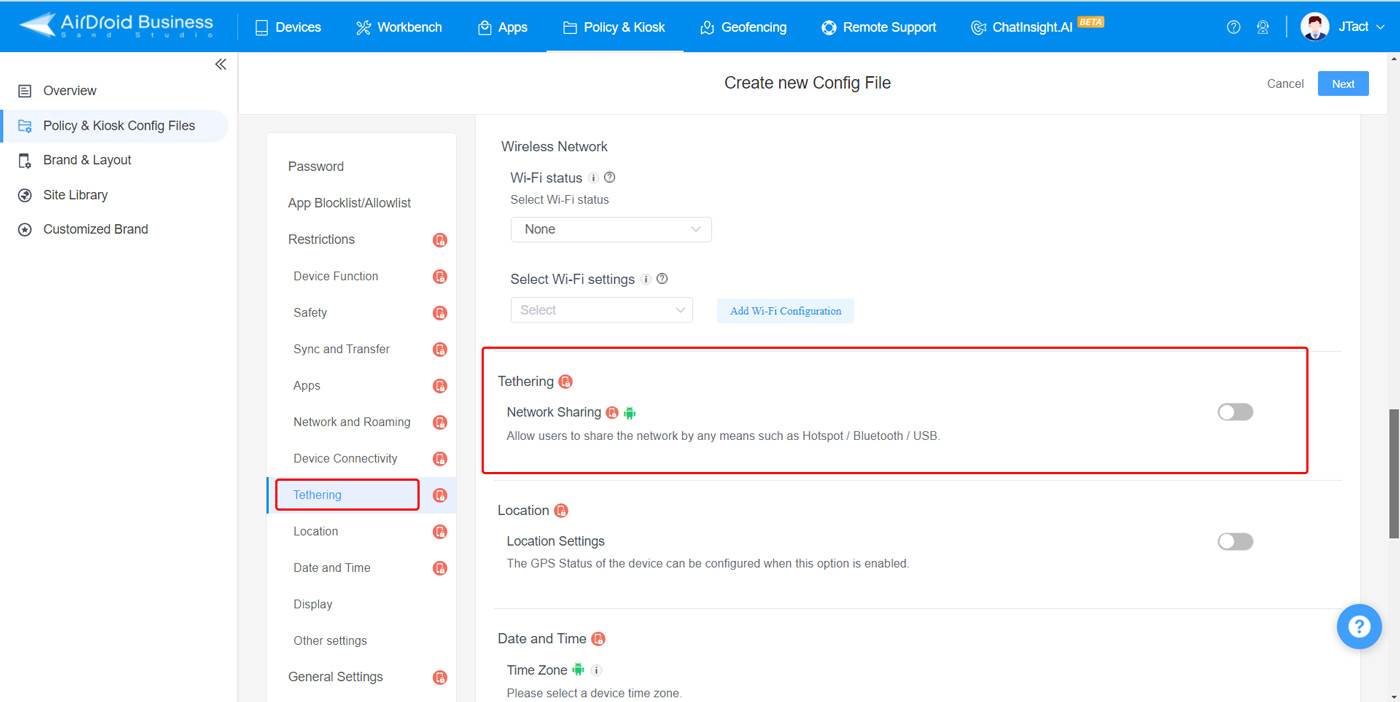
- Step One: Same in the Policy config file, you can see 'Tethering' under 'Restrictions'.
- Step Two: Enable or disable the button in the right hand.
As we mentioned, the default Android USB mode is no data transfer. This means that when you plug your Android device into a computer via a USB connection, you will not be able to transfer files to or from the computer unless the mode is changed.
However, there are USB preferences Android has enabled, which allow you to change how your device behaves when a USB connection is established. Let’s discuss these tools in more detail.
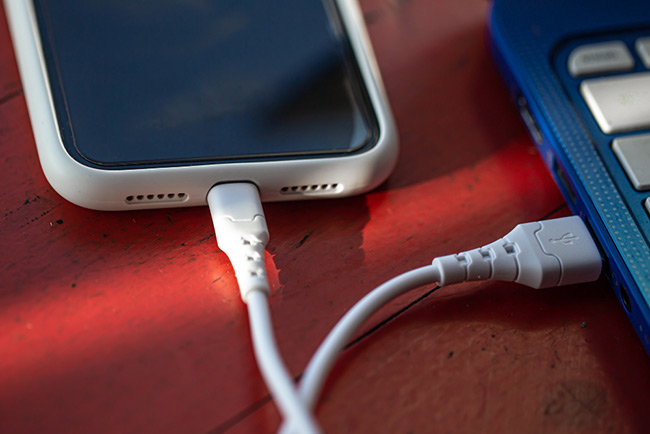
Tools to Change USB Settings for Android
1Built-in Settings/Pop-Up Notification Bar (Personal Use)
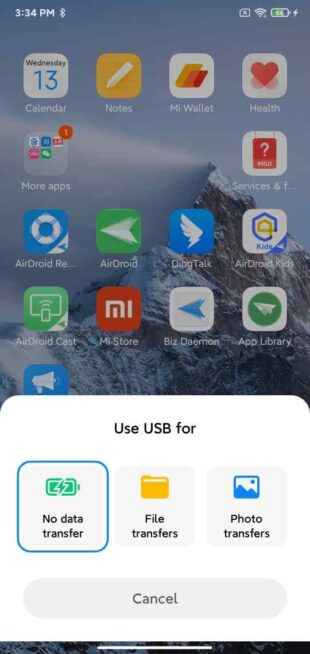
First and foremost, when establishing a USB connection, a notification pop-up will appear. This is a wonderful option for those who are using their device for personal use and would like to quickly change their USB settings in the moment.
This notification pop-up will ask the user what they would like to do with the USB connection. This is a simple and easy solution for a one-time USB connection. However, if you expect to use your device regularly to transfer data via a USB connection, you may want to consider the second option on our list to change your device settings.
2Built-In Developer Options (Personal Use)
You may also use Developer Mode on your Android device to change the USB settings of your device. Developer Mode allows users to customize their device, where they can access customization options beyond typical setting options on a device.
Through Developer Mode, a user can change the ‘Default USB Configuration’ from ‘No Data Transfer’ to an option they choose.
3Third-Party Apps (Business Use)
For businesses, there is an easy solution to change USB solutions for one device or many through platforms known as Android device management solutions. An example of one of these solutions is AirDroid Business.
AirDroid Business is an MDM solution for Android and allows IT admins to make bulk device changes, including device settings, policy enforcement OS updates, kiosk mode, etc. It can be used as a USB restriction software or to perform USB configuration for Android devices.
How to Change USB Settings Within Android Phone
In this section, we will explain step-by-step how to use the first two options on our list of solutions for changing USB settings.
Method one, changing USB settings via pop-up notification:
This method is very simple but is only suitable for one-time use on a single device. Please note that the interface of phone models may be vary, for example, you need to open the USB settings in the notification bar in Samsung devices.
Method two, change USB settings via Android Developer Mode:
Here, we will take Samsung Galaxy Tab to demonstrate.
How to Control Android USB Connection Settings from a PC
If you would like to change Android USB connection settings for multiple devices, doing so from a PC is the third method. Using AirDroid Business, users can easily update USB options for business mobile devices. Let’s walk through each of the steps of updating Android default USB options on a PC.
Bonus: Configure USB Tethering with AirDroid Business:
You can also use AirDroid Business to control USB tethering via the policy file. By activating the button, you can allow/disallow sharing the network by USB.
How to Fix Android USB | Why Is USB Not Working for Transferring Files on an Android Device
There are many reasons why a USB connection isn’t working when trying to transfer files from an Android device.
‘No Data Transfer’ is Enabled
The first reason why you may be having this issue is that your device may be using the default USB mode for Android, which is ‘No Data Transfer.’ If your device is in this mode, it will not transfer data via a USB connection. You will need to update the settings on the device to enable data transfer capabilities in order to transfer data via USB.
You can check USB settings by viewing the pop-up notification that appears when plugging your device into a PC.
Outdated or Missing Drivers on Computer
Another reason why your device is failing to transfer files via a USB connection could be due to outdated or missing drivers on the computer. Restart the computer and ensure that all updates are current on the PC.
Faulty USB Port
The next reason why this issue may be occurring is due to damaged hardware. There may be a faulty USB port on the computer or the device you are using. To check to make sure this is not occurring, plug a different device into the computer via USB. You can also try plugging in your Android device via a USB charger to see if the port on your Android device is working and rule out this issue.
Software Issues
Finally, third-party software issues may be a reason for USB data transfer failure. The programs on your computer may be functionally incompatible with the phone’s operating system. Make sure your device is updated, and the program you are using is compatible with your phone’s OS and version.




Leave a Reply.