- Supports multiple OS
- Real-time casting with no lags
- Two-way audio
- Advanced Encryption
- Local network and remote connection
- No ads in the app
Connect to a Wireless Display Not Showing - 2023 Fixes
Are you trying to connect your Windows 10 display to another screen, but the “Connect to a wireless display” option is not showing up? Are you struggling to wirelessly connect your Windows 10 display to a TV, projector, or another PC?
Duplicating or extending your Windows 10 display allows you to project your PC or laptop to another screen. Windows 10, along with most new devices, uses Miracast as a standard protocol to screen share across multiple platforms. In addition, Miracast technology uses HDMI over Wi-Fi to send content to a compatible display without the use of cables and wires. So if you are struggling to cast your Windows 10 PC display to a TV, projector, or another PC, use this article as a guide.
1Prerequisites for Windows Wireless Display
Although the wireless display is a built-in feature of Windows 10, some configuration and verification are still required. Make sure your PC or laptop is compatible and properly configured for wireless display screen sharing.
1Check If Your Devices Are Compatible with Miracast
First, check that your Windows 10 PC or laptop supports Miracast. Steps to Follow:
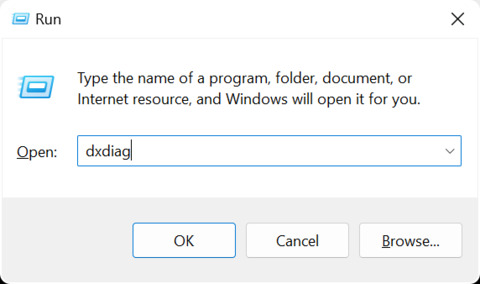
- Step 1.On your computer, press the Windows key + R on your keyboard.
- Step 2.The Run dialog box appears. Type ‘dxdiag’, and click OK.
- Step 3.The DirectX Diagnostic Tool appears. Click Save All Information.
- Step 4.Select a location on your computer to save the DxDiag.txt text file and click Save.
- Step 5.Navigate to the location where you saved DxDiag.txt, and double-click to open the file.
- Step 6.The DxDiag.txt file opens. Scroll and locate Miracast. If Miracast is compatible with your PC or laptop, then ‘Available’ appears next to the Miracast entry.
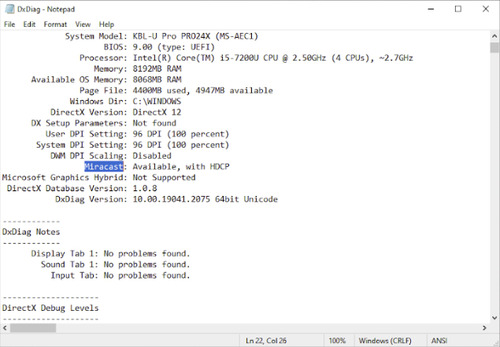
If your PC or laptop is not compatible with Miracast, then refer to another option to share your screen wirelessly such as AirDroid Cast.
2Ensure to Enable Wireless Display in Windows
If Miracast is available on your Windows 10 computer, make sure that Wireless Display is installed and enabled. Steps to Follow:
- Step 1.Click Start > Settings > System > Projecting to this PC.
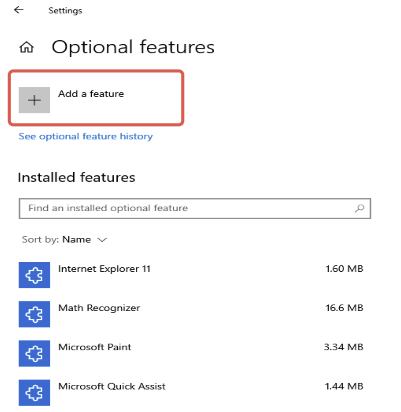
- Step 2.The Projecting to this PC screen appears. Click Optional features.
- Step 3.Click Add a feature.
- Step 4.The Add an optional feature page appears. Begin typing “wireless display”, and click the checkbox next to Wireless Display. Click Install.
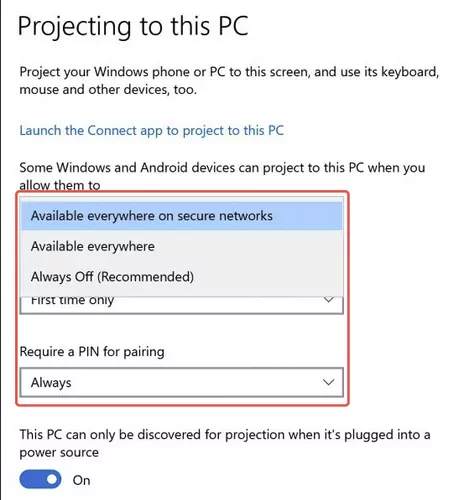
- Step 5.Once Wireless Display is installed, you can modify your projecting preferences. Select Available everything on secure networks or Available Everywhere to enable Wireless Display.
3Ensure Your Wi-Fi Is Turned On
To cast your Windows 10 computer to another device, you must have Wi-Fi enabled. Steps to Follow:
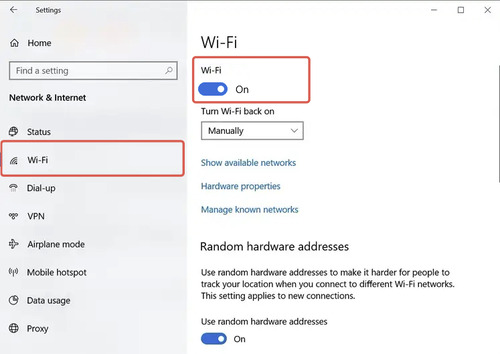
- Step 1.Click Start > Settings > Network & Internet > Wi-Fi.
- Step 2.The Wi-Fi Settings page appears. Click the slider to toggle on the Wi-Fi.
2How to Fix Wireless Display Not Working?
So your PC is Miracast compatible, wireless display is installed and enabled, and connected to Wi-Fi. Why is the option to “Connect to a Wireless Display” still not showing?
Let’s dive a little deeper into some additional configurations that could be preventing you from connecting your display.
1Remove the Device and Reconnect
Sometimes a fresh start is all you need to start sharing your Windows 10 display to another device screen. Try removing and reconnecting the device from Bluetooth and other devices.
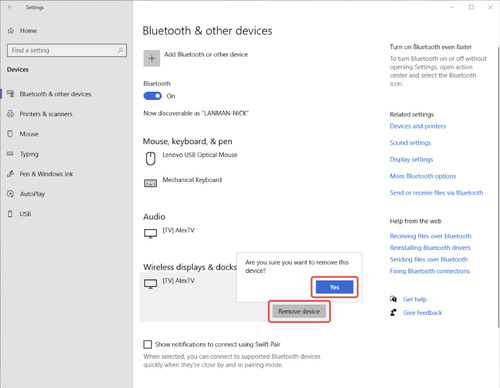
- Step 1.Click Start > Settings > Devices > Bluetooth & other devices.
- Step 2.Under Wireless displays & docks, locate your display, and click Remove device. Click Yes to remove the device pairing.
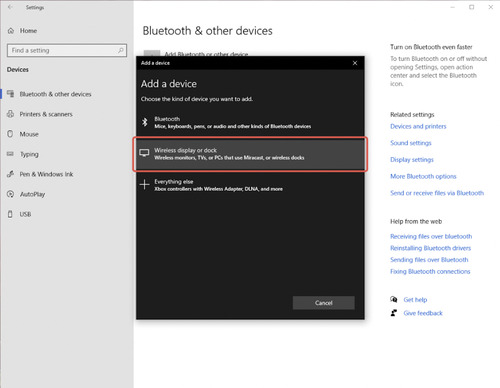
- Step 3.Click Add Bluetooth or other devices.
- Step 4.Select Wireless display or dock.
- Step 5.Wait for your display device to appear, and click the device name from the list to reconnect.
- Step 6.If the reconnection was successful, click Done.
2Connect to the Same Wi-Fi
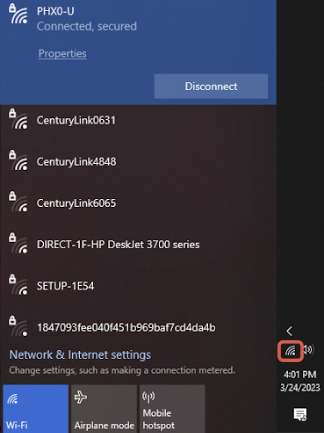
To cast, your Windows 10 computer must be on the same Wi-Fi network as your extended display. Every device has slightly different settings, but the Wi-Fi network should match the network on your computer.
- Step 1.Verify the network Wi-Fi name on your extended display by accessing the network settings on the device.
- Step 2.On your Windows 10 computer, click the network icon to view the Wi-Fi network.
- Step 3.Verify that the Wi-Fi network on your extended display and your Windows 10 computer are the same.
3Enable MS Wi-Fi Direct Virtual Adapter
The MS Wi-Fi Direct Virtual Adapter is a feature of the Windows 10 operating system that creates a virtual network on your computer. Therefore, enabling the virtual network is required to wirelessly project your Windows screen to another display.
- Step 1.Click Start button, and begin typing ‘Device Manager’. Hit the Enter key.
- Step 2.The Device Manager appears. Click the drop-down arrow next to Network adapters to open a list of installed network devices.
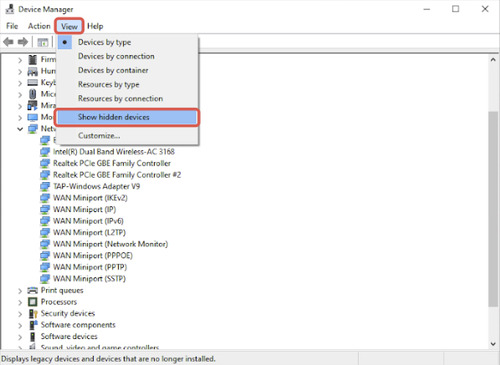
- Step 3.If Microsoft Wi-Fi Direct Virtual Adapter does not appear, click View > Show hidden devices.
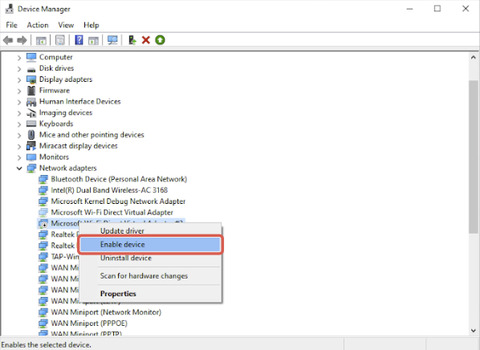
- Step 4.Right-click on Microsoft Wi-Fi Direct Virtual Adapter, and click Enable device.
4Update MS Wi-Fi Direct Virtual Adapter Driver
You may be unable to connect to a wireless display because the MS Wi-Fi Direct Virtual Adapter driver needs an update to a newer version. If you don't know how to do it, please follow these steps:
- Step 1.Click Start button, and begin typing ‘Device Manager’. Hit the Enter key.
- Step 2.The Device Manager appears. Click the drop-down arrow next to Network adapters to open a list of the installed network devices.
- Step 3.Right-click on Microsoft Wi-Fi Direct Virtual Adapter, and click Update driver.
- Step 4.Click Search automatically for drivers to allow Windows to detect and update the driver.
- Step 5.If the most up-to-date drivers are already installed, then click Search for updated drivers on Windows Update to view all available updates for your computer.

5Allow Wireless Display Through Windows Firewall
The Windows Firewall can prevent your Windows 10 computer from connecting to a wireless display. Verify that the Windows Firewall is not the problem by allowing Wireless Display through the firewall settings.
- Step 1.Click the Windows Search icon from the taskbar. Begin typing ‘allow firewall’ until Allow an app through Windows Firewall appears, and hit Enter.
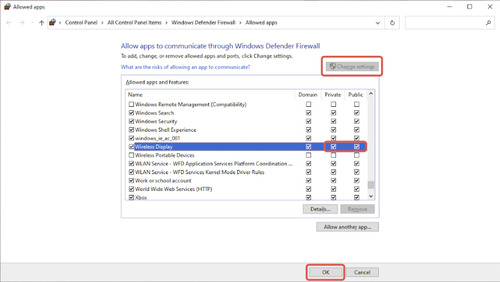
- Step 2.Scroll the Allowed apps and features list to find Wireless Display.
- Step 3.Click Change settings, and ensure that the Private and Public checkboxes are selected.
- Step 4.Click OK.
Restart your PC and see if your problem has been resolved.
6Run Hardware and Device Troubleshooter
The Windows 10 Troubleshooter can help determine why the wireless display is unable to connect. Using the Windows 10 Troubleshooter can provide clues when the Wireless Display option is unavailable on your computer.
- Step 1.Click the Start button, type ‘cmd’, and hit Enter.
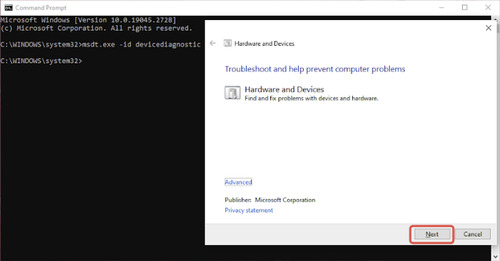
- Step 2.Type ‘msdt.exe -id devicediagnostic’, and hit Enter.
- Step 3.The Hardware and Devices prompt appears. Click Next to start troubleshooting.
- Step 4.Once the troubleshooter has successfully completed, a prompt appears containing any errors that were encountered.
- Step 4.Use the prompts to continue resolving any suggested errors.
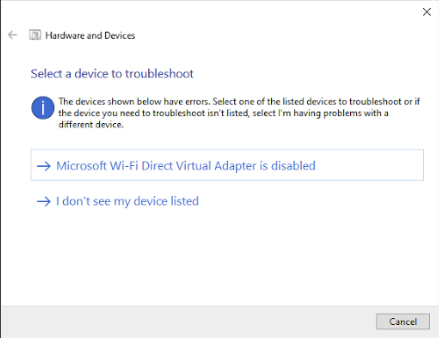
Once done, try to restart your PC and see if your problem has been resolved.
3AirDroid Cast - Windows Wireless Display Alternative
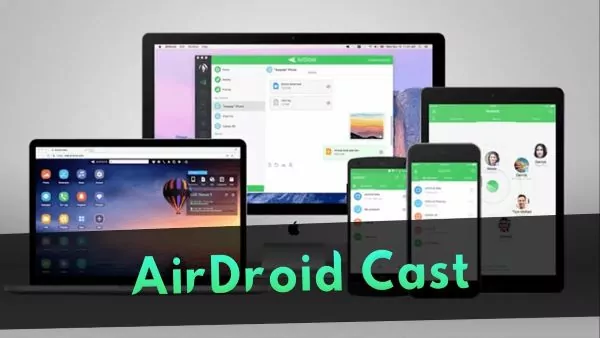
AirDroid Cast is a powerful screen sharing tool that enables fast, easy, real-time casting to a variety of devices. Not every PC is Wireless Display-enabled or capable of screen casting through simple means. AirDroid Cast steps in as a straightforward alternative to a complex problem.
1Key Features of AirDroid Cast
AirDroid Cast offers a variety of feature upgrades to the basic Wireless Display casting. You can get the most out of screencasting with these AirDroid Cast features:
2How to Mirror PC Screen to PC/Mac/Phone via AirDroid Cast
AirDroid Cast offers a quick and easy solution for mirroring your computer to another PC, Mac, or mobile device. Both the AirDroid Cast desktop app and the web version lets you mirror your PC easily. Follow the steps below:
- Step 1.Download and install the AirDroid Cast app to your PC.
- Step 2.Download and install the AirDroid Cast app on the receiving PC/Mac/Phone or navigate to webcast.airdroid.com to use the web version.
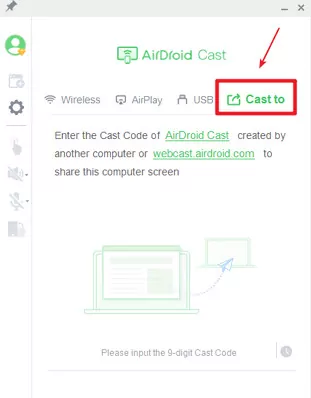
- Step 3.In the AirDroid Cast app on the casting computer, click Cast to.
- Step 4.Once the troubleshooter has successfully completed, a prompt appears containing any errors that were encountered.
- Step 5.Enter the 9-digit code that appears on the receiving computer.
- Step 6.The casting request appears on the receiving device. Click Allow to begin casting your PC to another PC/Mac/Phone.

4Closing and FAQs About Wireless Display
Wirelessly casting your Windows 10 PC to another screen opens up a world of possibilities for collaboration, presentations, gaming, and entertainment. Furthermore, Windows 10 Wireless Display feature allows you to duplicate or extend your workspace to another device. Whether you are surfing the web or streaming high definition videos, casting is a great way to use a larger screen.
After diving into connecting to a Wireless Display not showing issues, many might question if there is a better solution. But don't worry. AirDroid Cast gives you the functionality of casting to a wide variety of devices easily. With this tool, you can cast your PC on your local network or over the internet to friends, family, or team members. And it allows you to get the most out of sharing by providing a secure and easy-to-use cross-platform collaboration tool.





Leave a Reply.