Part 1: Install and Register on the Parent's End
Get started with AirDroid Parental Control by first installing and registering an AirDroid account on the parent's device.
- Step 1 Download AirDroid Parental Control
Directly search for AirDroid Parental Control on Google Play or App Store to download it. You can also download the app by clicking the icon or scanning the QR code at the top of the page.
Note: If you'd rather not install an app, you can use the web version of AirDroid Parental Control.
- Step 2 Register an AirDroid Account
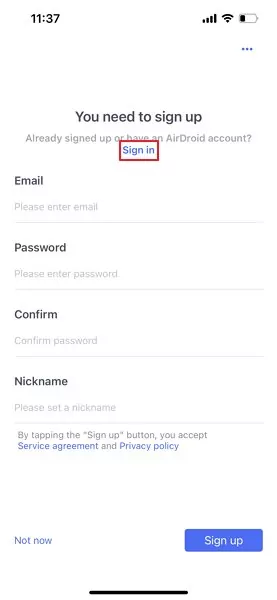
- Install and launch AirDroid Parental Control on your devices. You will be directed to the sign up page. If you have already registered an AirDroid account, please click Sign in.
Part 2: Tie Up Your Kid's Device
We have created a YouTube video to help you understand this guide better and faster.
Video Tutorial: How to Set Up Parental Control for Your Kid's Android Phone
Below are the detailed steps to tie up your kid's device, which will also show on the parent's device.
- Step 1 Download and Install AirDroid Kids on Kid's Device
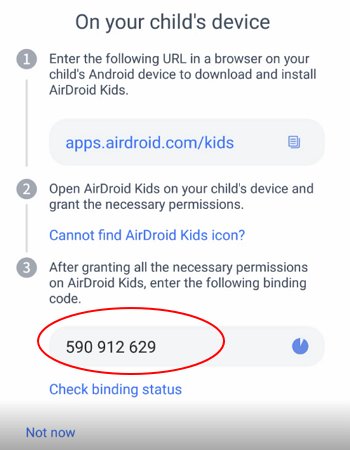
- Tap the following button on your child's Android device to download AirDroid Kids. You may also copy the URL (kids.airdroid.at) and transfer it to your kid's mobile device.
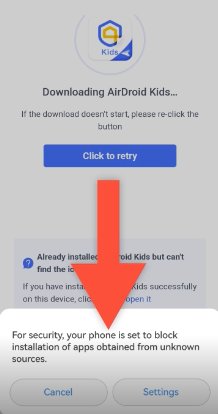
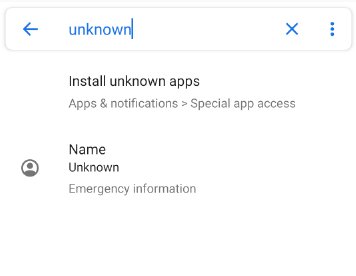
- Open the APK file to install the app. Because AirDroid Kids is not on the Google Play Store, there may be prompt security warning about installing apps from "unknown sources" on some devices.

- To continue installation, tap on Settings > toggle on Downloads from Unknown Sources or something similar that contains "Unknown Sources."

- Now you can go back to the app and continue with the installation.
- Step 2 Tie Up Kid's Devices
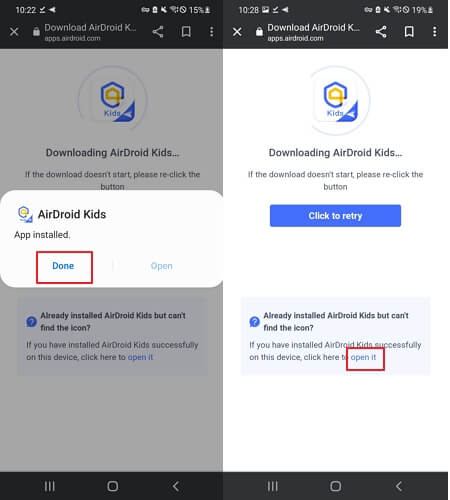
Open AirDroid Kids on your child's device after installation.
Tips:
- Please click Done and open it by click the blue "open it" on the screen in case of the Open icon is greyed.
- You can also use the below ways to find AirDroid Kids icon and open it.

- Enter the binding code to bind the child's device. The pairing code has nine digits which will show on the window of the parent's app.
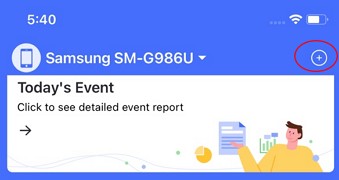
- If you want to bind next to tie up more devices, you can also tap the Add icon to bind more devices next time at the upper right corner of your dashboard.
- Step 3 Set up AirDroid Kids
- Please follow the on-screen instructions to grant the necessary permissions.
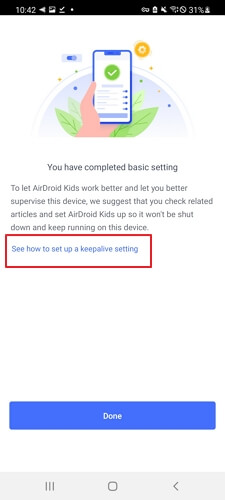
- Tap "Hide and continue" after the setup is completed. It will be better to set up keepalive setting to make AirDroid Kids keep running. Tap Done after finishing the setting.
Here's a video guide to help you tie up: Bind your child's device in AirDroid Parental Control
Note: If you find your Android device can't grant Accessibility Permission in AirDroid Kids, please follow the steps:
Cannot Find AirDroid Kids Icon?
If you can't find AirDroid Kids on the home page of your child's device, refer to the following steps to open it.
Method 1. You can enter *#*#247543#*#* on the dial pad of your child's device to open AirDroid Kids. Please note this method is only available on some devices.
Method 2. Enter the following URL in a browser on your child’s device to open AirDroid Kids.
Part 3: Start Parental Control
Ensure your kid's digital activities are balanced and risk-free with the reliable AirDroid Parental Control solution.
Activity Report
Function
- Check the daily and weekly phone usage details in a timeline format.
- Receive information about the most used apps. You can also know how long and when they were used.
- See how many notifications each app has received.
- Learn which app has used the most data and how much it has used.
- Free to check the activity report of any date within 30 days.
How-to-Use
Step 1. Tap Today's Event at the top of the dashboard.
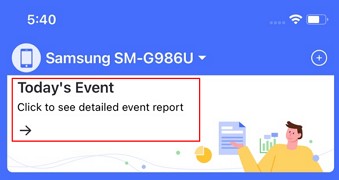
Step 2. Choose whether you want to see a Daily or a Weekly report. The Daily report is the default. You can also swipe the chart left and right to check the activity report of the previous or next day.
Step 3. Scroll to view Screen Time Usage, Most Used Apps, Number of Notifications, or Data Usage.
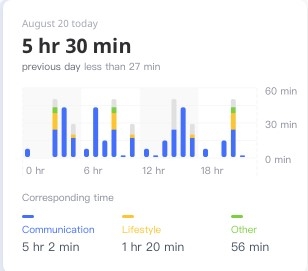
Screen Time Usage
Check when and how long the device has been used. You will know what kinds of apps have been used most. You can also set screen time limits here.
Most Used Apps
Swipe left and right to check the screen time usage of the previous or next day.
Click Screen Time Limits to set screen time or timespan limits.
Number of Notifications
Check how many notifications the kid's phone has received.
Know the name of frequently-notified apps and the times they received notifications.
Click the app name to read the notifications the app has received.
Cellular Data Usage
Find out the cellular data usage of a kid's phone on a specific day.
Check which apps have used data and how much they have used.
Usage Limits
Function
- Block all apps with one tap by using the Disable All Apps feature.
- Set up a screen time limit for the devices.
- Set up a time limit for an app and block the app when the limit is reached.
- Set up Smart Schedule to block a chosen app or disable the phone during a particular time or at a specific place.
- Customize the allowed apps list.
Tap Usage Limits on the dashboard. Click See More in the upper right corner to see the Screen Time Usage report. Tap the switch with Disable All Apps or Forbid New Apps to block all apps or new installed apps.
How to Set Screen Time Limits
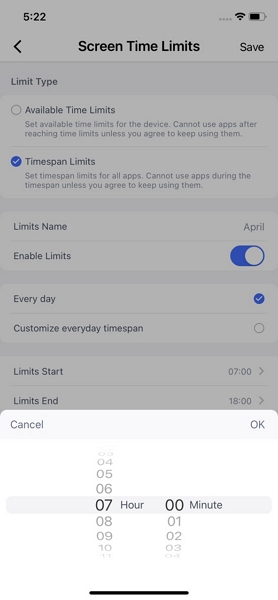
Step 1. Click Screen Time Limits and then tap Add limits. Tick Available Time Limits or Timespan Limits as you like.
Step 2. Suppose you want to set the same timespan limits every day, tick Timespan Limits, type in the Limits Name and tap Enable Limits, tick Every Day, and set available time limits or the start & end times.
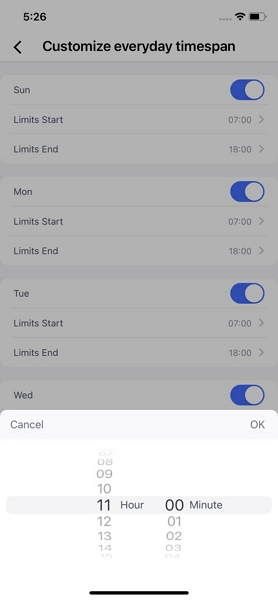
If you want to customize everyday timespan, tick it and set the start & end time from Mon to Sun.
How to Set App Time Limits
Step 1. Click App Time Limits and then tap Add limits.
Step 2. Find the app you want to limit from the catalog or search by its name, then click Next in the upper right corner.
Step 3. Tick Available Time Limits or Timespan Limits from your need. Suppose you want to set the same limits every day, tick Time Limits, type in the Limits Name, tap Enable Limits, tick Every Day, and set available time limits or the start & end times.
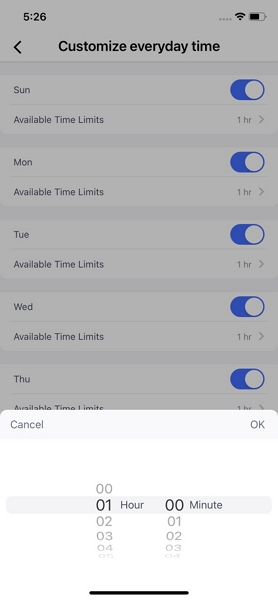
If you want to customize everyday time, tick it and set available time limits from Mon to Sun.
How to Add Apps to Whitelist
Scroll to find the app or search the app by its name. Then click the “+” at the app's left to add it to the allowlist.
If you want to delete an app, click the “-”and tap Delete on the right.
Real-time Location
Function
- Check the current location of your kid's device.
How-to-Use
Step 1. Click the GPS icon at the bottom of the dashboard.
![]()
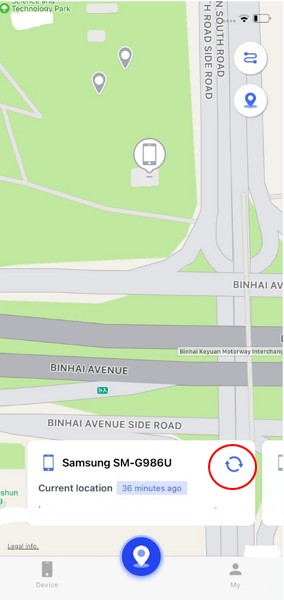
Step 2. You will see the location of your kid's device. To refresh your kid's location, you may also tap on the Refresh icon in the right top corner.
Location History
Function
- Check where your kids have been.
- View location history of the past 15 days.
How-to-Use
Step 1. Tap the GPS icon on the underside of the dashboard.
Step 2. You can check the location history in timeline form.
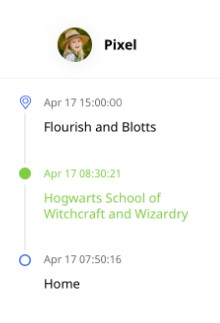
Step 3. Tap on "<" or ">" to check the location history of the previous or next day. Or tap on the date icon to choose the date you would like to check.
Geofences
Function
- Set up a specific area to get notified when kids enter or leave the area.
How-to-Use
Step 1. Click the GPS icon on the underside of the dashboard, and you will see a smaller GPS icon. Tap it and then click Add geofence.
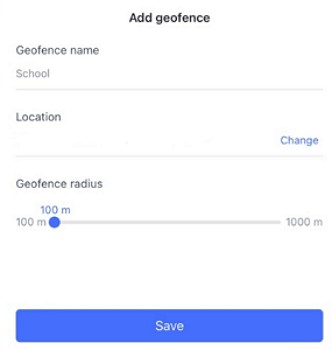
Step 2. Enter a name for the geofence. You can choose to set the current location as the geofence or click Change and search for another place.
Step 3. Swipe the blue dot left and right to confirm the range you would like to apply to the Geofence area and tap Save.
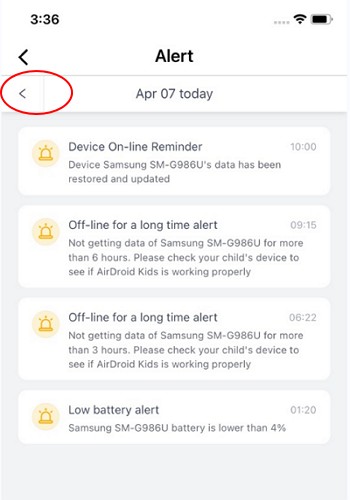
Instant Alerts
Function
- Know whether your kids are in or out of the Geofences.
- Learn whether your kids' phones have enough battery.
- Get alerts if there is no data update for a long time.
- Receive a notification if your kids are trying to open a blocked app.
How-to-Use
Click the Alerts on the dashboard, and you will see all alerts. You can also tap on "<" or ">" to check the Alerts of the previous or next day.
Apps Details & Activities
Function
- Know all apps installed on your kid's phone.
- View what app your kid has added recently.
- See whether the apps are safe for kids.
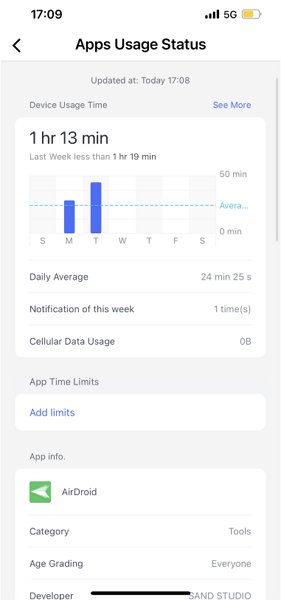
- Check app usage and add time limits for some apps.
How-to-Use
Click App List, and you will find the app recently added and all the apps installed on the kid's phone.
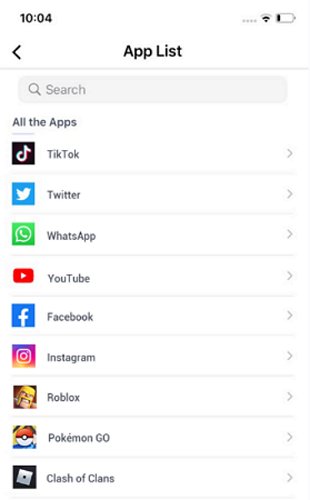
You can also find a specific app by viewing the catalog or searching by its name, then click the app to check its usage & info. or add limits for it.
Social Content Detection
Function
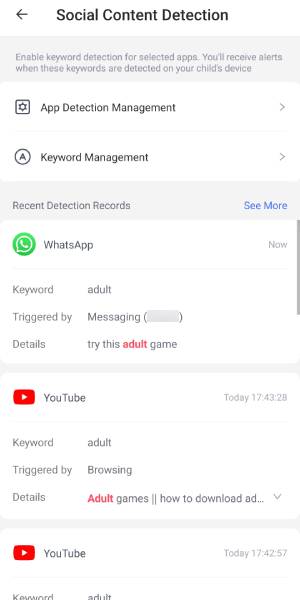
- Monitor content on the child's social media apps through keyword detection.
- Receive instant alerts when keywords are detected, activating the content filter.
- View details of detected keywords.
How to Enable Content Monitoring
Step 1. Click on 'App Detection Management.'
Step 2. Turn on the button of the app you want to monitor.
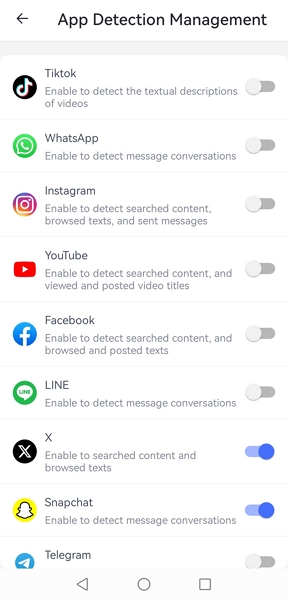
Step 3. Once this is done, the content monitoring will begin, and the app will send alerts whenever keywords you've added are detected.
How to Set Up Keyword Detection for Content Filtering
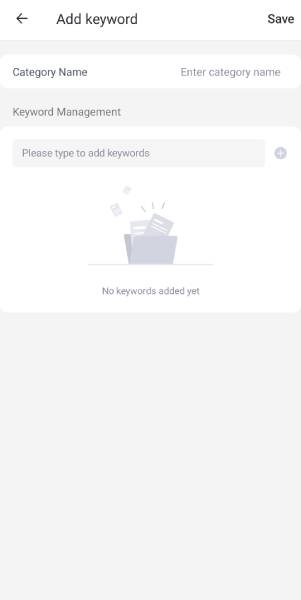
Step 1. Navigate to 'Social Content Detection' and tap 'Keyword Management.'
Step 2. Press 'Create keyword category,' enter the category name, add keywords you want the content filter to detect on your child's phone, and hit 'Save'.
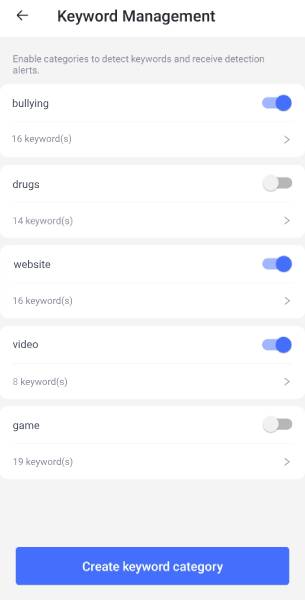
Step 3. Enable the categories that contain the keywords for the content filter.
Managed Browser
Function
- Display your child's browsing history of searches and visits.
- Modify whitelists of URLs to control which websites your child can access.
- Customize blocked websites or select the types of websites to block.
- The browser mode can be set to Whitelist Mode, Block Mode, or Unrestricted Mode.
- Receive alerts when your child attempts to visit blocked sites.
Binding AirDroid Browser on Kid's End (available for iPhones)
Step 1. Download and install AirDroid Browser on your child's iPhone.
Step 2. Get ready the binding code for AirDroid Parental Control. You can find the code in 'My' > 'My Device,' and tap the '+' icon.
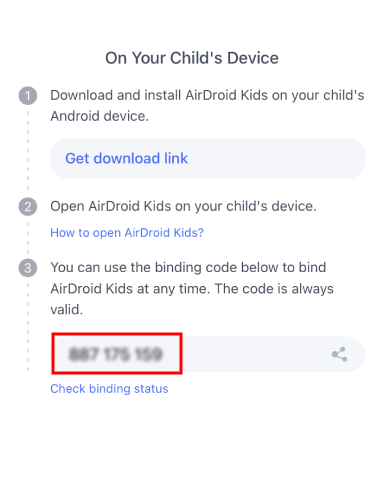
Step 3. Open AirDroid Browser and enter the binding code.
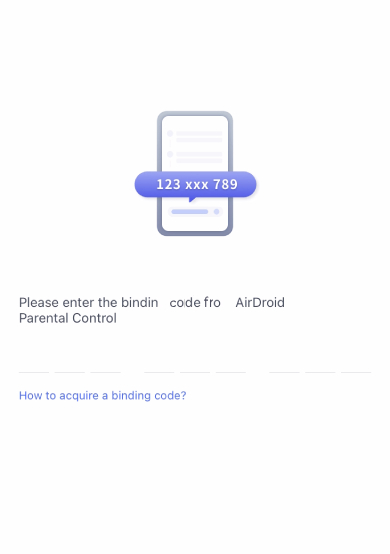
Binding AirDroid Browser on Kid's End (available for Android phones)
Step 1. Download and install AirDroid Browser on your child's Android phone.
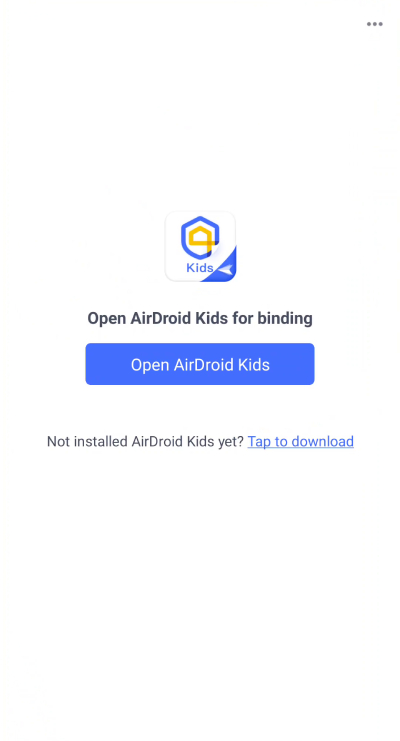
Step 2. Launch the app and click 'Open AirDroid Kids' to bind AirDroid Kids.
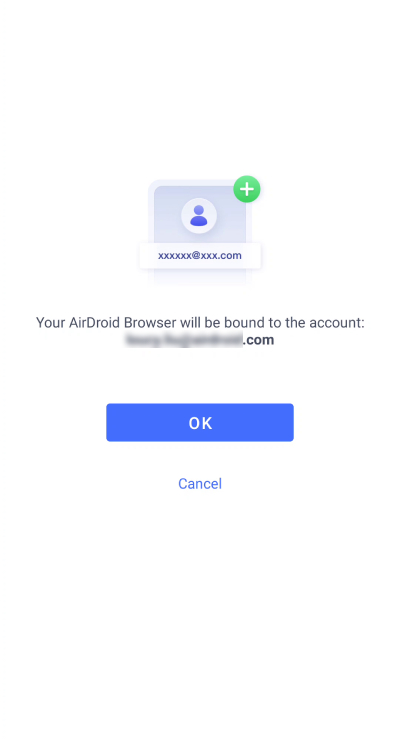
Step 3. Check the account you want to bind. If yes, tap 'OK.'
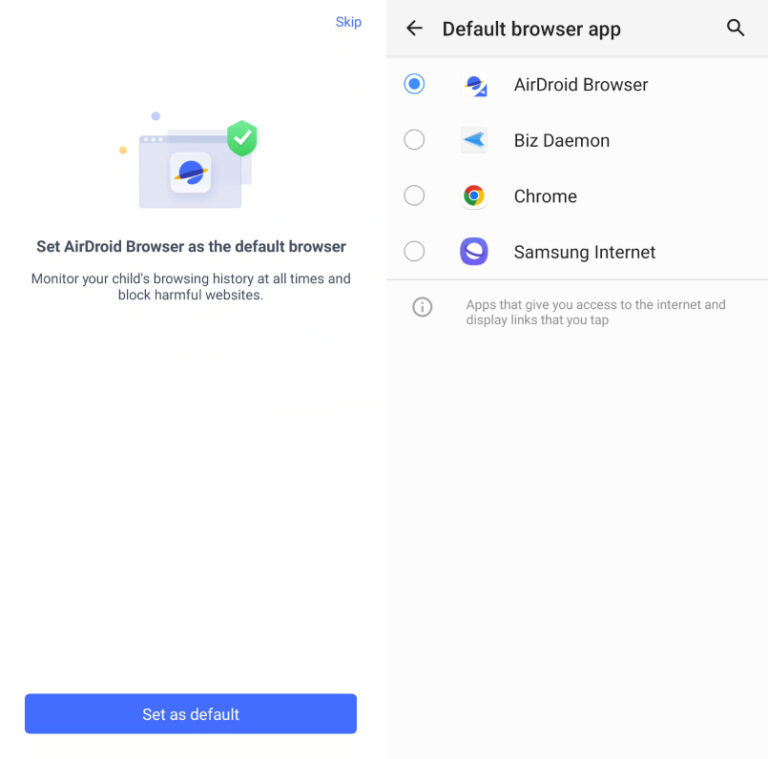
Step 4. Set AirDroid Browser as the default browser to create a healthier Internet environment.
Choosing Management Mode
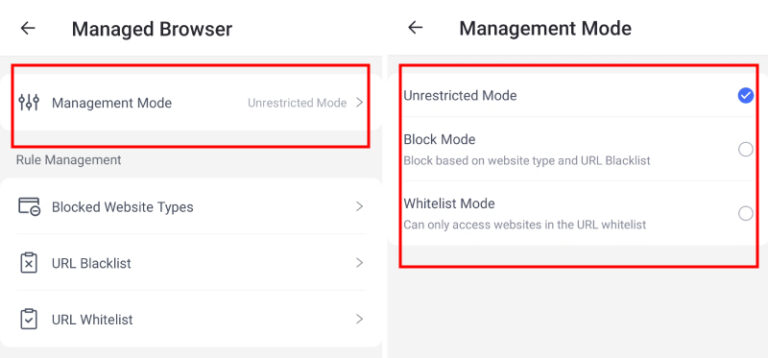
There are three different modes for you to manage the activity on AirDroid Browser.
- Unrestricted Mode: No restrict for the websites your child can visit.
- Block Mode: Blocking the sites you added or the website types you choose to block.
- Whitelist Mode: Where your child can only access the sites you add.
Managing Blocking Rules on AirDroid Browser
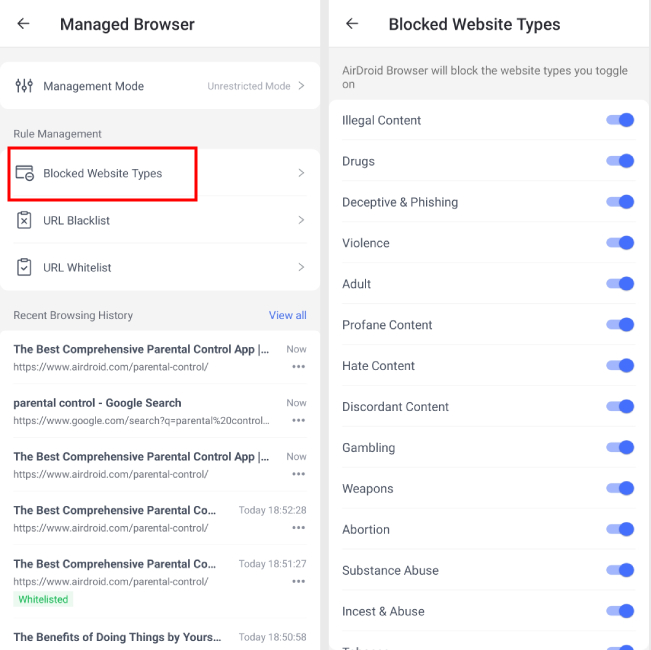
1. Choosing Blocked Website Types
In 'Blocked Website Types,' you can choose which website types to block. This includes common categories that aren't suitable for kids, such as adults, drugs, violence, and more.
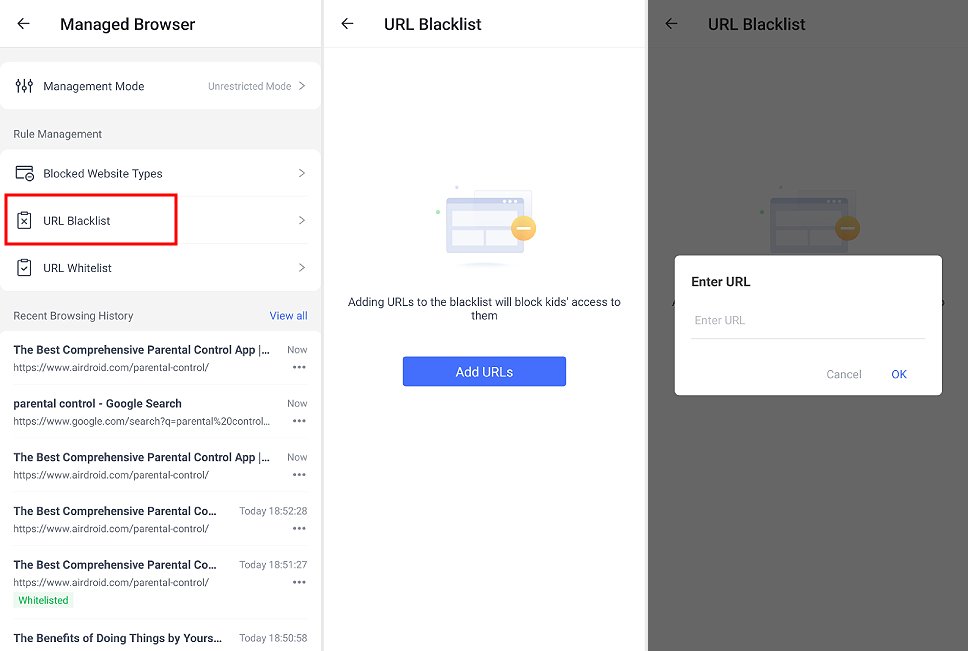
2. Adding the Sites You Want to Block
In 'URL Blacklist,' tap 'Add URLs' to add sites you don't want your child to visit.
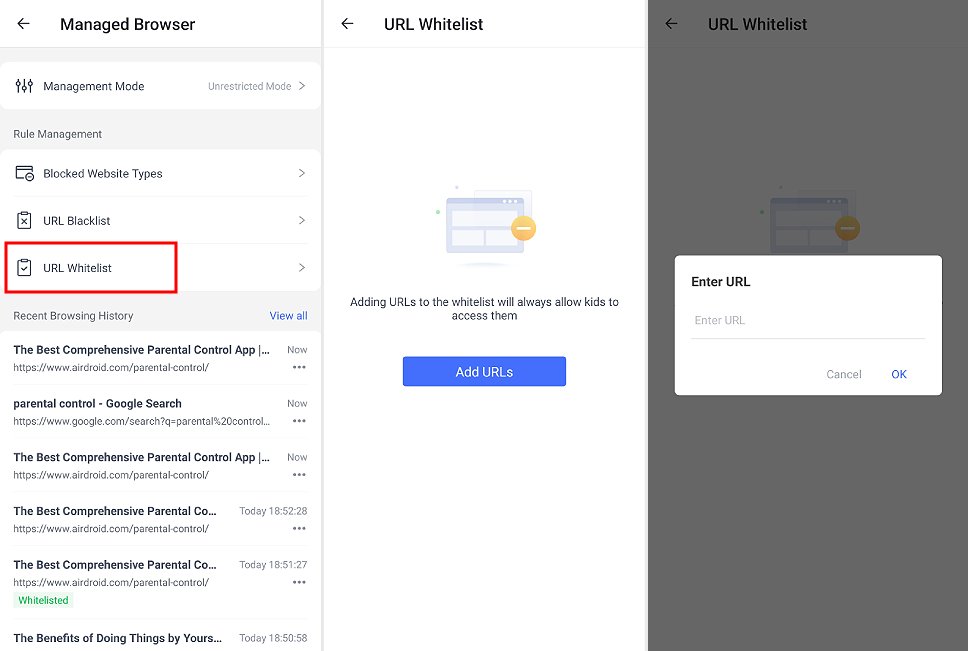
Managing Accessible Websites
In 'URL Whitelist,'' tap 'Add URLs' to add sites you allow your child to visit.
Checking Browsing History
All browsing history appears in 'Recent Browsing History,' including searches and sites they visited or tried to visit.
Click 'View All' to see all entries. These recorded websites will have different marks depending on the mode.
● In 'Whitelist Mode' or 'Blacklist mode,' accessible websites will be marked as 'Whitelist,' while inaccessible ones will be labeled 'Blocked.'
You can click 'Blocked' to see the websites your child has been prevented from accessing.
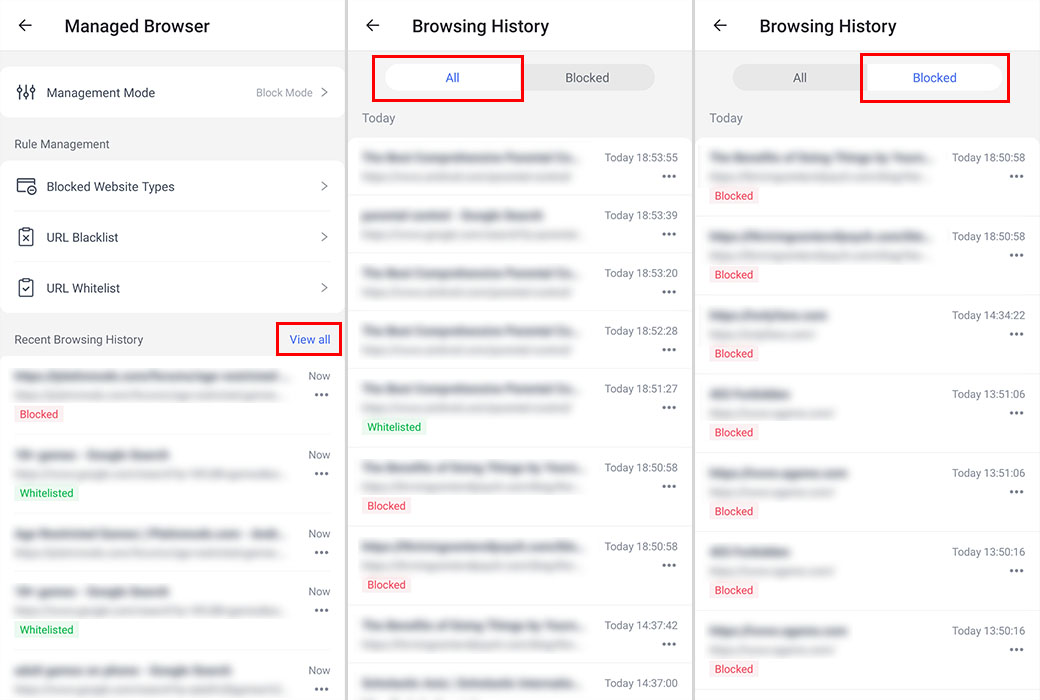
● In 'Unrestricted Mode,' all websites have no labels.
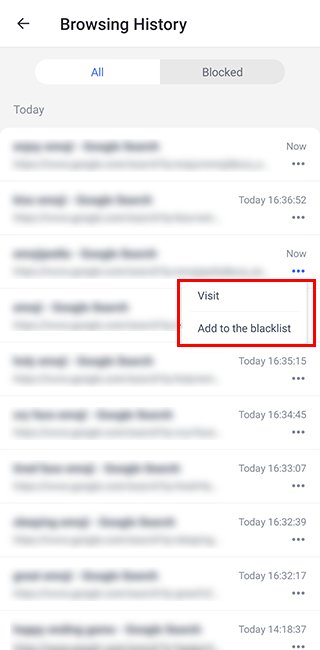
You can click the three-dot button next to the link and tap 'Visit' to check for suspicious websites. If inappropriate for your child, choose 'Add to the blacklist.'
Part 4: Exclusive Features of AirDroid Parental Control
As well as the parental control feature above, AirDroid Parental Control has many exclusive features for parental monitoring. Check these details below:
Remote Control Kid's Phone Camera
Function
- Remotely open the kid's phone camera and switch between front and rear cameras.
- See the background with the cameras of your kids' mobile devices.
- Open the flashlight on kids' phones to get a brighter field of view.
- Enable the one-way audio to listen to the kid's phone surroundings.
How-to-Use
Click the Remote Camera in Remote operations, and you can view the surroundings of your kid's phone.
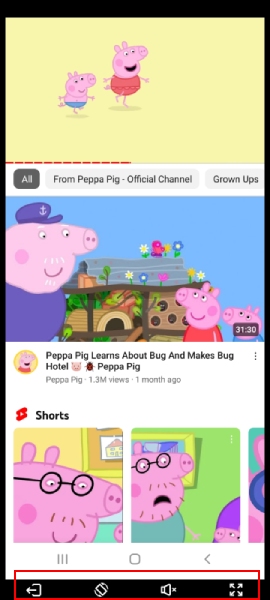
You can also rotate the screen, switch the webcam, full screen, remotely open the flashlight and enable a one-way audio function.

One-Way Audio
Function
- Listen to the environment through the microphones of your kids' phones.
How-to-Use
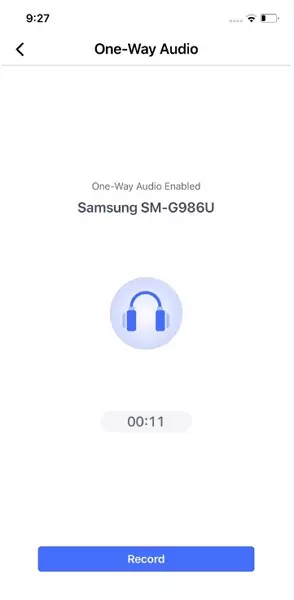
Click the One-Way Audio in Remote operations to listen to the kid's phone surroundings. You can also make an audio recording by tapping Record.
Mirror Kid's Phone Screen
Function
- Remotely monitor your kids' online activities in real-time.
- Ensure your child's digital activities are risk-free.
How-to-Use
Click the Screen Mirroring in Remote operations, and then you can clone the kid's phone screen to your device.
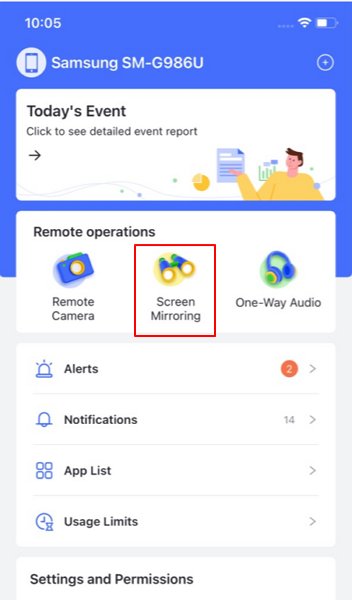
You can also rotate the screen, turn on the one-way sound, and go full screen.
Sync Notifications & SMS
Function
- Check your kid's incoming messages and calls online.
- Monitor social media apps' notifications, such as WhatsApp, Line, and Facebook Messenger.
- Stop cyberbullying and online fraud timely.
- Customize apps to sync notifications.
How-to-Use
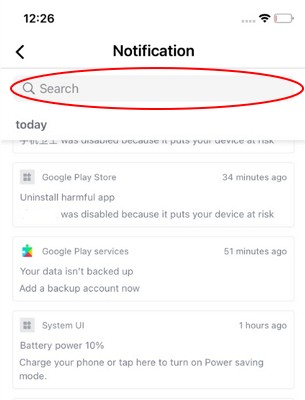
Click Notification, and you will see all notifications your kids have received on their phones.
You can also search whether there is sensitive or suspicious content by search.
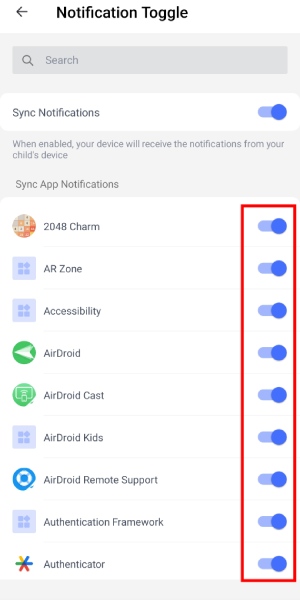
To customize which app you do or don't want to receive notifications for, click the Settings icon at the upper right corner to access the Notification Toggle section, then turn the apps you want on or off.
Leave a Reply.