9 Methods to Setup Windows Kiosk [Single/Multi-app Mode]
Windows kiosk is an essential feature for institutes and businesses that want to control unnecessary usage on corporate devices. Another significant use of Windows kiosks is to provide an interactive user interface for customers to process information, place orders, and make transactions.
They are used in different industries as information kiosks, POS, digital signage, and gaming kiosks for training and educational purposes. In this article, we will discuss different types of Windows kiosk modes and some practical ways to implement them on corporate devices.
1What is Windows Kiosk?
A Windows kiosk is a system configuration that enables users to run only specified applications while limiting other functions and settings.
Two Different Windows Lockdown Kiosk Mode
Single-app kiosk mode
Single-app kiosk mode allows only one app to run on managed devices, blocking all other apps and device functions.
- Organizations primarily use this feature to set Windows devices into information kiosks, points of sales, self-service kiosks, digital signage, and to run private business apps.
- Let’s take an example of KFC. At the reception, they have placed interactive screens showing attractive food images with prices on slides. These devices are set to kiosk mode because no other operation is accessible on these devices.
- Similarly, order-taking staff has kiosk devices with single-app kiosk mode. They can only use the KFC order booking app on these devices to take customer orders.
Multi-app kiosk mode
Multi-app kiosk mode is a special mode for organizations that allows them to restrict Windows devices to multiple but selected apps. It helps them utilize different apps that are necessary to run business operations.
- Business models like COBO (Company-Owned-Business-Only) devices need Windows multi-app kiosk mode to use a single device for multiple purposes.
- Large businesses like call centers hire employees in day and night shifts to manage more employees with less number of devices.
- Management uses multi-app kiosk mode so employees can access relevant apps without changing settings or using unnecessary apps.
2How Do You Make A Windows Kiosk?
2.1Single/Multi-app mode supported Method
AirDroid Business is an MDM solution designed for Windows and Android devices, enabling seamless transformation of single or multiple Windows devices into kiosks.
- Step 1.Sign Up AirDroid Account
- Click the free trial button to sign up an AirDroid Business account.
- Step 2.Enter the dashboard
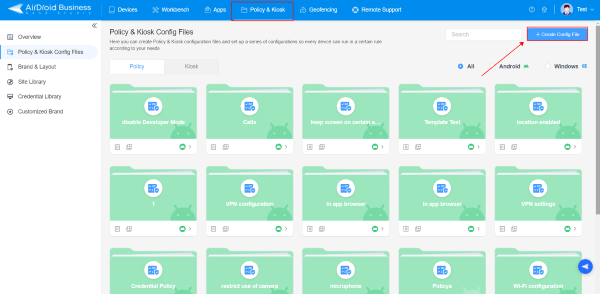
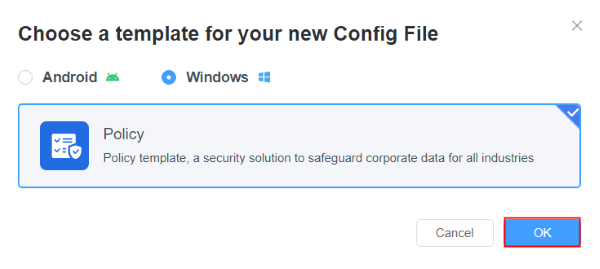
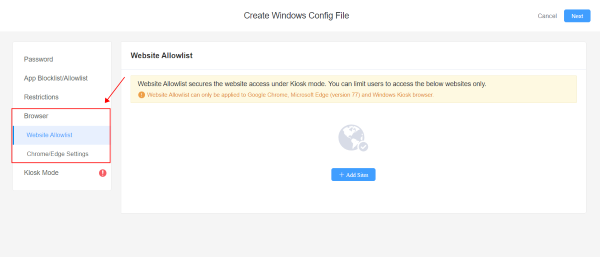
- Go to the AirDroid Business MDM dashboard, click on "Policy & kiosk" > "+Create Config File" > "Windows Policy".
- Step 3.Kiosk Settings
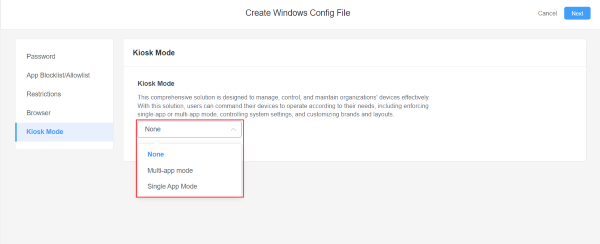
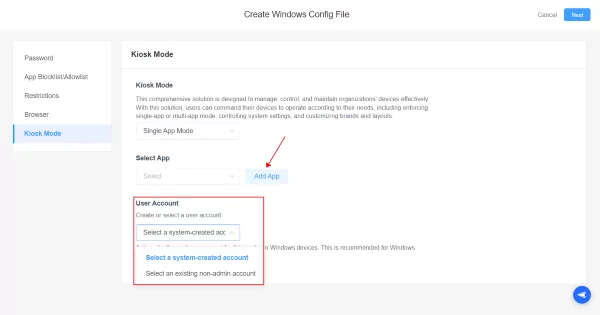
- Open "Kiosk," choose single-app or multi-app mode, select the app(s) to lock down, and choose the user account for this setting. Then, apply the configuration file to your target Windows devices to complete the kiosk restriction.
2.2Windows Single-app Mode
Here are some methods to set Windows devices to single app-kiosk mode. These methods vary with the ability to manage a single device or in bulk. So you can easily find the appropriate solution for your needs.
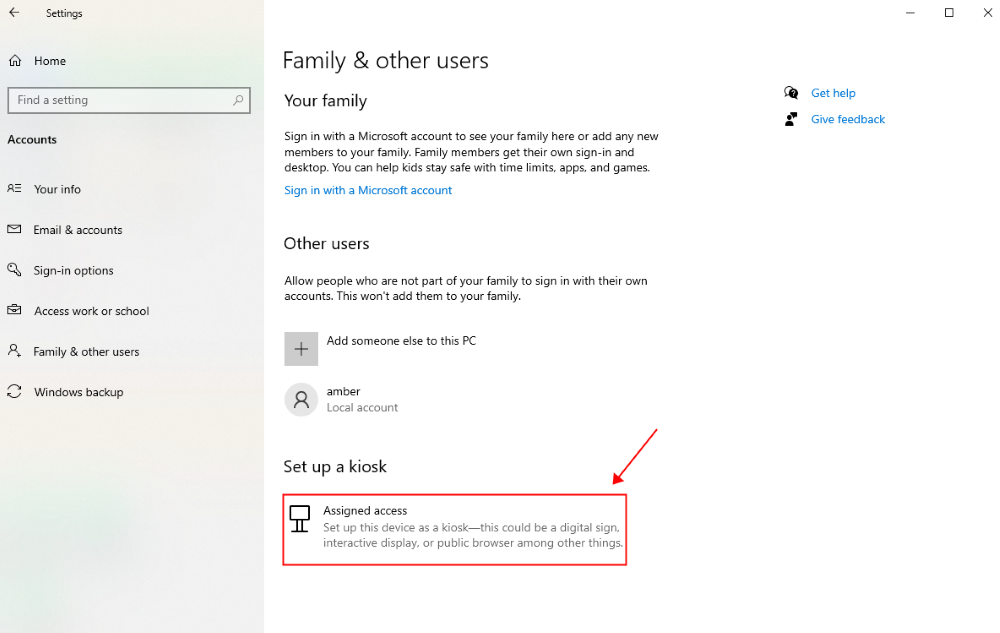
Method 1. Assigned Access in Settings
This method allows individual devices to be set in single-app kiosk mode. It requires no additional downloading of any software or app. You can enable single-app kiosk mode from device settings on Windows devices without paying any costs.
Supported Versions
- It supports Windows 10 Pro, Enterprise, Education, and Windows 11.
Using Steps:
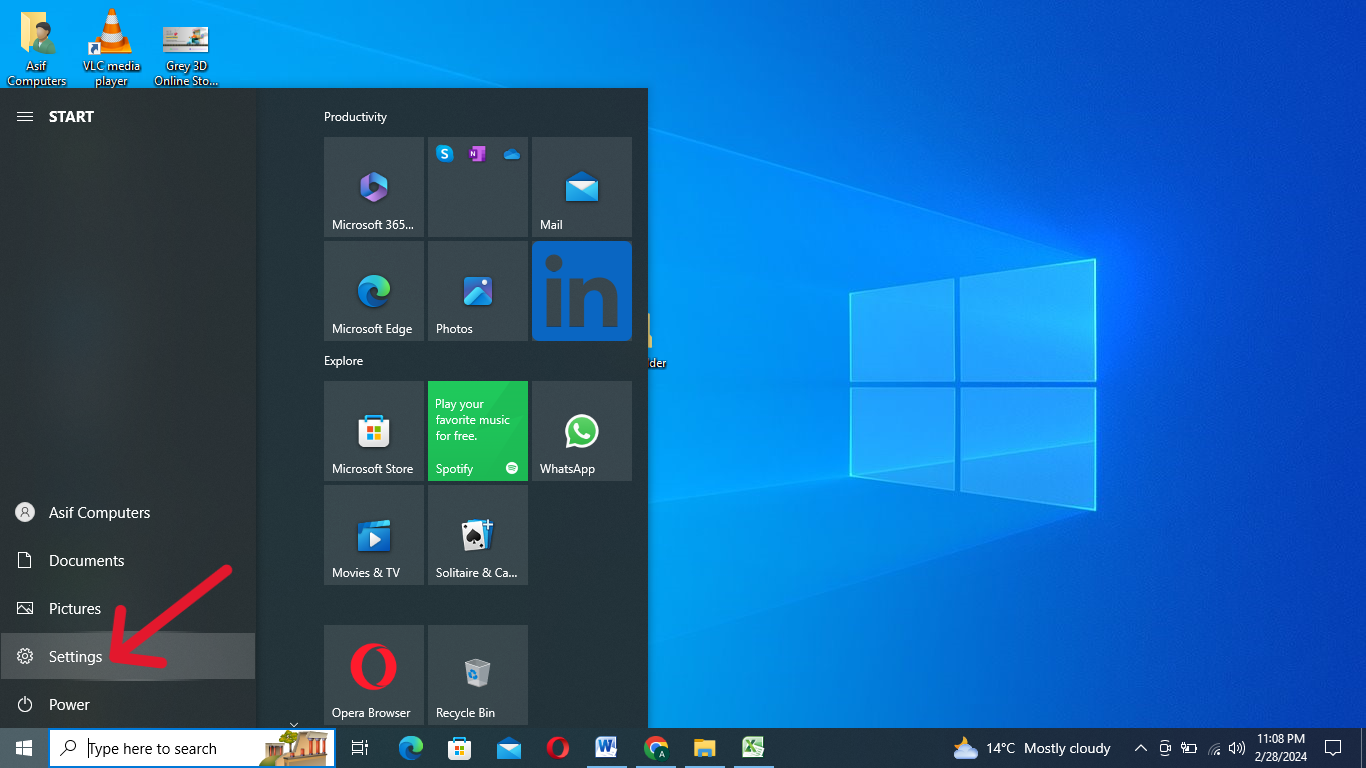
- Step 1: Click the programs menu from the main screen and select the Settings tab.
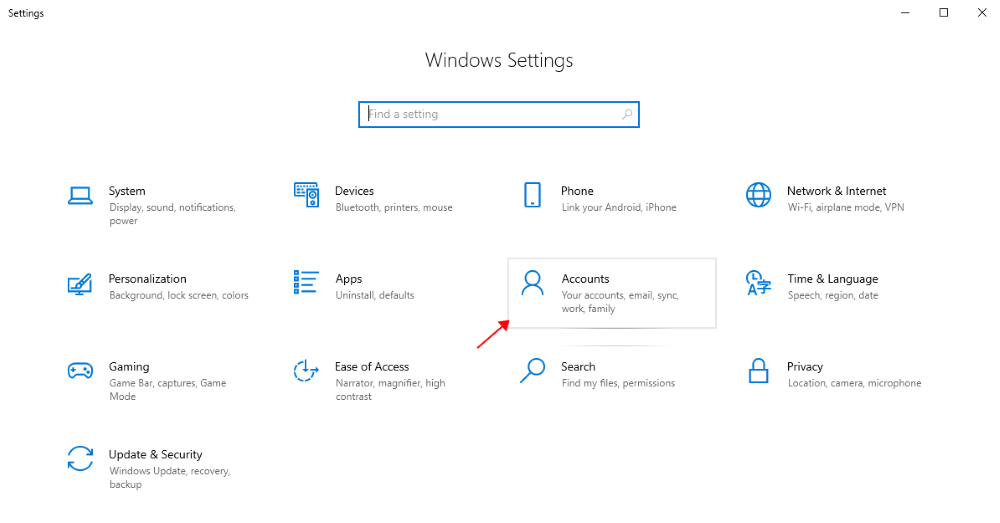
- Step 2: In the Settings tab, select the ‘Accounts’ tab.
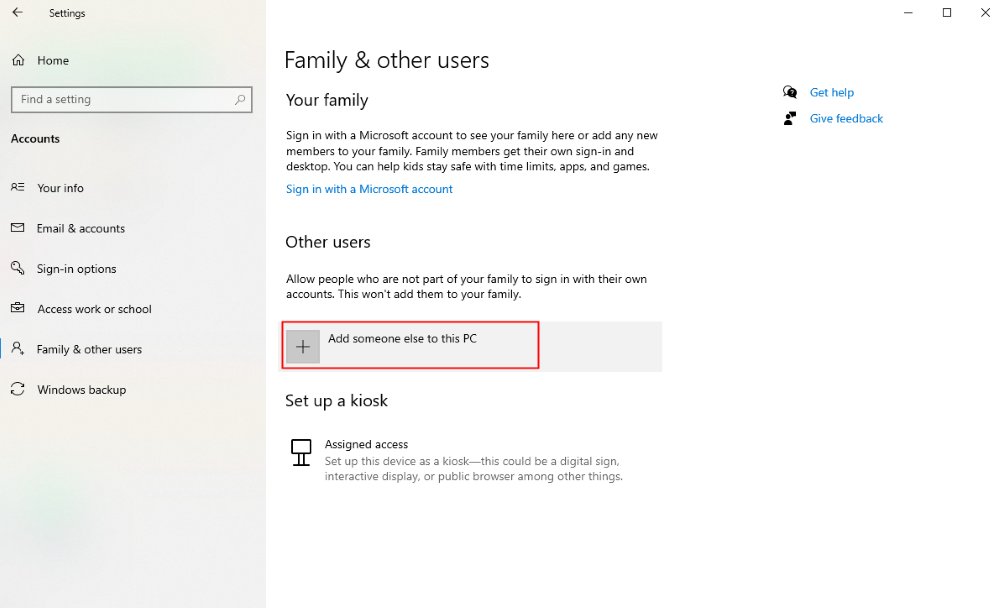
- Step 3: Select the ‘Family and other users’ tab to create a new account.
- Step 4: Click on ‘Add someone else to this PC’ and create a username with a password.
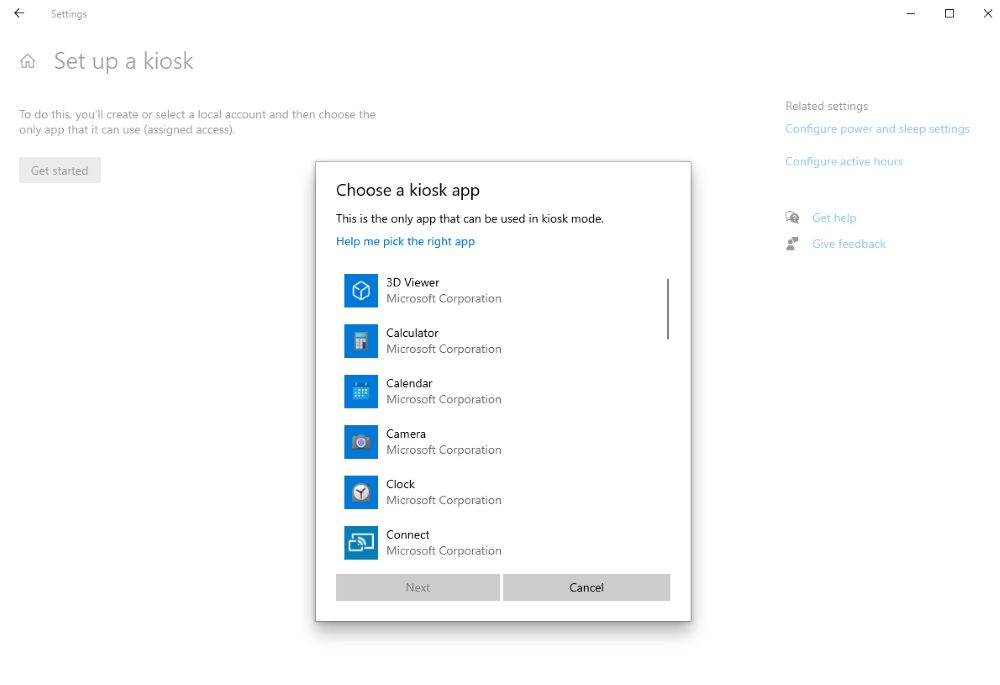
- Step 5: Select ‘Set up assigned access’ after creating an account.
- Step 6: Choose the account you created for assigned access and the app you want to run in single-app kiosk mode.
- Step 7: Close all tabs and sign out the current account. Sign in with the kiosk account, which will open the selected app in full-screen mode.
Method 2. Assigned Access Cmdlets
Windows PowerShell cmdlets are also helpful in setting single-app kiosk mode on individual or multiple devices. It requires creating a user account and installing a desired app for that specific account. Assigned Access Cmdlet only support UWP apps and not the desktop apps.
Supported Versions
- It supports the same Windows versions as assigned access supports, i.e., Windows 10 Pro, Enterprise, Education, and Windows 11.
Using Steps:
It requires a Windows UWP app to provision as this method does not support desktop apps and a local user account to use as assigned access.
- Step 1: Download your wanted app from Microsoft App Store. Prefer downloading the app using Microsoft 365 Admin portal to seamlessly provision the app for all users.
- Step 2: Open Windows PowerShell ISE app and select ‘Run as Administrator.’ The below script will enable you to provision kiosk app on the device. You can also change the app name in the script to another one.
- Step 3: Create a new Assigned Access account if you don’t have it. Use the following PowerShell script to create it:
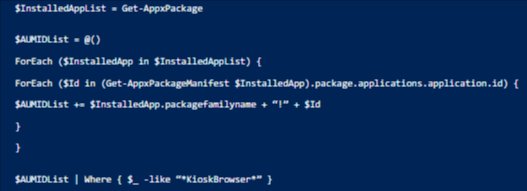
- Step 4: Now you need to create AUMID (Application User Model ID) for the selected app. Here is the script to create it:
- Step 5: After completing above steps, execute Set-AssignedAccess cmdlet by mentioning the account name and the AUMID for desired app. Here is the format:
- Step 6: Restart the device and sign in with the new created account. The single-app kiosk mode will execute with restricted features like no toolbars and no keyboard shortcuts.

Method 3. The Kiosk Wizard in Windows Configuration Designer
Windows Configuration Designer tool is developed by Microsoft to configure Windows devices particularly for corporate sector. It enable IT admins to create provisioning packages for better management of Windows devices when applied on Windows devices.
Kiosk Wizard is a part of feature of Windows Configuration Designer tool to customize settings in a provisioning package including the device name, configuration for shared use, remove installed software, create local administrator account, and add certificates and apps.
User need access to Windows Configuration Designer tool, provided by Microsoft and is free to use.
Supported Versions
- It supports Windows 10 Pro version 1709+ for UWP only, Windows 10 Enterprise and Education for UWP and desktop, and Windows 11.
Using Steps
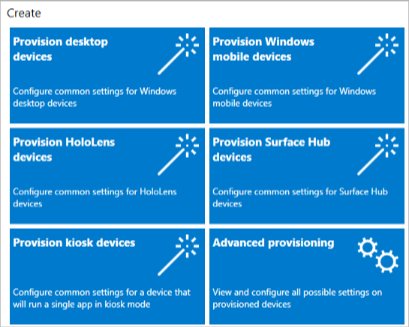
You can configure the kiosk to run UWP or Windows desktop applications by choosing the Provision kiosk devices wizard in Windows Configuration Designer.
- Step 1: Install the Windows Configuration Designer and open it to select the Provision Kiosk devices tab. Name the project and select the ‘Next’ button to configure settings.
- Step 2: Configure the settings for device setup after enabling it. Similarly, it allows network setup, account management, adding applications (name and path), and certificates.
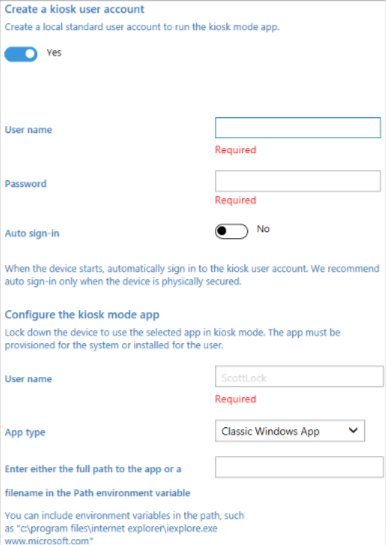
- Step 3: Now configure a kiosk account and the kiosk mode app.
Method 4. Microsoft Intune
Microsoft Intune is an MDM solution that supports Windows devices set into kiosk mode. This method is appropriate for organizations to manage bulk devices for a company.
It is a Universal Windows app, and the supported account types are local standard user accounts and Microsoft Entra IDs.
Microsoft Intune uses an AssignedAccess configuration service provider to enable kiosk configuration. It contains the KioskModeApp setting, where you can enter the user account name and the AUMID for the app to apply kiosk mode.
Supported Versions
- It supports Windows 10 Pro version 1709+, Enterprise and Education, and Windows 11.
Method 5. Shell Launcher V1 & V2
Shell Launcher is a comprehensive way to launch any app as custom shell on Windows devices. It is free to execute from control panel. You only need to replace the default shell with your desired app to run in kiosk mode.
It is an optimal feature that is, by default, turned off and needs to be turned on when required. Shell Launcher needs to turn on before Installation of Windows but if it is already installed, then you need to turn it on before applying the provisioning package.
Supported Windows
It is applicable on Windows 10 Enterprise or Windows 10 Education only. You can enable the launcher using the control panel, DISM, or by calling WESL_UserSetting.
Turn On Shell Launcher from Control Panel
- Step 1: Open control panel on your Windows device and select ‘Search the web and Windows’.
- Step 2: Find ‘Programs and Features’ tab and open it to select ‘Turn Windows features on or off.’
- Step 3: Find ‘Device Lockdown’ node and expand it to select ‘Shell Launcher’ tab. Then press ‘OK’.
- Step 4: A progress bar is displayed indicating that changes are being applied. Once completed, you will get notified that requested changes are complete. Now you can close the Windows feature. No restarting to device is required after this process.
2.3Windows Multi-app Mode
Method 1. Microsoft Intune
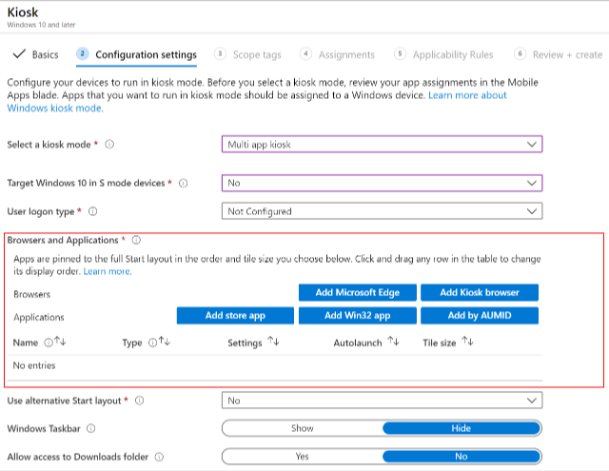
You can only use Microsoft Intune to configure multi-app kiosk mode on Windows 10 devices. If one app depends on the other, then you must add both apps to the allowed list during multi-app kiosk mode to run smoothly.
Select the multi-app kiosk mode and then manage other configuration options as needed. In the browser and application tab, add multiple apps you want to run in kiosk mode as you selected multi-app mode. You can also choose to manage an alternative start layout, Windows taskbar, and permission to access downloaded files.
Method 2. MDM WMI Bridge Provider
WMI stands for Windows Management Instrument. Business entities can use WMI bridge provider to configure MDM_AssignedAccess class. For WMI Bridge method, you need to create your own multi-app kiosk XML file. Users can run multi-app kiosk mode on Windows 10 and 11 with this method.
WMI Bridge method allows assigned access user account to be an AD user account, the assigned app for kiosk mode to be desktop or Window 32 application, and the parameters to be specified for both desktop and Windows 32 application.
Using Steps
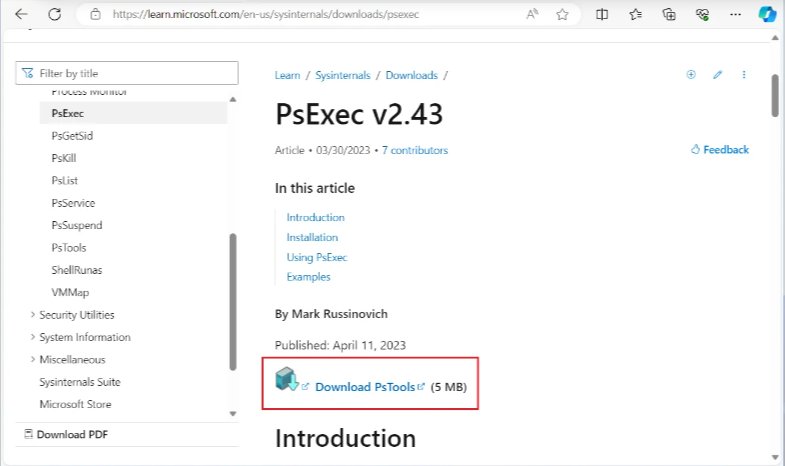
- Step 1. You need to execute PowerShell script in System context to run MDM_AssignedAccess. So download psexec tool from PsTools bundle provided by Sysinternals. Open the download file and extract the files in it.
- Step 2. Run psexec.exe –i –s cmd.exe command on the command prompt.
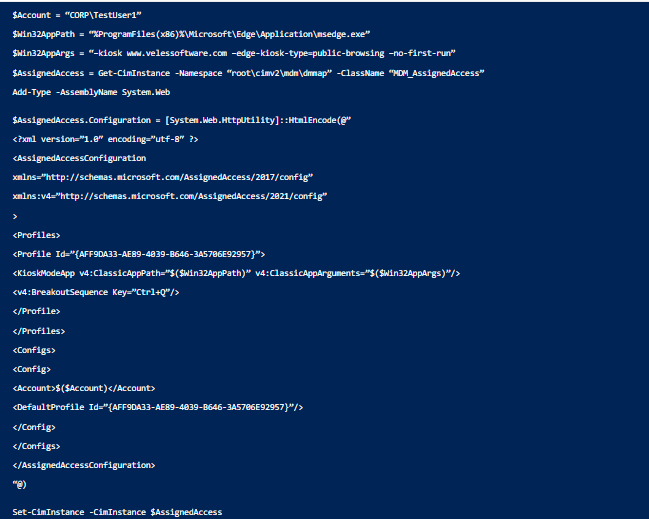
- Step 3. Launch PowerShell or PowerShell ISE and add the following script:
- Step 4. It will enable you to turn on kiosk mode with AD user account with the help of Bridge WIM Provider. Here we will use assigned access configuration XML for MDM_AssignedAccess WMI class.
After execution, restart the device to sign in with designated Ad account that was mentioned in the PowerShell script. The kiosk app will open on the screen with specific limitations at instructed in the script.
Method 3. XML in a provisioning package
To use XML in a provisioning package, you need to create your own XML file first. XML stands for eXtensible Markup language similar to HTML. Its primary goal is to store and transport the data.
Data is enclosed in tags and they define the meaning and structure of data. XML focused on what data is while the HTML focuses on how data looks. It stores data in simplest form, streamlining ways for hardware and software tools easily store and share the data. It is a free to use method that demands administrative access to make changes.
XML in a provisioning package involves three basic steps:
In involves three basic steps:
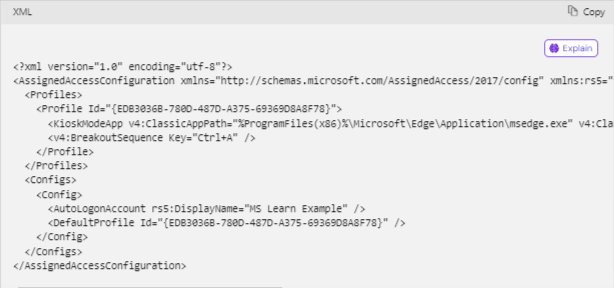
- Step 1.Create XML file
- Create a profile which defines allowed apps and the layouts. Each profile is identified with a unique id and then add the apps to run in kiosk mode.
Config section associates account with the profile. Multiple configs can use the same profile. In this section you identify the account. You can also decide to display or hide the taskbar as required.
- Step 2.Add XML file to the provisioning package
- Open Windows configuration designer, add the XML file to the provisioning package. Expand runtime settings, and then assigned access. Then open multi-app assigned access settings. Browse and select XML file to upload and save it. Then export it as a provisioning package.
- Step 3.Apply provisioning package to the device
- Provisioning packages can be applied on a device during initial or final setup.
For initial setup, start from initial setup screen and insert the USB drive. If there is one provisioning package, the device will automatically apply it.
But if there are multiple packages then Windows will ask how you want to proceed. Select ‘Install Provisioning Package’ and press the ‘Next’ button.
Select a provisioning package and click ‘Yes’ to initiate installation process. After installation, it will apply on the device.
Once it’s done, you can remove the USB drive from the device.
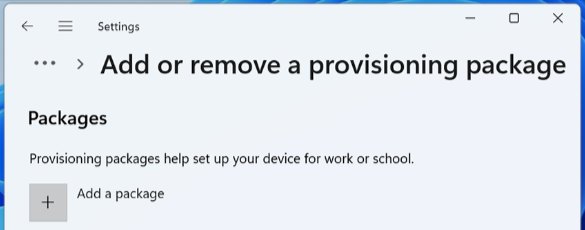
For after initial setup, you need to open device Settings and choose Accounts tab. Then select ‘Access work or school’ and then ‘Add or remove provisioning package’. Select ‘Add package’ to select the file. First choose the method, then the provisioning package to launch on the device and confirm to initiate.
3Key Configuration Options of Windows Kiosk Mode
Windows kiosk mode offers several customization options to optimize kiosk usage. These configurations help ensure the devices are tailored to the specific business needs. Here are some essential configurations users need to know while setting kiosk mode:
Group Policy
Settings made in group policy impact all the devices in a business network except the admin devices because they are the prime controllers and managers of all business operations, whether done through assigned access or not.
Group policy helps to create Assigned access, which helps to restrict device usage to specific applications. Assigned access is particularly useful for assigning single-app kiosk mode.
Group policies also help customize various user experience aspects, such as taskbar settings and clearing the history of recently opened documents. Enabling ‘Prevent access to drives from My Computer’ allows users to browse the directory structure but cannot access any file from the computer or the run program. Although the files will appear, they will not be functional and display a message that they are restricted.
Some essential configuration options under group policy include:
- Prevent users from customizing the Start Screen
- Prevent users from uninstalling applications from the Start
- Remove the Run menu from the Start Menu
- Disable showing balloon notifications as toast
- Do not allow pinning items in Jump Lists
- Do not allow pinning programs to the Taskbar
- Do not display or track items in Jump Lists from remote locations
- Remove Notifications and Action Center
- Lock all taskbar settings
- Lock the Taskbar
- Prevent users from adding or removing toolbars
- Prevent users from resizing the Taskbar
- Remove the frequent programs list from the Start Menu
- Remove the Security and Maintenance icon
- Prevent access to drives from My Computer
- Remove All Programs list from the Start Menu
- Remove the Sign Out option in the Security Options UI
- Remove the Change Password option in the Security Options UI
- Remove Task Manager
Group policy allows you to enable or disable these options per company requirements.
Customize the appearance
Windows kiosk mode allows admins to set configurations to provide interactive visuals for devices in kiosk mode. It includes the visual settings for the start menu and the Taskbar to display necessary apps.
Customization of themes, logos, backgrounds, removal or addition of Taskbar, and addition of images and logos help to create a brand-oriented kiosk appearance to improve brand visibility and provide a user-friendly interface to the users.
Kiosk Browser
Kiosk browser provides one of the safest browsing experiences for businesses. Devices set in kiosk mode are optimized and managed to ensure safe internet usage by adding limitations for safe and necessary usage.
Assigned access with Microsoft Edge provides a full-screen display of the browser to restrict other functions and keep devices operational for business use. Utilizing customization options like running the browser in incognito mode strengthens device and data security.
Security and Privacy
Managing settings for Windows Defender allows admins to ensure real-time protection against malicious attacks and cyber threats. Adding privacy settings helps to prevent data sharing by unauthorized users. By restricting external device connections and messaging apps, admins are able to prevent data leakage from devices in kiosk mode.
Network Settings
Configuring proxy settings lets you control internet access for kiosk devices and enhance security by limiting internet browsing using web filtering.
Setting up wireless network policies or settings allows users to connect only to the secure network allowed by the admins.
4Which Type of Kiosk Mode is Suitable for You?
Users can be allowed to choose different modes depending on the usage scenarios. Providing access to multiple apps on a self-service kiosk device will let users waste time on unnecessary usage instead to the prime purpose it is installed for, leading to time waste. Setting it to single-app kiosk mode with only app to perform transactions will save everyone’s time and transactions will be performed quickly.
The multi-app kiosk mode benefits organizations with multiple members accessing a single device to perform numerous operations. It is essential in offices to provide a broader area for employees to work, prioritizing the necessity of work.
Almost all hospitality, healthcare, education, transportation, and food industries need interactive kiosks. Healthcare institutes need self-service kiosks to help patients check doctors' availability and schedule appointments.
Airports and railway stations need interactive kiosks to enable travelers to seamlessly check flight schedules and book tickets. POS systems at retail help customers pay bills after purchasing.
Educational institutes need self-service kiosks for students to check results, get updated with current admission details, and contact relevant faculty members. All these operations are done using single-app kiosk mode.
5Conclusive Note
Windows kiosks are a cost-effective and efficient way to streamline business operations by limiting and controlling employee device usage. With Windows kiosk mode, enterprises can turn simple PCs and other Windows devices into interactive kiosks to ease the process of device management.
AirDroid Business MDM is a powerful solution that provides kiosk mode for Windows 10 and later. Other methods to implement single app kiosk mode include assigned access settings and cmdlets, the kiosk wizard, and ShellLauncher. Microsoft Intune allows single-app kiosk mode for Windows 10 and 11, but it only supports Windows 10 for multi-app kiosk mode. For Windows 11, you need to use the WMI bridge provider or XML provisioning package method.





Leave a Reply.