How can I set up System Update Policy in AirDroid Business for optimal performance?
Controlling System updates of devices is crucial for maintaining optimal device performance and security.
An outdated system may not perform as efficiently as a newer system. Over time, this can lead to slower device performance, decreased user satisfaction, and potentially costly maintenance issues. Additionally, this can pose a significant security risk as the old system is vulnerable to malware or hacking.
However, when an enterprise needs to manage a large number of devices, it becomes a big challenge to keep the system of each device consistent with the latest version. Manually performing system updates on each device can be very time-consuming.
Furthermore, incompatibility issues may occur between new system updates and existing software or applications on the device, leading to functionality problems.
Additionally, unplanned updates can disrupt work processes, especially during critical work hours. This can lead to downtime and lost productivity.
Therefore, effective control and management of system updates are essential in preventing these potential problems and ensuring a smooth, efficient, and secure operational environment. This is where the System Update feature of AirDroid Business comes in.
1What is the System Update Feature in MDM Policy?
The "System Update" Policy in AirDroid Business allows administrators to control how system updates are handled on the devices. Specifically, it can be set to allow users to configure updates based on their preferences when system updates are available. This gives users the flexibility to choose when and how to install updates, which can reduce potential disruptions to their work, ensure device compatibility and maintain device performance.
2How to set up a System Update Policy in AirDroid Business?
Follow these steps to set up the System Update Policy:
- Step 1Access Policy Setting
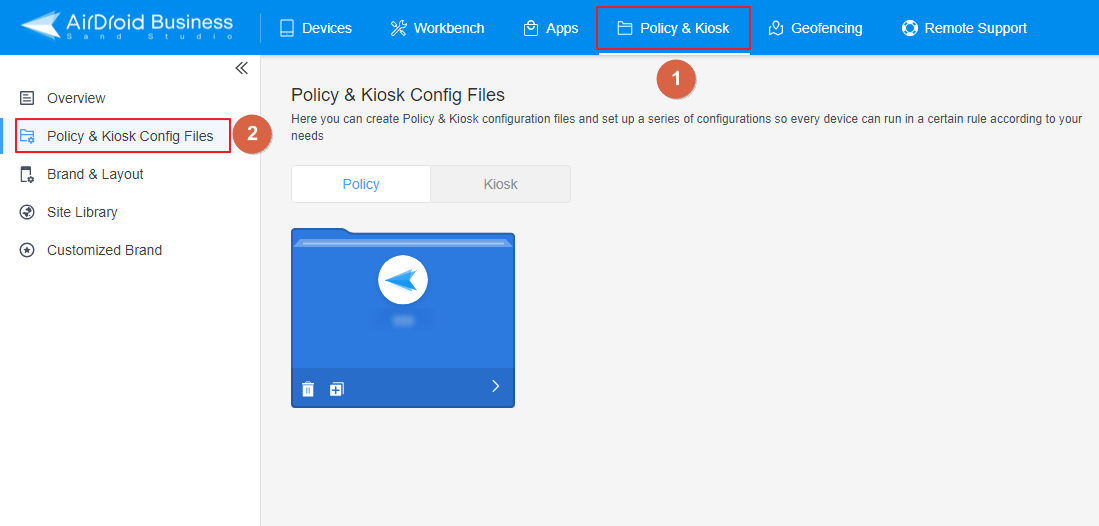
- Log into Admin Console, navigate to the "Policy & Kiosk" Section on the dashboard, and click "Policy & Kiosk Config Files".
- Step 2Create or Edit a Policy
- In this section, you can either create a new policy or modify an existing one.
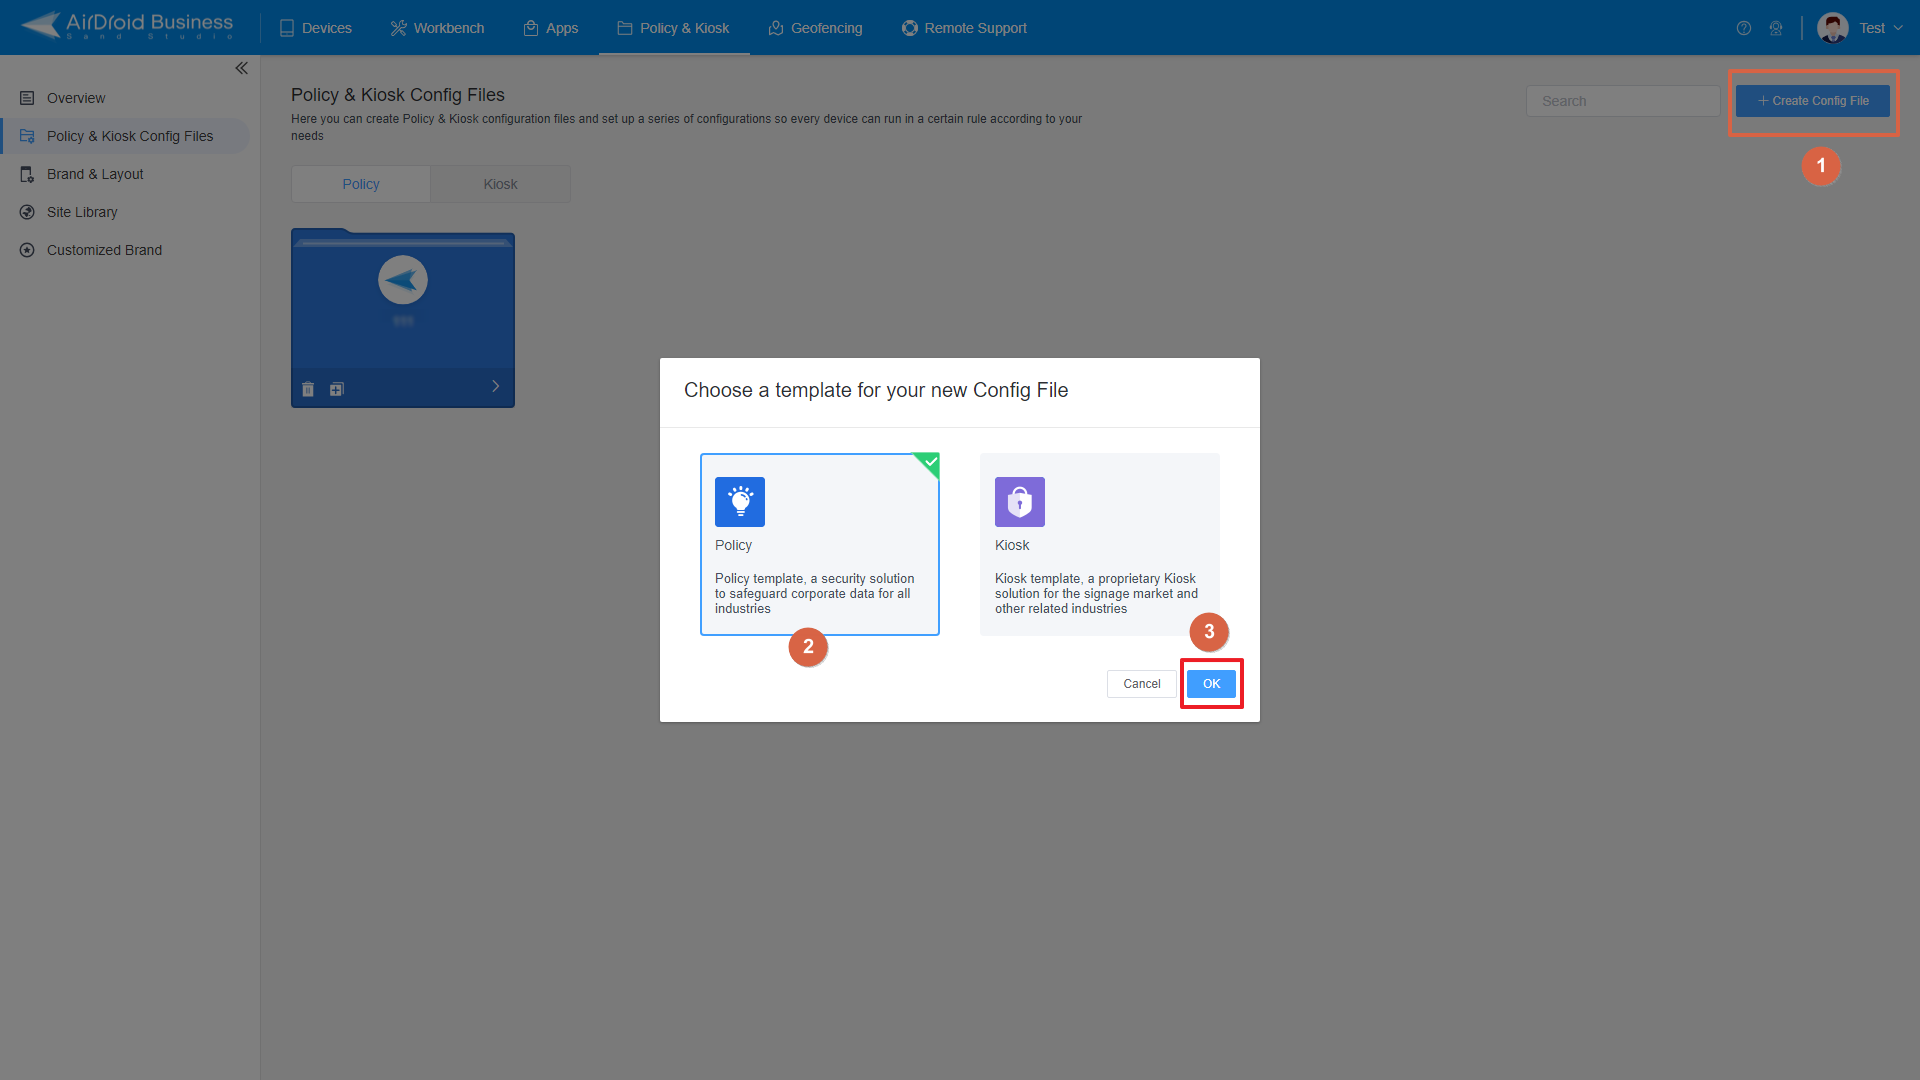
- To create a new policy, click on "+Create Config File", choose "Policy" and then click "OK" on the pop-up.
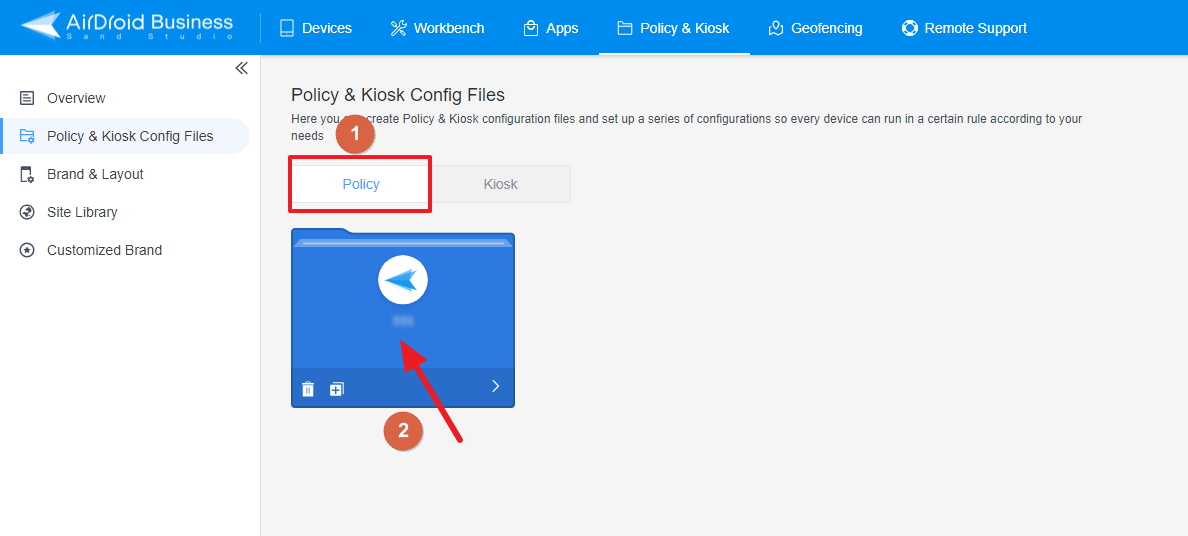
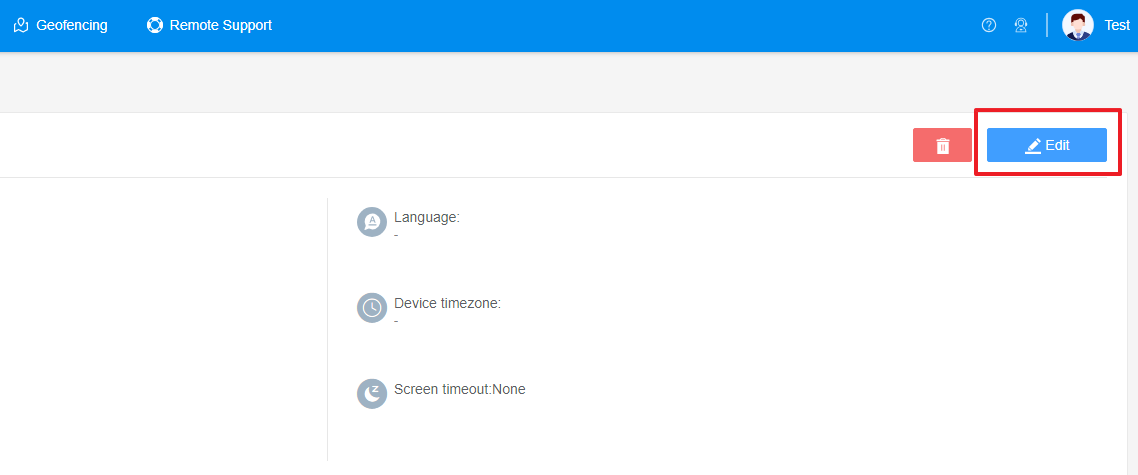
- To create a new policy, click on "+Create Config File", choose "Policy" To modify an existing Policy, switch to the "Policy" tab, select the Policy File you want to modify.Click on the "Edit" Button in the top right corner. On the following page, you can set all kinds of limitations and settings for your config file.
- Step 3Access the "System Update" Policy Setting Section
- In this section, you can either create a new policy or modify an existing one.
- Click on [Restrictions], and find the "Device Fuction" section. Here, you'll be able to configure "System Update" Policy Setting.

- Step 4Set up the "System Update" policy
- Here, you have several options:
- This option imposes no limitations or restrictions on system update.
- If enabled, this setting will automatically install any available system update and reboot the device without requiring user permission.
- For example, if you want all the devices you manage to always keep the system up to date, you can choose this option.
- This option will defer system update for up to 30 days.
- For example, If the new system version is not compatible with some applications, you can choose this option to defer the update to avoid the problem of application unavailability.
- This option allows you to set a maintenance time window to push out update and insert a start and end time of the maintenance window.
- By setting "Windowed update", administrators can schedule system update during off-business hours to minimize the impact on users.
- For example, the administrator can set the system to update at night or on weekends so the user does not disturb the normal work or use. At the same time, this can also ensure the performance and availability of the device during the critical time.
- For example, the administrator can set the system update at night or on weekends, so that the user does not disturb the normal work or use. At the same time, this can also ensure the performance and availability of the device during the critical time.
- Choose the option that best suits your organization's needs.

1None
2Auto update
3Defer update
4Windowed update
- Step 5Click "Save" and Apply the Policy
- After setting up the System Update Policy, click "Save" button on the top right corner.
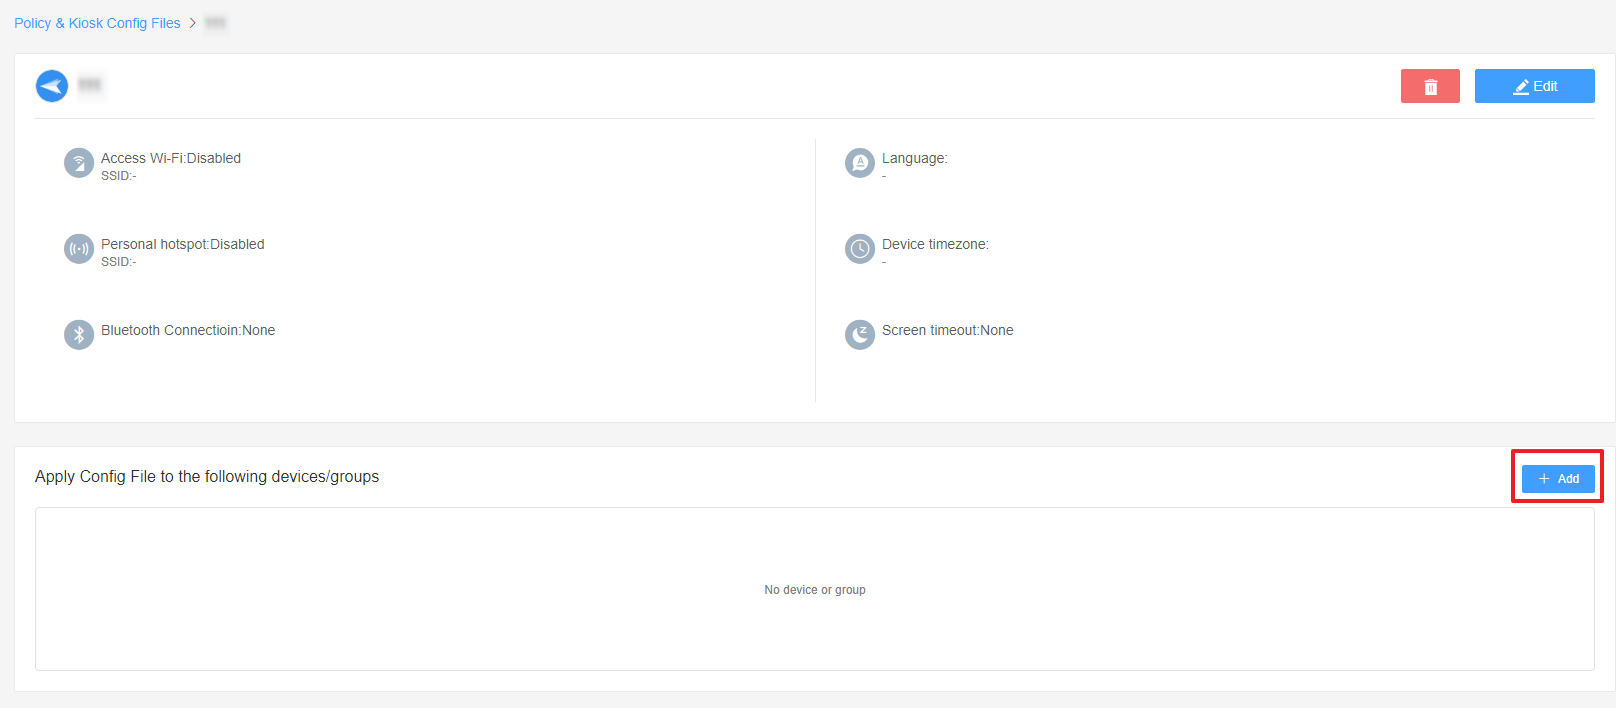
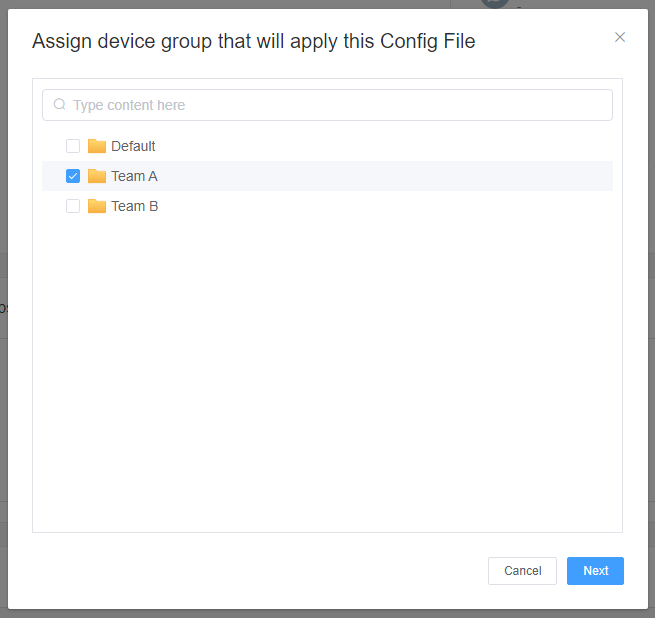
- Then, return to the Policy Management section, select the policy you just created or edited, find the [Apply Config File to the following devices/groups] and click [+Add]. Choose the devices or groups you want to apply the policy to and confirm.

Effectively managing system update is crucial for maintaining optimal organizational performance and security. With AirDroid Business, you can easily set up a System Update Policy that fits your organization's needs and schedule.
Still need help? Submit a request >>
Related Articles
- How to implement App Blocklist/ App Allowlist on AirDroid Business?
- How can I control camera access using Camera and Lockscreen Camera Settings in AirDroid Business?
- How can I set up password rules with Android Password Policy in AirDroid Business?
- How do I manage Microphone Permissions in AirDroid Business?
- How can I ensure data security with Mandatory Storage Encryption in AirDroid Business?
You May Also Like
- How to use App Allowlist for Kiosk Mode in AirDroid Business?
- How to Set up Kiosk Website Allowlist on AirDroid Business?
- How to set up Kiosk Browser Settings on AirDroid Business?
- How do I Customize the Kiosk Brand within AirDroid Business?
- How to Modify My Brand and Layout in Kiosk Mode of AirDroid Business?

