How to Make Good Use of Knox Mobile Enrollment (Auto-Enroll)
When Samsung devices meet enterprise needs, a centralized device management platform - Samsung Knox comes to the public. Since its first release in 2013, the solution has been 10 years today and still constantly updating functions for security and administration. Enrollment is one of the aspects that continuously improve.
Most recently, Samsung Knox updates Knox Mobile Enrollment Direct in July. The new capabilities include Knox Enrollment Service agent self-update in a closed network; Expert mode for device configuration profiles; and captive portal mode in device deployment profiles.
Knox enrollment service is a big part of Samsung device management that maximizes efficiency for organizations. Here, we will walk through it and provide everything you need to know.
- Part 1 : What is Knox Enrollment Service?
- Part 2 : How Much Does Knox Mobile Enrollment/Knox Enrollment Service Cost?
- Part 3 : Features of Knox Mobile Enrollment
- Part 4 : How to Use Knox Enrollment Service? (Full Guide)
- Part 5 : What is Knox Deployment App and Knox Mobile Enrollment Direct
- Part 6 : Knox Mobile Enrollment vs Android Enterprise Zero-Touch Enrollment
- Part 7 : FAQs
What is Knox Enrollment Service?
To explain the phrase, we need to understand how Samsung Knox works first. The using process can be summarized as enroll > configure > apply > monitor > update.
As you can see, the Knox platform is essentially based on the terminal-to-terminal connection, that draws support from the IoT technology. And, enrollment is the most essential step to build up the connection. That is to say, by enrolling devices, your Samsung phones or others can be bonded to the Samsung Knox platform so as to work on subsequent management tasks.
Therefore, when talking about Knox enrollment service, it refers to the initial step of deploying devices to Samsung Knox. Precisely, Knox enrollment service is the process and feature of binding Samsung devices to the Knox platform, and giving it certain access for management and monitoring during it.
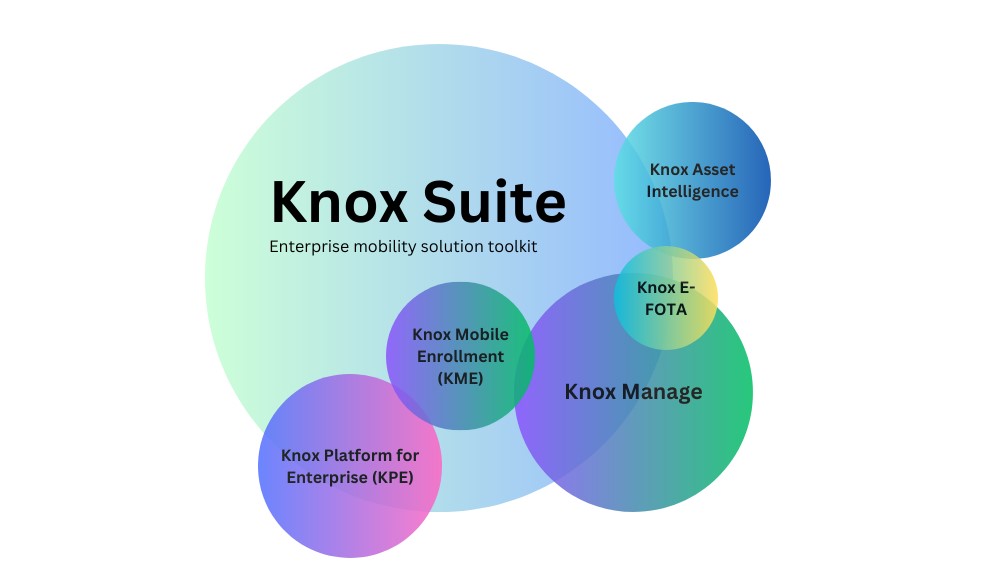
The enrollment service involves another term - Samsung Knox Mobile Enrollment. Actually, the two are the same thing. It's just that Knox Mobile Enrollment (KME) is the official product name and a package of Knox Suite. It is best used for enrolling corporate-owned Samsung devices with automation.
You may be interested:
Knox Suite is a toolkit that contains multiple features for enterprise mobility management. Those features have separate product names (you can just view them as navigation bars) and require Samsung Knox Admin Portal (the centralized cloud-based console) to use their functionality.
- Knox Platform for Enterprise - It means those built-in security and management features embedded in specific Samsung device models. Activating KEP on the device requires a license provided by resellers.
- Knox Mobile Enrollment - The tool to enroll or delete devices seamlessly. It can also be used for large-scale device bulk deployment but with several prerequisites.
- Knox Manage - The device management tool with various capabilities for monitoring, managing, configuring, and updating devices. It needs to be used together with Knox Manage MDM Client (an app to install on devices being managed.)
- Knox E-FOTA - A tool that is related to OS versions, such as forced updates and scheduled updates. You will need to add devices to Knox E-FOTA and install the Knox E-FOTA client app on the enrolled devices.
- Knox Asset Intelligence - A tool for network, apps, and device status tracking which is helpful to analyze data.
How Much Does Knox Mobile Enrollment/Knox Enrollment Service Cost?
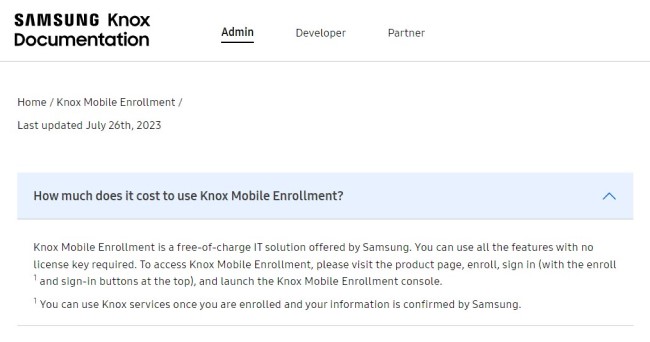
Free. You don't have to pay to use the Samsung enrollment services. Moreover, no license is required.
As you can see some other Knox Suite tools, like Knox Manage and Knox Platform for Enterprise, will require a license, which you need to purchase so to get the right of use for the service. But Knox Mobile Enrollment is allowed to use all features without a license.
Source: docs.samsungknox.com
Features of Knox Mobile Enrollment
With Knox Mobile Enrollment, organizations are able to complete the setup process of adding and configuring employees' devices. Although enrollment is the primary capability, other features are placed in the enrollment service. See what you can do with it.
Features Overview
- Devices
- Profiles
- Resellers
- Device users
- Administrators & Roles
- Activity log
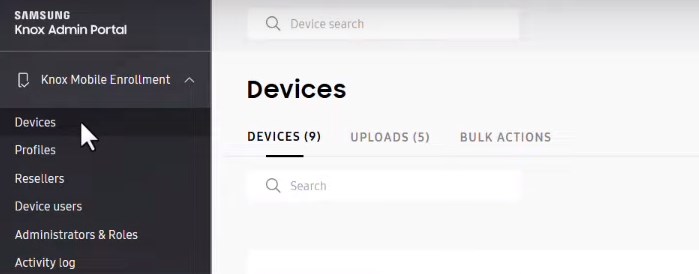
There are six main features in Knox mobile enrollment portal. Let's talk about it one by one.
1) Devices
'Devices' is at the top of the navigation bar. This is the place where you can check all enrolled devices' info and status. It contains:
- DEVICES: include IMEI/MEID, serial num, model, user ID, tag, submit date, profile info, and status.
- UPLOADS: devices enrolled to KEM by your reseller by default; include reseller name, upload date, device num, status and details.
- BULK ACTIONS: use to upload a CSV file for automated enrollment.
2) Profiles
Profiles, or MDM profiles, is the place to create and manage your MDM/EMM providers, for example, Samsung Manage and other third-party device management tools. Besides, it helps completing specific device settings, configurations, and policies that will use on the device. When a profile is assigned to the device, configurations will be applied automatically during the enrollment process.
In this panel, you can check these things: name, profile type, EMM URI, enroll status, assign status, and failure.
3) Resellers
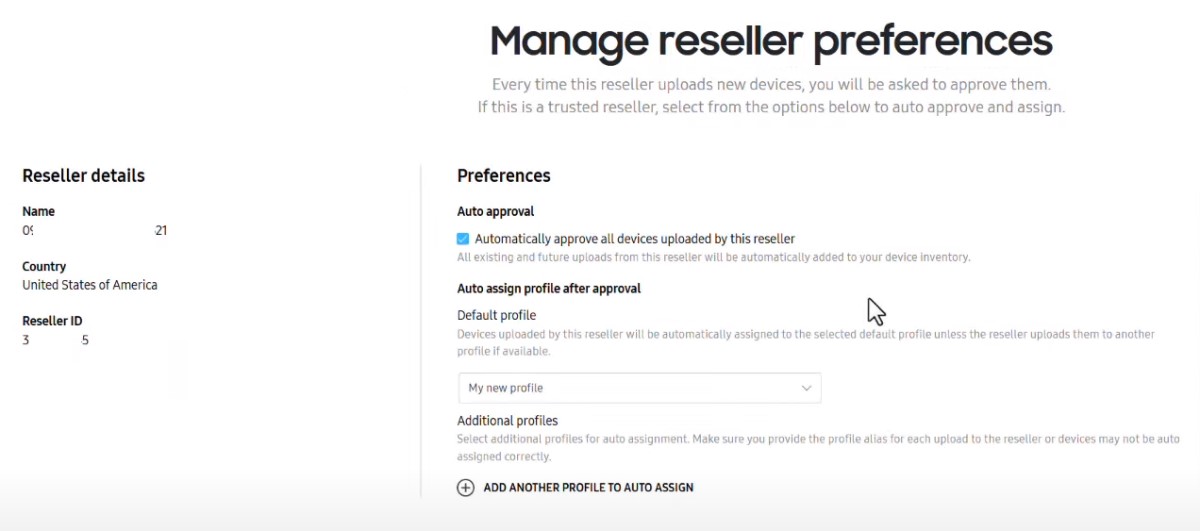
You can register the resellers that you purchase Samsung devices from by entering their IDs. More, managing preferences is available, such as auto approval of all devices uploaded by this reseller, and auto assign profile.
4) Device users
This feature is to set up credentials that are used by device end users, i.e. employees. Only end users who have credentials can enter and access the enrolled devices. In this way, the IT admin can add an extra security layer to protect both corporate devices and data.
In 'Device user', you can add, edit, remove an user ID and update the related password.
5) Administrators & Roles
If you want to invite team members to access the Knox mobile enrollment portal, here is the place. As a Super Admin, you can create roles and assign permissions. And the roles can be Custom and Role-based access control (RBAC).
6) Activity log
This is a monitoring feature for tracking log events generated by devices, MDM/EMM, resellers, device users, and admins. And detectable activities are as follows: Uploaded, Approved, Deleted, Configured, Added, Modified, Registered, Imported, Logged in, Added via NFC, and Added via Bluetooth.
How to Use Knox Enrollment Service? (Full Guide)
Knox Enrollment Service is available to enroll Samsung smartphones, phablets, tablets, rugged devices, and wearable devices. Before getting started, make sure that your target devices meet these requirements:
a. Samsung Galaxy devices only
b. Running Knox 3.0 or higher
c. Running Android 8 or higher
d. More than 50% of battery or charging
To purchase eligible devices, enterprises can directly buy from resellers who partner with Knox Deployment Program (KDP). What's more, they will help upload your devices to Knox so you can batch enroll them seamlessly. As you finish the purchase, begin with the following steps.
Step 1 : Sign up for Knox Mobile Enrollment and access the admin console.
If you're completely new to Samsung Knox, you should get a Samsung account first. You can get one via this link.
Then, use your account to log into the Samsung Knox Admin Portal so that to further access Knox Mobile Enrollment. Here is the official entrance: Knox Admin Portal.
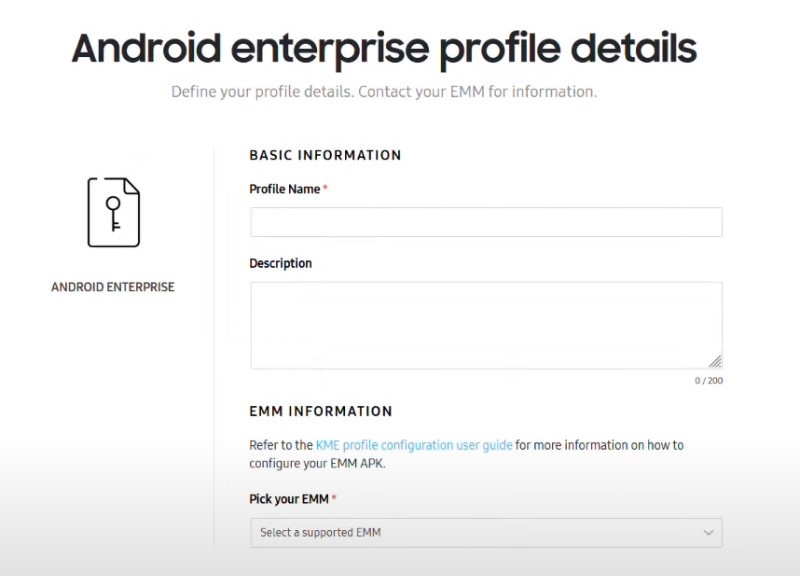
Step 2 : Create a profile with MDM/EMM details to configure out-of-box device settings.
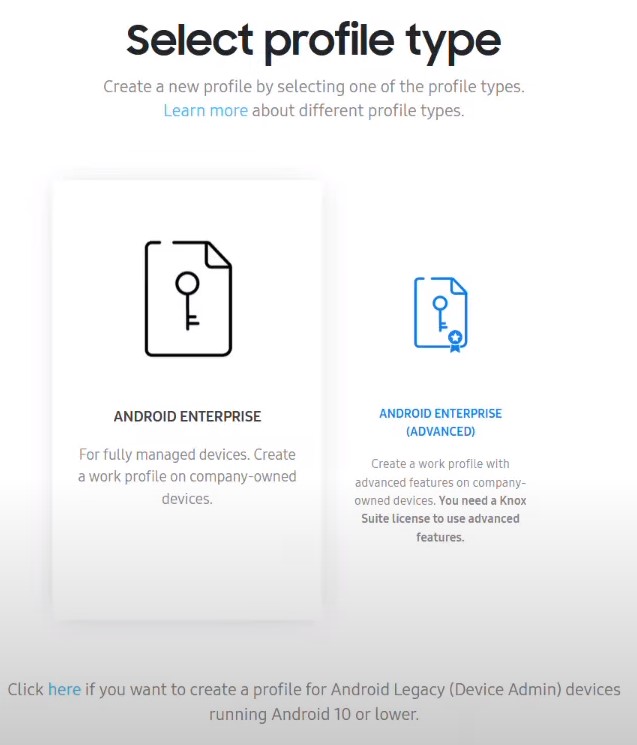
On the left navigation bar, you can see Knox Mobile Enrollment. Drop it down and click 'Profiles' > 'CREATE PROFILE'.

You need to select profile types between 'ANDROID ENTERPRISE' and 'ANDROID ENTERPRISE (ADVANCED)'.
Both are methods to obtain enrollment and management permissions for devices but with differences in features. The advanced type has more controls for locking, such as auto-lock, remote lock, or unlock.
Next, complete the profile details after selecting a type. You need to fill in three EMM information:
- Pick your EMM: choose a software name in the droplist.
- EMM Agent APK: add an APK which is the supporting component of EMM and install it on enrolled devices automatically.
- EMM Server URI: it's used to download specific device configurations that bring by your picked EMM.
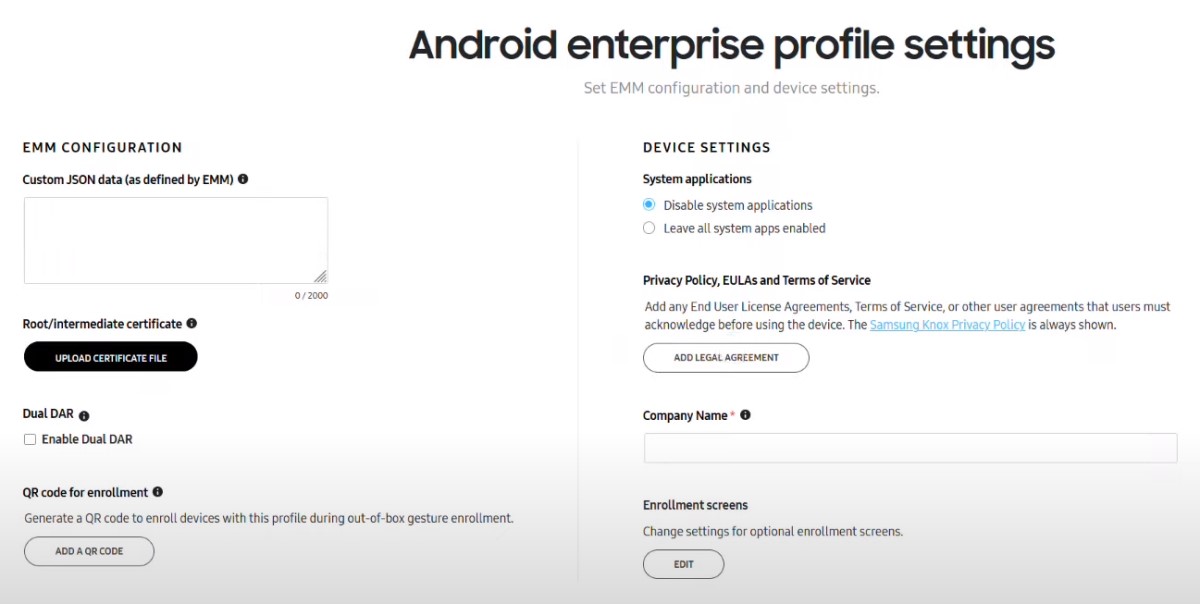
Now you will come to the Android Enterprise profile settings page.
There are two boards - EMM CONFIGURATION and DEVICE SETTINGS. For the former, contact your EMM solution to get the JSON data and certificates. As for 'QR code for enrollment', please note that it's only for Android 10+ devices. The latter, in device settings, you can choose to disable or enable system apps. The 'Android Legacy admin profile' is not a necessary option, just add it if needed.
Step 3 : Add a reseller so that to upload your purchased devices info automatically.
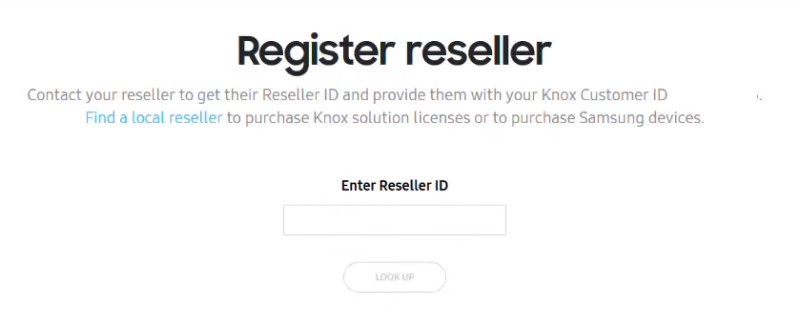
Go to the 'Resellers' menu and click 'REGISTER RESELLER.'

In the screen, a Reseller ID is needed. Contact your reseller to get it. Also, you should provide your customer ID to him.
The reseller ID is 10 digits in length typically. After entering, continue setting up Manage reseller preferences based on your needs, such as auto approve all devices uploaded by this reseller, and auto assign profile to devices uploaded by this reseller.
Step 4 : Add a device user in order to create credential for your employee.
In 'Device Users', click 'ADD DEVICE USERS' to set up User ID and the corresponding password. You can also add in bulk by importing a CSV file.
This info will be used for device configuration in the next step.

Source: docs.samsungknox.com
Step 5 : Configure devices individually or in bulk.
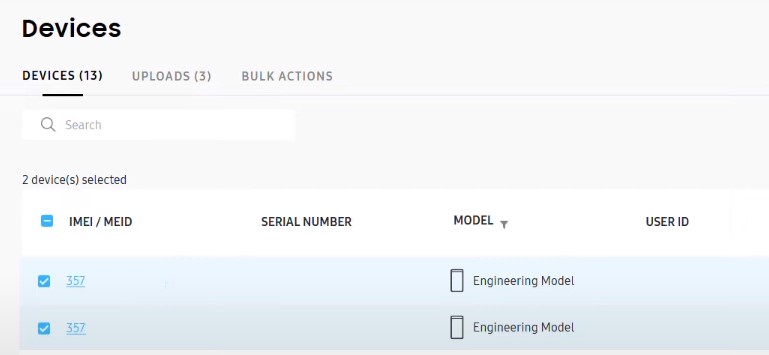
Go to 'Devices' to view device lists.
Please follow these steps if you have not set up automatic operations in the processes mentioned above:
- 1) Tick the checkbox in front of the IMEI/MEID number. You're able to operate multiple devices at once by ticking selected devices.
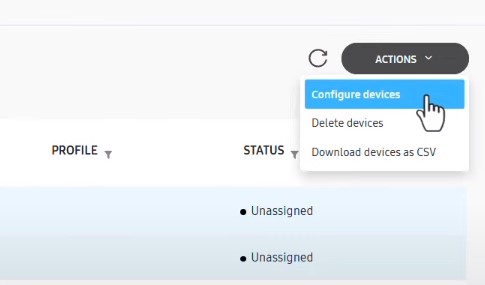
- 2) Click the 'ACTION' button and select 'Configure devices'.
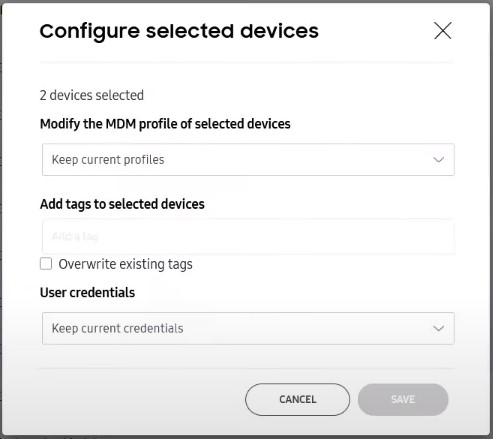
- 3) In the popup window, choose a profile that you want to apply on the devices as well as User credentials.
- 4) Click 'SAVE' when all are configured.
Tips to configure mass devices:
- 1) Go to 'BULK ACTIONS' and click 'ASSIGN USER CREDENTIALS AND PROFILE.'
- 2) Then on the Bulk Configure page, upload the CSV file with device IDs, user IDs, and passwords. Next, click 'SUBMIT.'
Step 6 : Power on the device to complete device enrollment.
After the Samsung device has been shipped to your employee, there is still one final step left. And this will be completed by your employee, the end user of the out-of-box device.
The IT admin can guide the employee to finish Knox Mobile Enrollment:
- 1) Turn on the device and connect to WiFi.
- 2) Tap 'Continue' on screen, and then 'Next' for agreement.
- 3) Enter the assigned User ID and Password, and tap 'Confirm.'
You may be curious about how the device will work then. The device will automatically enroll to the MDM/EMM platform and run the configured profile, for example, auto-install apps and set up system settings.

What are Knox Deployment App and Knox Mobile Enrollment Direct?
Knox Deployment App and KME Direct can sometimes be confusing when it comes to Knox enrollment service. This part will help you out with queries.
Knox Deployment App:
It's a mobile app to enroll non-eligible-for-KME Samsung phones and tablets in Knox Manage or Knox Configure. It has three enrollment methods - NFC deployment, Bluetooth deployment, and Wi-Fi Direct deployment. To use the app, you need to have it installed on an IT admin's device and use a Samsung Knox Admin Portal account.
Knox Mobile Enrollment Direct:
It's an on-premise software to install on a laptop or PC running Windows 10. KME and KME Direct are the same in function. It's just that KME Direct requires more steps on the setup.

Knox Mobile Enrollment vs Android Enterprise Zero-Touch Enrollment
Android Enterprise Zero-touch enrollment (ZTE) is another enrollment service similar to KME. Both are methods for batch device enrollment, however, they have differences.
Knox Mobile Enrollment | Android Enterprise Zero-Touch Enrollment | |
|---|---|---|
| Device Attribution | Corporate-owned & employee-owned devices | Corporate-owned, fully managed devices |
| Supported Device | Samsung Galaxy devices running Android 8.0+, Knox 3.0+ | Android Enterprise devices that enable Zero-ouch and running Android 9.0+ Pixel phone running Android Nougat 7.0 |
| Resellers | Knox Deployment Program partner | Android Enterprise Recommended Program partner |
| Admin Portal | Samsung Knox Admin Portal | Android Zero-touch Enrollment portal |
| Requirements | ● Samsung account ● Knox Admin Portal access permission ● Reseller ID ● MDM/EMM provider joined in Android Enterprise Partner Program and KME (currently 19) | ● Gmail Business account ● Zero-touch enrollment portal access permission ● MDM/EMM provider joined in Android Enterprise Partner Program |
As for comparison, Konx Mobile Enrollment is for Samsung's own devices and works with its EMM partner only, which has a narrower usage range. And Android ZTE has more options on device models covering most Android phone manufacturers. As for device management services, you can find 80 service providers to manage your company-owned devices.
Question comes.
What if an organization wants to batch enroll devices from different brands, not just Samsung? Does Android ZTE support Samsung devices?
Yes. Android Zero-touch Enrollment is available for Samsung devices. It's just you cannot enroll Samsung devices both in KMT and ZTE simultaneously. Otherwise, the configuration will be affected.
AirDroid Business - MDM Supports Zero-Touch Enrollment
AirDroid Business is an Android device management solution that can be used to enroll, manage, and monitor large fleet devices. With the centralized platform, organizations are able to deploy smartphones, tablets, rugged devices and others easily. It's available for Cloud Deployment & On-Premises Deployment.
Key features include: remote access & control, Google Play apps & enterprise's apps management, policy, single & multi-apps kiosk mode, alerts & automated workflows, geofencing & location tracking, file transfer, notification, user management, reports, etc.



Leave a Reply.