What is Zero Touch Enrollment & Setup Guide
Enterprises that provide COBO devices to their employees can meet the following issues:
- How to handle a large fleet of devices?
- Is there a tool to bring automated processes to device configuration?
- Can we skip training employees on setting devices?
Android Enterprise provides Zero Touch Enrollment (ZTE) for organizations with batch device management demand to streamline enrollment and provisioning process.
The content here will take you into Android Enterprise Zero-touch with detailed explanations, how-to guides, and issues you may meet. Now, let's explore.
- Part 1 : What Is Zero Touch Enrollment (ZTE)?
- Part 2 : Essential Requirements for Android Zero-Touch Enrollment
- Part 3 : How Android Zero Touch Works?
- Part 4 : How to Set Up Zero Touch Enrollment? (Include Bulk Configuration)
- Part 5 : Common Issues of Applying Zero Touch Enrollment
- Part 6 : Alternatives to Android Zero-Touch Enrollment
- Part 7 : FAQ
Part 1: What Is Zero Touch Enrollment (ZTE)?
Zero touch enrollment (ZTE), also called Android zero-touch enrollment (formerly Android for Work zero touch enrollment), is an 'automated device provisioning' feature in Google's Android Enterprise (AE) that allows organizations to streamline the enrollment and deployment processes of their enterprice-owned devices in bulk.
The enrollment is based on the Android zero-touch portal, a web-based platform, in which the IT team can configure settings for eligible devices. The process involves device resellers and EMM/MDM (mobile device management) support making it possible to complete over the air.
What effect can zero touch enrollment achieve? When employees turn on the enrolled devices, they will come all preconfigured and ready to use straight out of the box. For example, logistics companies can use it for tablet deployment and ship them to truck drivers. And drivers do not have to spend time on settings.
Some key benefits of zero touch enrollment include:
- Enroll devices in bulk; no need for IT personnel intervention.
- Automatically sets up devices with predefined policies and apps.
- Compatible with various Android device types and models.
- Consistent configuration reduces human errors.
- Advanced security layers (zero-touch enrollment is only available for authorized device manufacturers, resellers, and EMM/MDM solutions).
How Secure Is Zero Touch Enrollment?
It's a secure enrollment with four layers of protection mechanisms - the Android OS, the device compliance and certifications, the authorized OEMs and resellers, and the certified MDM/EMM solutions.
Both device OEMs, EMMs, MSPs, device resellers, and other service providers have to meet the requirements of Android Enterprise partner programs so that to become an option for enterprise users. And, zero touch enrollment needs additional authorization to work out the process.
What's more, Google gives technical support on device provisioning services for zero touch security:
- Resellers need authorization to apply the corresponding API, such as storing the JSON key file with a private key.
- EMM developers use an OAuth token (an industry-standard protocol) and a Google Account to obtain authorization.
- Data is kept in Google server.
Part 2: Essential Requirements for Android Zero-Touch Enrollment
Android zero-touch requirements contain: supported devices, EMM/MDM solutions partner with Android Enterprise, and a Google account to log in to the portal. Here are some details.
Compatible Devices
- All phones and tablets running Android OS 9.0+
- Sold by authorized device resellers
- Company-owned/fully managed devices
Authorized EMM/MDM Solution
- Partner with Android Enterprise
- Console integrated with zero-touch enrollment
- DPC (device policy controller) available from Google Play
As for the portal account, it should be a business-used Gmail account. The reseller will help with the activation after you purchase devices.
Part 3: How Android Zero Touch Works?
Due to the fact that zero touch enrollment is an integrative mechanism containing hardware and software, most tasks are done by device manufacturers, distributors, and service providers themselves. This section will focus on how enterprises can utilize this mechanism.
- The organization purchases eligible devices from a reseller and provides its customer info.
- The reseller creates the zero touch portal account for the organization and uploads the purchased devices to the account.
- The IT personnel uses the account to log into the portal and set up configurations that apply to devices. During the configuration process, a DPC extras provided by the EMM/MDM solution is required.
- The IT personnel need to set up the DPC extras through the admin console of EMM/MDM.
- As the devices have been configured, they will be shipped to employees.
- After employees power on the device and connect it to the internet, those pre-configured settings will be applied automatically as well as app installation.
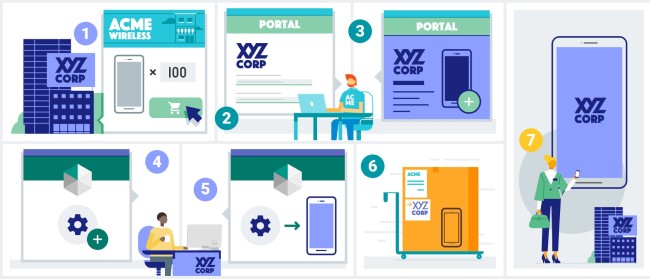
Source: developers.google.com
Part 4: How to Set Up Zero Touch Enrollment? (Include Bulk Configuration)
As mentioned above, an IT admin needs to operate on the zero-touch portal and device management platform. This section will give a full guide. And, configuring devices in bulk is also included.
How to use zero-touch enrollment admin portal?
- Step 1.
- After you purchase the zero-tough registered devices, your reseller will ask for a corporate Google account to associate with the Android zero-touch protal. Please note that you cannot use a personal email address or it will be banned from accessing.
- Next, visit the portal and sign in with your account. A pop-up will show on the page for entering the email address and password. Here is the official website.
- Step 2.
- View the purchased devices in the 'Devices' navigation bar and see if your reseller has uploaded the device info. You can make good use of the searching feature.
- In the dashboard, you can see the 'Configuration' column beside the IMEI or serial number. This is the place to select the configuration file for the device. You need to create one in the 'Configurations' navigation bar. Please continue with step three.
- Step 3.
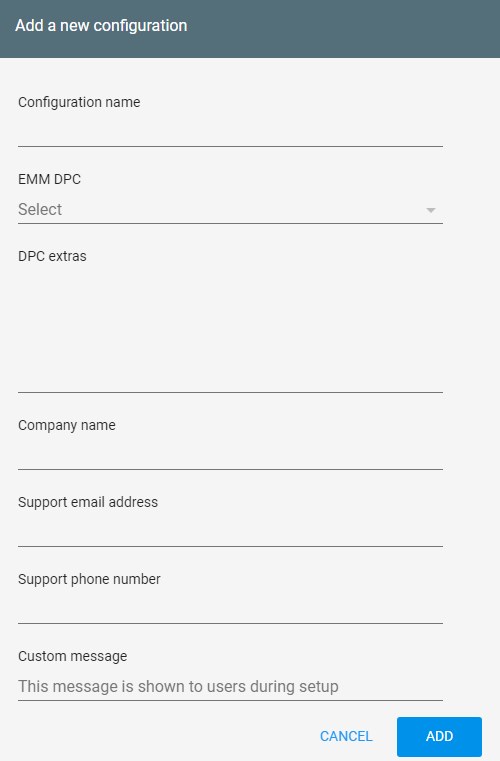
- Click 'Configurations' > '+' to create a new configuration.
Things you need to fill in:
- Configuration name - It's better to name it with policies, device types, employee positions, etc., so you can see the purpose and limitations of the device.
- EMM DPC - Drop down and you can choose Android Device Policy from the list.
- DPC extras - Copy and paste the text here. you need to get it from the EMM/MDM console.
- Company name - This will display during device provisoning and your employee will see it on screen.
- Support email address - Same as above; leave an email address so your employee can contact and get help.
- Support phone number - Leave a phone num so your employee can call.
- Custom message - If you want to provide more details, such as a brief instruction or points for attention, write them in this blank; a character limit is not specified, but to bring a good user experience, you'd better keep it within 1 to 2 sentences, that is, around 75 to 200 characters.
- Click 'ADD' once you finish the configuration profile.
- Step 4.
- Back to 'Devices' and apply the configuration on selected devices.
- Step 5. (Optional)
- Inviting team members to access the zero touch enrollment portal, you can go to 'Users' and add one with a role assigned.
- If you're working with multiple resellers, you can click 'ENROLL' in 'Resellers' to add them.
How to set up policies and apps for devices and deploy in zero-touch enrollment?
Before getting started, please sign up for a mobile device management or enterprise mobility management solution. Then, log in to the admin console and proceed with the zero touch MDM enrollment steps. Here, take AirDroid Business for instance.
- Step 1. Register Gmail account
- Go to 'Devices' > 'Device Enrollment' > 'Zero Touch'.
- Click 'Register/Bind with Gmail', and you will jump to the page of Google Play -Bring Android to Work. Fill in your business info and then it will back to 'Zero Touch.'
- Step 2. Setup Provisioning Templates
- This is the feature to pre-configure policies and apps for your company-owned devices. When settings are done, it will generate the DPC extras in 'Device Enrollment' > 'Zero Touch' which is allowed to copy and paste.
- First, go to 'Devices' > 'Provisioning Templates' > '+ Create template.'
- In the dashboard, three types of settings are provided. 'Device Group' and 'Config File' are either-or options while 'Pre-install apps' is optional. Here are the detailed functions.
- Click 'Save' if you finished. You can remark on this template for easy identification if you've different configuration groups.
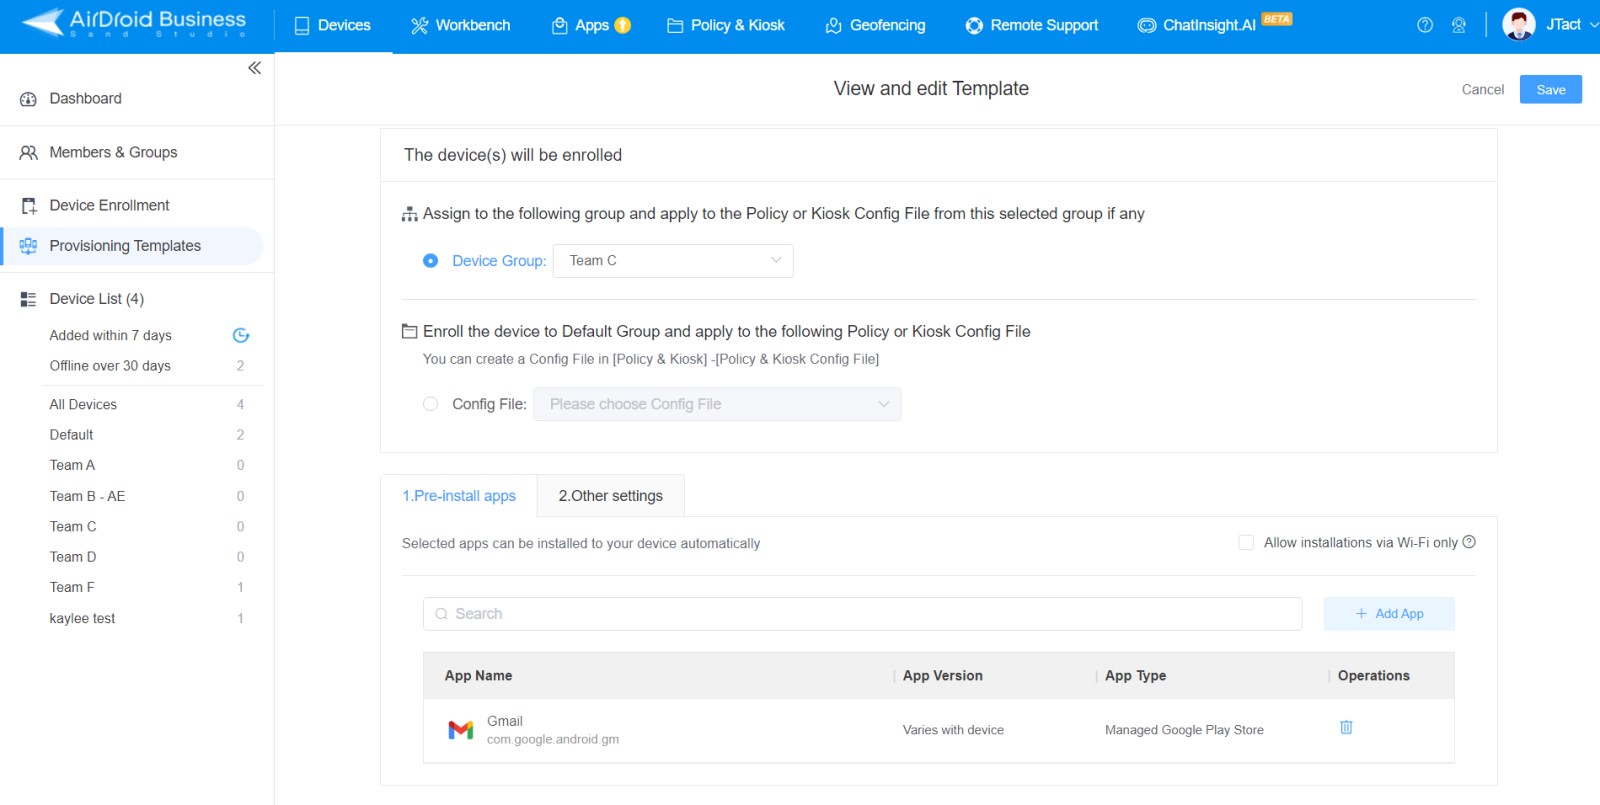
Device Group | Config File | Pre-install apps |
|---|---|---|
| Only for grouping. Zero-touch devices will auto-assign to the preset group. If you do not make any other settings ('Pre-install apps' and 'Other settings'), the device will only install the accessory app of AirDroid Business to be managed and controlled. | Allow to choose pre-configured Policy/Kiosk Mode file. This offers more capabilities like system setting restrictions, password rules, app blocklist & allowlist, block external devices, network and APN settings, etc. Devices that use this setting will auto-apply what you've configured in the Policy/Kiosk Mode file. | Allow to select apps that will auto-install during the zero-touch enrollment process. If you want the installation to happen only in a Wi-Fi environment, you can tick the button in the top right-hand corner. |
- Step 3. Copy configuration text
- Go back to 'Devices' > 'Device Enrollment' > 'Zero Touch'.
- In the right hand, you can see a blank to choose provisoning template and a button of 'Copy.' Select the template you've just completed and click the button.
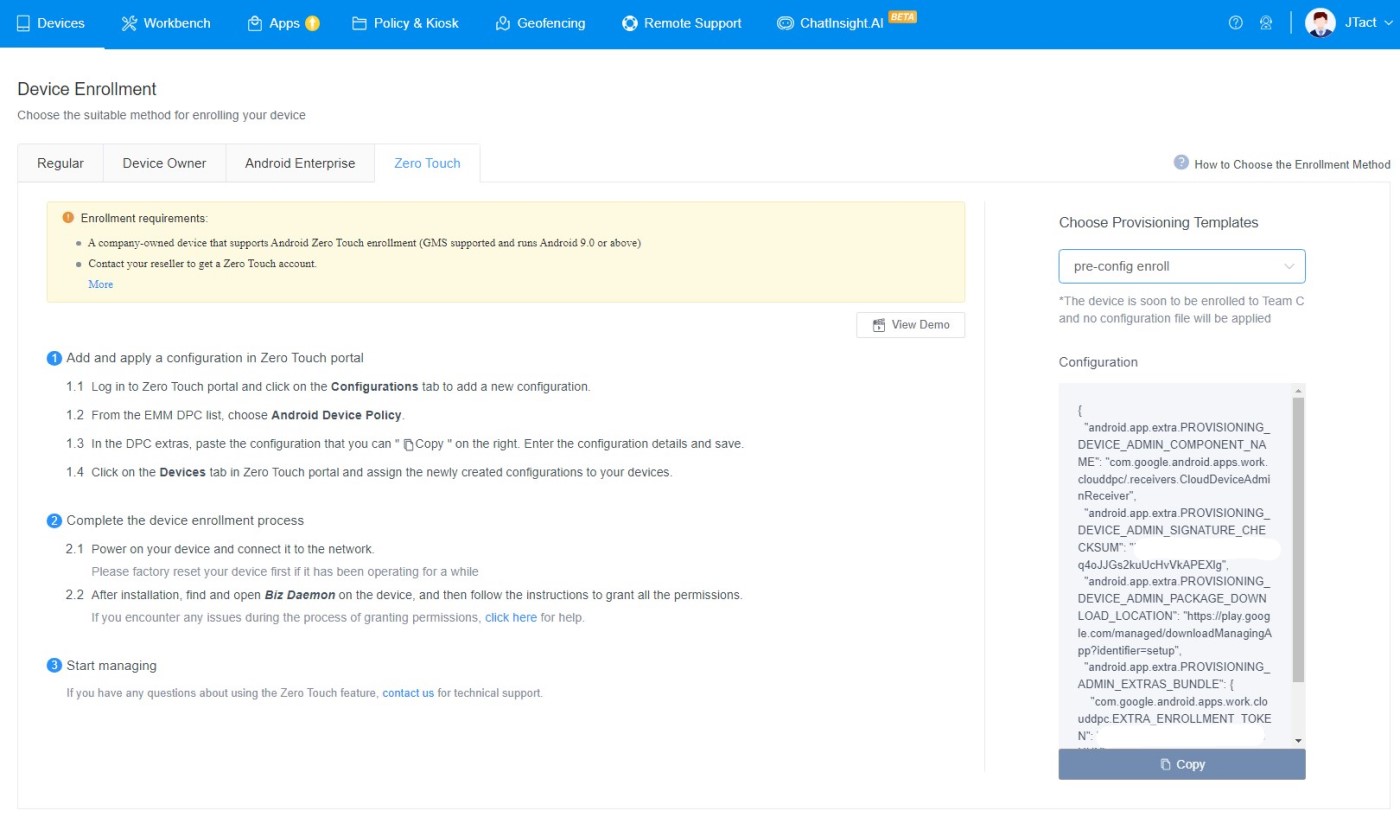
- Step 4. Paste configuration text to zero touch enrollment portal
- Go to 'Configurations' and click the profile. Paste the configuration text in 'DPC extras.'
- Now you can apply the settings to enrolled devices.
How to apply zero-touch configuration in bulk to devices?
To apply the configuration to multiple devices at once, you need a CSV file. Follow the steps and check the example given below.
- Step 1: Go to 'Devices' > 'Upload batch configurations' in the zero-touch portal.
- Step 2: Download an example CSV on the pop-up window.
- Step 3: Complete the necessary info according to the file.
- Step 4: Upload the file by clicking 'UPLOAD' in 'Upload batch configurations.'
The CSV file format is as follows.
| Device Type | Snippet |
| SIM-based | modemtype; modemid; manufacturer; profiletype; profileid |
| Wi-Fi Only | serial; model; manufacturer; profiletype; profileid |
Field Parameter | Example | Description |
|---|---|---|
| modemtype | IMEI | This serves as the identifier, always set as IMEI in uppercase. |
| modemid | 120220053723130 | This value is always set as IMEI number of device. |
| manufacturer | Samsung | This is the device manufacturer's name, also referred to as Original Equipment Manufacturer (OEM). |
| serial | ABcd0123456 | Case-sensitive serial number of the device. Used with model for Wi-Fi-only device matching. |
| model | Galaxy S23+ | The model's name of the device. Used with serial for Wi-Fi-only device matching. |
| profiletype | ZERO_TOUCH | Specifies the purpose of assigning the profile, is always set as ZERO_TOUCH in uppercase. |
| profileid | 200858400 | The numeric ID of the configuration file you want to apply. To get this ID, refer to the 'Configurations' bar on the zero-touch portal's first column. |
Part 5: Common Issues of Applying Zero Touch Enrollment
Configuration Doesn't Apply
This problem usually occurs when you fill in the DPC Extras field incorrectly. To overcome this, refer to your EMM/MDM's official documentation or contact your service provider to properly guide you on how to acquire the correct configuration code to put as DPC Extras in the ZTE portal.
Zero-touch Enrollment Isn't Available
Sometimes zero-touch outage might occur while provisioning your Android devices, in that case, make sure your internet connection is working properly and then try again. If nothing happens, leave a query directly in the 'Send feedback' of the portal.
Another reason behind the problem could be that your device is not zero-touch compatible, in that case, ask your reseller to get registered on Android Enterprise Partner Portal first and then enable devices for Android zero-touch enrollment.
Part 6: Alternatives to Android Zero-Touch Enrollment
If you attach importance to compatibility, such as in both the device and the management platform for devices, some other programs offer zero-touch enrollment similar to Android zero-touch. Just make sure that the devices are in the same brand and OS.
Alternatives include:
1ChromeOS Zero-Touch Enrollment
Google MDM, or more well-known, Google Workspace, is an enterprise-level solution to manage employees' devices and Gmail accounts. It's available for batch enrolling ChromeOS devices, such as Chromebook.
The enrollment will be done via the Google Workspace Admin console completely.
2Samsung Knox Mobile Enrollment
Samsung Knox Mobile Enrollment (KME) is an enrollment solution designed only for Samsung devices. You can use it together with Knox Suite (the tailored Enterprise Mobility Solution for Samsung devices) including Knox Manage and Knox Configure.
Knox Mobile Enrollment is free to use. You will need a Samsung account to access the KME portal so that to configure device settings.




Leave a Reply.